Introduction to Plastic SCM
Chapter 1:The world according to Plastic SCM
By definition, all software configuration management (SCM) systems manage your source code, but each system has its own way of organizing the development environment, along with its own terminology. This chapter introduces Plastic SCM’s architectural concepts and describes the data structures it manages.
There won’t be any surprises – our terminology is quite consistent with that of most other SCM systems. To prove it, here’s a one-paragraph view from 10,000 feet of the Plastic SCM landscape:
Each installation of Plastic SCM on a computer can provide both server and client software. The Plastic SCM server manages any number of repositories, each of which stores the entire history of a particular directory tree. Each item in the tree can have any number of revisions. To support parallel development, revisions can be organized into named branches. Working in a Plastic SCM workspace, a user often makes changes to several files at the same time, and enters a single checkin command to create new revisions of them all. Plastic SCM records this group of revisions as a changeset. Periodically, you mark the current state of development (designated a "baseline" or "release") by attaching a label to the current revision of every item.
If that all seems familiar, great! Plastic SCM is designed to be straightforward, fast, and extremely good-looking – everything you want in ... an SCM system!
The following sections in this chapter provide a bit more detail on the data structures mentioned above, along with a few others we didn’t squeeze into that paragraph. The remaining chapters of the manual go even deeper, so that you’ll come out with a thorough understanding (and appreciation, we hope!) of Plastic SCM.
Plastic SCM Installations
When you run a Plastic SCM installer on your computer (Windows, Linux, or MacOS), you can have it install both client and server software. "Bor-ing", you think. "Yet another client-server system". But wait – you don't have to use Plastic SCM in a stodgy, old '90s manner (and that's ancient, right?!). Here are some modern day usage patterns:
- Hermit developer – You're a one-stop shop with a need for revision control, because you tend to code too fast. So you run the Plastic SCM server on your computer, managing one or more repositories that are also located on your computer.
- Member of the community – You're part of an open-source team. You work alone, but periodically exchange code with other team members, who are also running Plastic SCM. You work like a hermit developer, but also "push” and "pull" changes from other installations. (Think Git/Mercurial.)
- Cog in the machine – You're part of a development team, so you use the client software only, accessing Plastic SCM installations in the same building, across the country, and/or around the world.
- Cog in the multiple-site machine – Your company has development groups distributed around the world. Each one uses a local Plastic SCM server. The various servers periodically exchange data with each other.
- On-site firefighter – You're traveling to your company's biggest customer in order to develop an emergency fix. As you're packing your bags, you replicate (pull) the code you need from your company's Plastic SCM installation to the installation on your computer. (You don't need to clone entire repositories.) Then you reconfigure the Plastic SCM client software to use your computer's standalone, unplugged installation. Upon your return to data connection, you replicate (push) your changes back to the company server.
These are examples of an essential aspect of the Plastic SCM system – its flexibility. That's what "plastic" means, after all! We'll be pointing out the product's flexibility repeatedly in this manual. Hope you don't get tired of hearing about it!
Users and Security
Plastic SCM has robust security features, all built around the concept that you must be authenticated under a particular username to access the system. Plastic SCM can maintain its own username/password database. Alternatively, you can configure it to use a network-based authentication system, such as NIS+, LDAP, or Active Directory.
You can fine-tune the Plastic SCM security system, which consists of access control lists (ACLs) for just about all the entities managed by the system. The system is hierarchical, so it’s easy to grant or deny access to large amounts of data (such as the entire installation) or small amounts (such as an individual file, or even an individual revision of a file). Here are just a few of the operations that the ACL system can grant or deny to particular usernames:
- reading the contents of a file
- reading the contents of any file in a particular repository
- creating a new revision of a file
- attaching labels to any revisions of a file
- creating a new branch
- seeing the contents of a branch
Repositories
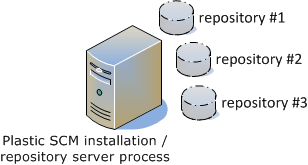
Each Plastic SCM installation can handle any number of repositories, of any size, limited only by the available disk space. Each repository stores a complete directory tree – one particular directory along with all the files and subdirectories it contains. The repository also stores the entire development history of the directory tree. This includes all the old revisions (back to 10,000 BC!) along with a mass of metadata, such as revision numbers, branch structures, labels that define baselines, and a whole lot more.
Should repositories be big or small? It's your choice – Plastic SCM is flexible! (There we go again!) An important point is that there's no need to maintain a single, giant repository just because your software build process needs to access all files as a single directory hierarchy. You can, in effect, assemble any number of repositories together into the desired tree structure by means of Xlinks.
No matter how many repositories there are on an installation, a single Plastic SCM repository server process handles them all.
Workspaces
Users don't access repositories directly, only the Plastic SCM server process does. That makes sense because a repository contains all the revisions of a particular file, but at any given moment, you want to work with just one revision (often, the most recently created one). Like many SCM systems, Plastic SCM handles this situation by maintaining one or more workspaces for each user. A workspace is just a directory tree on your computer, with a two-way data path to a repository.
Whenever you execute an Update command, Plastic SCM makes sure that one revision of each source-controlled file from the repository is loaded into the workspace. This operation works very much like Subversion's checkout command. When you've edited one or more files and want to preserve your changes as official revisions, you execute a Checkin command, like a Subversion commit.
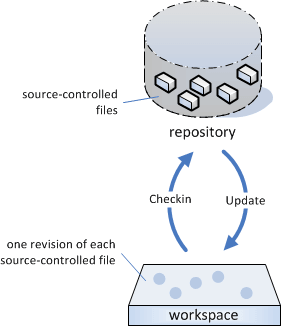
As you might suspect, the above description is an oversimplification. For example, when we said, "One revision of each source-controlled file", you might have thought, "Which revision?". You can specify your own answer to that question because workspaces are configurable. Here are some examples of simple workspace configurations:
- the most recent revisions in development of the next product release
- the revisions that are labeled RLS_1.2 (the ones that were used to build Release 1.2 of the product)
Another oversimplification: We implied that a workspace is married to a single repository, but in fact, you can switch a workspace back and forth among any number of repositories. Many developers find this practice causes brain cramps – and also a lot of unnecessary data transfers during Updates.
For ease-of-use, each workspace has a simple name, such as mary_asterproj, as well as a location in the file system, such as E:\user_workspaces\mary\current\asterproj. For flexibility and ease-of-maintenance, you can change a workspace's simple name or its file system location.
Items
A directory is sort of like a home for files, and like many homes (or at least like mine!) directories can get a bit messy. If you look inside a typical development directory, you'll find source files, of course, but you'll probably find lots of other stuff, too. Some of the files and subdirectories might be necessary (such as artifacts created by IDEs and other development tools) while other files would just be junk (editor backup files and temporary files, excerpts from email messages, to-do lists, etc.).
Recognizing this reality, Plastic SCM distinguishes between two kinds of file system objects in a workspace:
-
Items – Files, directories, and symbolic links that are under source control – that is, whose changes are to be monitored by Plastic SCM – and whose revisions are to be preserved in a repository. If you want Plastic SCM to track an object, you must say so, using the Add-to-source-control command.
-
Private objects – Files, directories, and symbolic links that are not under source control. These objects are allowed to peacefully coexist with the workspace's source-controlled items. Plastic SCM can locate and report on these objects, but they never get copied to the repository. This category also includes various other kinds of objects that might find their way into a workspace: hard links, device files, named pipes, and so on.
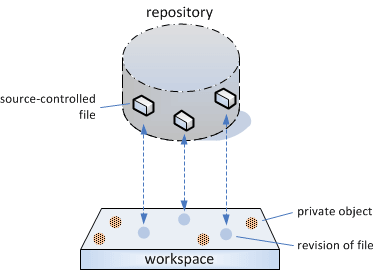
Plastic SCM offers flexibility in this area, too. You can specify filename patterns (such as *.bak) for the Add-to-source-control command to ignore, so that you don't mistakenly load a whole bunch of junk from a new workspace into the repository. If you do, though, it's easy to remove it.
You might have some very large, rarely modified files under source control (third-party libraries come to mind) or maybe there are files that are not required for the work you're currently doing (say, giant bitmaps). You can cloak such items, reducing administrative overhead and saving download time. For example, the Update command won't waste time copying cloaked files from the repository to your workspace; it won't even waste time determining whether such a copy is needed.
The ignore and cloak features are implemented through the configuration files ignore.conf and cloaked.conf, which can be located either centrally or in particular workspaces.
Changesets
As you work on source files in your workspace, using a text editor or an IDE, you probably execute the save command many times a day. It wouldn’t make sense for Plastic SCM to create a new revision in the repository each time you save – the repository would be littered with intermediate revisions that no one really cared about. Instead, a new revision of an item is recorded only when you specify the item in Plastic SCM's Checkin command.
If you've been using source control systems for a while, you might be thinking, "Aha, the command is called Checkin, so Plastic SCM must use the checkout-modify-checkin paradigm, not the simpler modify-commit paradigm". Or something like that. But having read this far, you shouldn't be surprised with our comeback: You can work using either of those revision-creation paradigms, because Plastic SCM is flexible! There is a Checkout command, which tells the server that you intend to create a new revision of an item (or a group of items) at some point in the future. After you've made changes to the item(s), you follow through on your intention by executing one or more Checkin commands.
But you don't have to work this way. Instead, you can use the CVS/Subversion/Git/Mercurial method: Just make changes to the items in your workspace, and use Checkin to send the changes to the repository. The only new thing to teach your fingers is clicking (or typing) "checkin" instead of "commit"!
Each time you check in a set of new revisions, whether it's a single file or an entire source tree, Plastic SCM records the entire set of revisions as a changeset. (Git and Mercurial call them "commits".) Changesets are automatically assigned integer changeset numbers, starting with zero.
This is certainly a convenience – it's a lot easier to remember a number like 5613, instead of a timestamp like Nov 11 2010 4:36 PM EST, when you're trying to retrace your recent (mis)steps – but changesets are much more than a nice history-tracking mechanism. They are first-class citizens in the world of Plastic SCM, enabling such sophisticated operations as:
- undoing the changes in a changeset (subtractive merge)
- merging (or cherry picking) the changes from each revision in a changeset
- basing a new branch on a changeset (because you forgot to label the source base last week)
Another remarkable property of changesets is that even if they only contain the items that were modified, they also contain references on how the complete source code tree was at that point, so any changeset can fully reproduce the structure of the workspace at the time it was created.

Changesets always have a parent changeset (except for the first one, number 0!) and they are the unit of change that Plastic SCM manages. Internally, Plastic SCM uses a directed acyclic graph (DAG) data structure to achieve this. This property will come in handy later when you start using replication.
...Oops, we're getting a little ahead of ourselves here! In the remaining chapters of this manual, we'll explain all those concepts in greater detail.
Branches and Labels
We'll conclude this overview chapter by introducing a few more of the data structures that play important roles in a Plastic SCM development environment.
You see, time might be restricted to a single dimension (as far as we know!) but software development knows no such bounds. Most organizations need to perform several coding tasks on the same source base at the same time, like working on the next release, fixing bugs in the last release, finally getting around to replacing the database engine – the list goes on. This means that a given item must be able to evolve in multiple dimensions at the same time. Like many SCM systems, Plastic SCM supports this "parallel development" or "concurrent development" practice with branches.
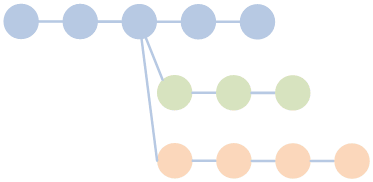
Maybe new development is taking place on the blue branch, bugfixing on the red branch, and database reworking on the green branch. Each branch will have a user-assigned name.
Any branch can have sub-branches, which can have sub-sub-branches, and so on, creating a hierarchy of branches. An item's complete set of revisions that's organized in a branch hierarchy is called its revision tree.
Many SCM systems support branch-based development, but the Plastic SCM implementation is particularly powerful and (of course) flexible. Each branch has a designated starting changeset from which it can load its content. Branches make it easy to configure a workspace to work on a branch – there's no getting caught in what ClearCase users call "config spec hell". With Plastic SCM, it just takes a few clicks in a user-friendly dialog box.
Like branches, labels are a feature of many SCM systems. A label is a user-defined name that can be attached to a changeset. That's nice – names are easier to remember than changeset numbers. Applying a label to a changeset is particularly helpful because you can assign a name (for example, RLS3.5) to the current version of every file within your workspace as of that changeset. (Right after your boss gives final confirmation that the latest build really will go out as WonderWidgets Release 3.5.) After that – next week, next year, whenever – you can use the label RLS3.5 to have Plastic SCM identify or retrieve the exact set of revisions (the tree) that went into the release. You won't have to remember complicated series of changeset numbers to come up with the right versions of each file for that release – just the easy-to-remember label.
How do Plastic SCM labels compare with your average SCM system's labels? Since they are just a mark applied to a given changeset, they are very fast to create, apply, and manage. Plastic SCM doesn't need to apply a mark on every revision of the items in the workspace (it used to be like that in versions prior to 4) so applying labels is really quick. Unlike some systems, Plastic SCM allows you to change a label's name – for example, when the Marketing Department decides that Release 3.5 should really be called Release 4.0.
Zooming in...
This concludes our view from 10,000 feet of the Plastic SCM landscape. In the remainder of this manual, we'll zoom in, giving you a more complete look at all the features we've seen so far. You'll get to see some additional features, too (some of which complained loudly about not making it into this chapter), including:
- comparing revisions and merging revisions from branch to branch
- replicating revisions between multiple Plastic SCM installations
- revision annotation and code reviews
- trigger-based automation of SCM policies and procedures
- integrations with third-party IDEs and other development tools
- Plastic SCM's killer graphical user interface (GUI)
Chapter 2: Basic Development with Plastic SCM
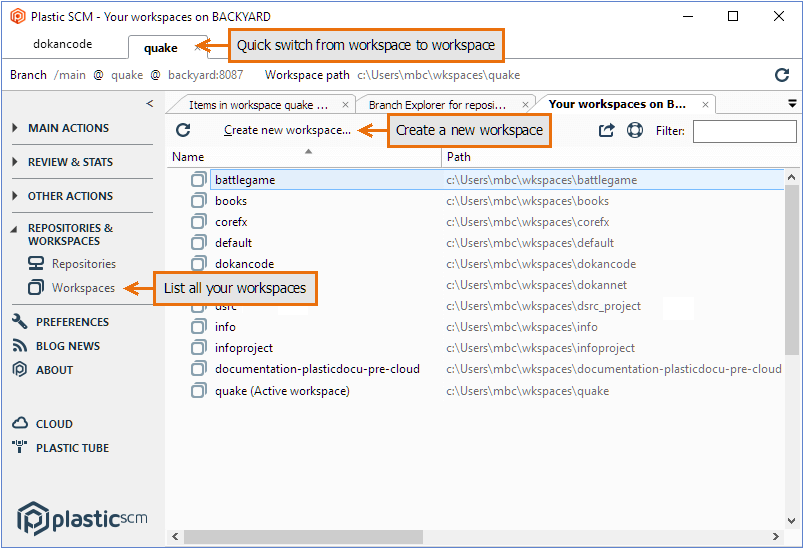
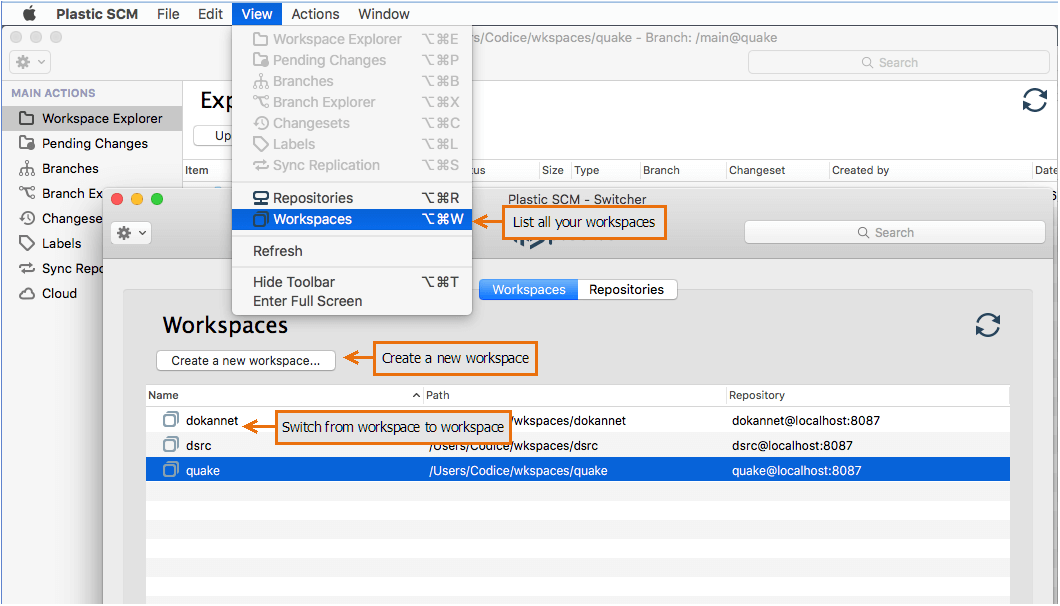
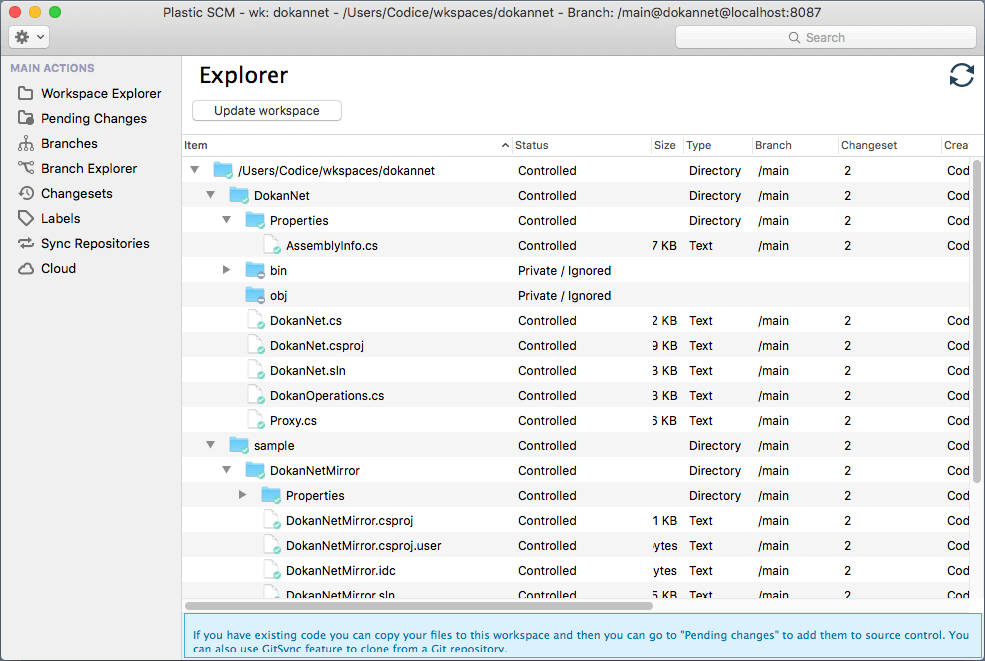
Use the Previous (<) and Next (>) arrows to see the Plastic SCM screenshots for the Windows and Mac OS platforms.
This chapter describes a very simple scenario using Plastic SCM: a small team of developers, working together on the same project. No subprojects, no branching, just everyone working on the same set of source files. The team relies on the SCM system to keep things organized and to prevent code from getting lost or overwritten. If your own development scenario is more complex, don't worry – we'll address your needs in later chapters!
What's more, we're going to start in the middle, with the team's code base already under Plastic SCM source control.
Workspaces
The source code base is safely stored in a Plastic SCM repository, but as a developer, you never access the repository directly. Instead, you create a workspace and use the Update command to load source files into it. The Plastic SCM GUI makes it very easy to keep track of your workspaces, switch back and forth among them, and create new ones.
A workspace is simply a directory – more precisely, a directory tree – on your machine, or maybe on some network server that your machine can access. The only thing that makes a directory special is a hidden subdirectory, named .plastic. On Linux systems, it's hidden from many commands by virtue of that initial dot character in the name. On Windows systems, the directory's "hidden" attribute is set. Plastic SCM uses the files in this subdirectory to establish the workspace's identity (plastic.workspace) and to determine which revisions of source-controlled items should be loaded into the workspace (plastic.selector and plastic.wktree). You never need to access these housekeeping files directly. The plastic hidden directory is only created on the root of your workspace, not on every single directory inside it, in contrast with other SCM systems.
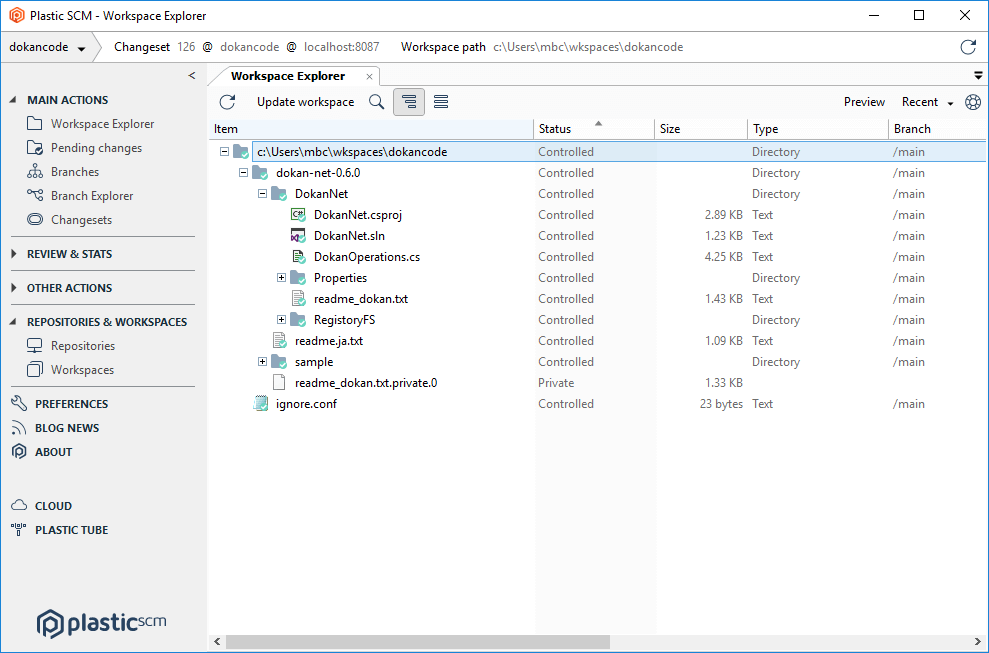
Because a workspace is just a standard directory on your machine, you can use all your regular tools to access it: file managers such as Windows Explorer, IDEs such as Eclipse and Visual Studio, and so on. Plastic SCM has its own Explorer-like tool, called the Workspace Explorer:
The Workspace Explorer (Workspace Explorer) has standard file-manager columns, including an item's name, its size, and its timestamp. It also has SCM-related columns: Status, Type, etc. The Changeset column shows that the workspace contains a particular version of each item.
In the Plastic SCM Windows GUI screenshot above you can see that the workspace contains changeset #80 of directory /conf, a checked-out revision of directory /DokanNet, and changeset #82 of DokanOperation.cs file. In keeping with our simple development scenario, all these revisions are on the /main branch.
Why those particular versions? It's time to discuss the way in which revisions find their way into a workspace.
The repository contains all the revisions of all the source-controlled items. Each workspace contains a configuration of revisions – just one revision (at most) of each item. Here's a conceptual picture for our example scenario:
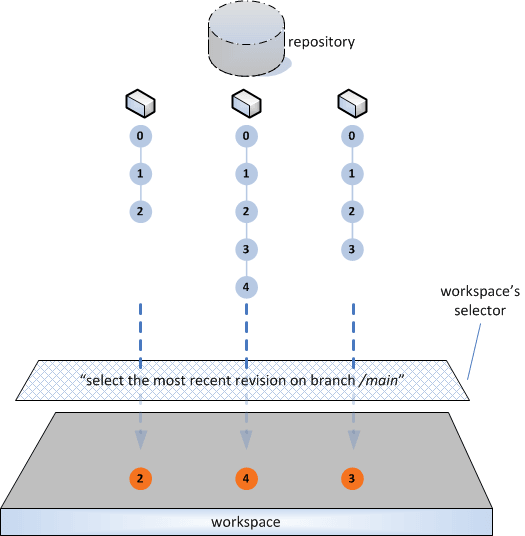
In normal conditions, a workspace loads the content of a given branch, meaning that it will load the latest changesets on that branch. You can see what branch is being loaded in your workspace at all times by looking at the top left of the GUI tool:
You can change what revisions are loaded in your workspace by switching the workspace to a specific branch, changeset, or label. Normally this means right-clicking on a branch in the Branch Explorer or Branches view in the GUI and selecting Switch workspace to this branch. You can also do this in the CLI by using the switchtobranch command:
cm switchtobranch /main/task0911
It's all quite simple. "Too simple", you're probably thinking. Fair enough – we'll introduce some complexities in the next section, where we describe the ways in which developers actually go about creating new revisions. And even more in the next chapter, where we discuss parallel development. You'll see that Plastic SCM handles the complexities simply, effectively, and ...flexibly.
Getting Started: Placing Objects under Source Control
We'll assume that the project files to be placed under source control are all in one location. They might be in a ZIP or TAR archive, or maybe they're just sitting in a directory on your disk.
Depending on how you've packaged your project files, you can create the workspace in either of these ways:
- Bringing the data to the workspace – If the project files are in a ZIP or TAR archive, create the workspace as a new directory in disk storage. Then, unpack the archive into the newly created workspace directory.
- Bringing the workspace to the data – If the project files are sitting in a directory, just designate that directory as the location of the new workspace.
In any case, you will create a workspace and connect it to a repository.
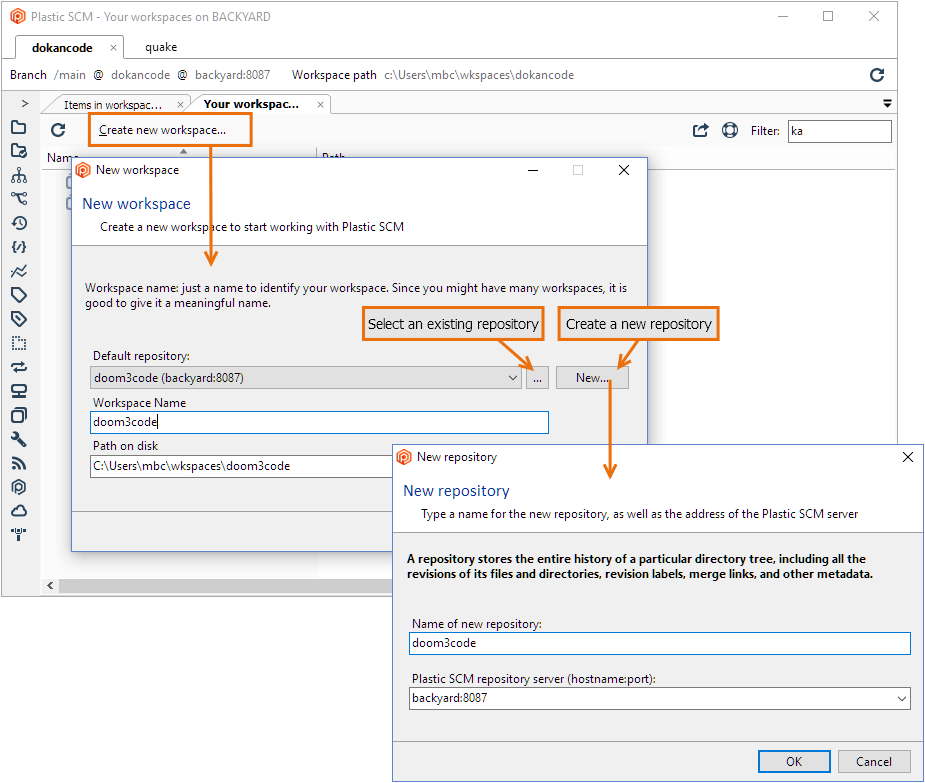
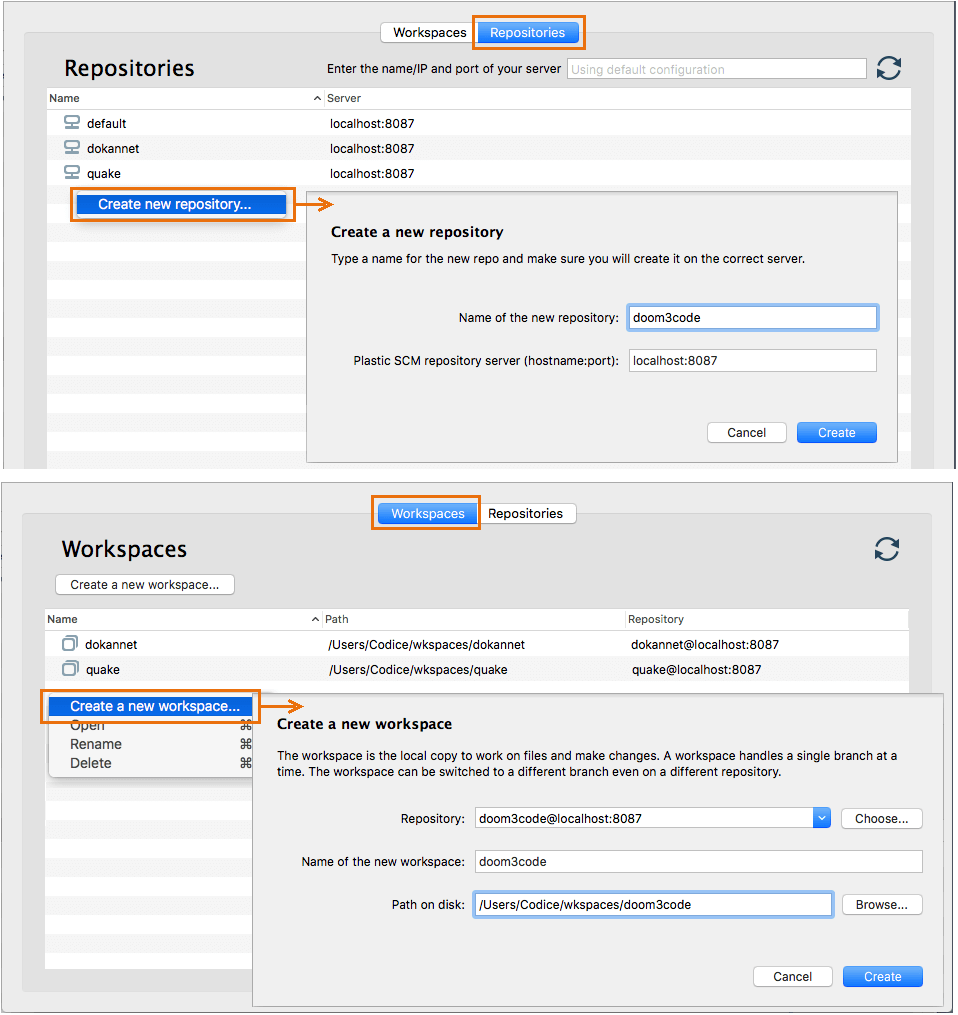
You need to decide whether to create a new repository. A project that has its own identity (which often means its own development schedule and perhaps its own set of developers) typically should have its own repository. The Plastic SCM GUI makes repository creation easy:
- In Windows, right from the New workspace dialog, you can either select an existing repository or create a new one.
- In Mac OS, first create the new repository from the Plastic SCM Switcher dialog and then select it from the New workspace window.
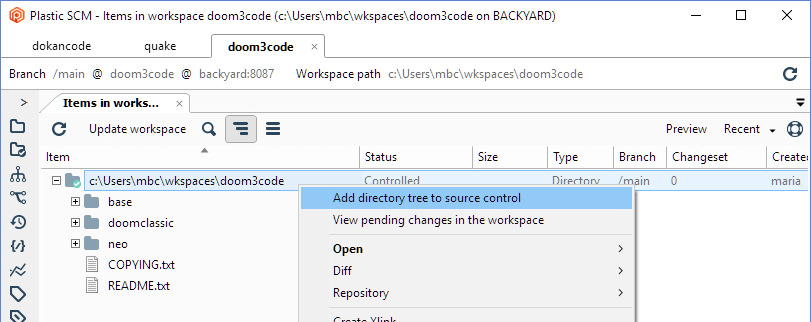
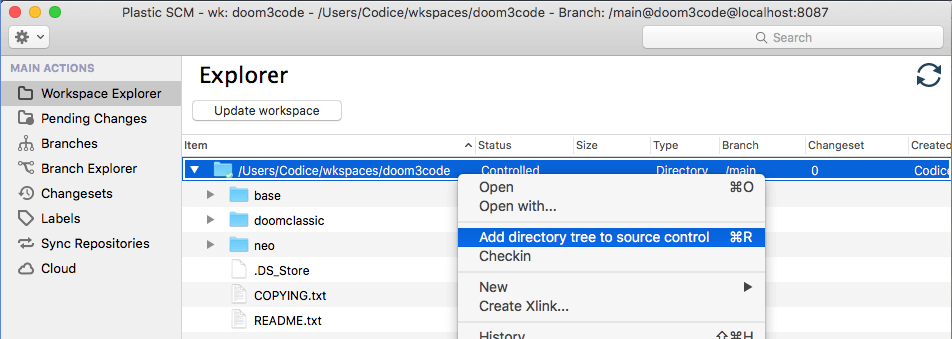
At this point, your project files are in the workspace, but are not yet under source control. That is, they are private objects. So the next (and last!) step is to convert this entire collection of private objects into source-controlled items, using the Add directory tree to source control command in the Workspace Explorer:
Sometimes, your packaged project files turn out to contain some junk like backup files and excerpts from email messages. You certainly don't want it cluttering up your repository, but what's the best way to handle this? Here are a couple of options:
- Clean up the package – Before getting started with Plastic SCM, take time to remove the junk files from the ZIP or TAR archive, or remove them from the directory tree containing the project files.
- Clean up the repository – After placing the project files under source control, go back and use the Delete command to get rid of the junk files and directories that were converted to source-controlled items.
Plastic SCM offers another alternative, which often turns out to be the cleanest solution. During execution of the Add directory tree to source control command, filter out the junk automatically. You accomplish this using an ignore file, a simple configuration file that specifies filename patterns. Here's a simple example:
# ignore all bin and build directories
*/bin*
*/build*
# ignore text-editor backup files and email messages
*.bak
*.msg
The ignore file, named ignore.conf, can be located in the Plastic SCM installation directory, where it affects all invocations of the Add directory tree to source control command. You can also place it in the root directory of your workspace, so that it affects just that workspace's repository.
Learn further about how to configure the ignored list.
Sometimes, it's not appropriate to create a new repository for a new set of project files. Maybe it's just an extra chapter of an Internet book, which you outsourced to a contractor. The project files are organized as a single directory, containing an HTML document and a bunch of GIF image files. To place this development data under source control in an existing repository, use a simple variant of the procedure described above:
- Copy (or unpack) the directory into an existing workspace, which is connected to an existing repository.
- In the Workspace Explorer, invoke the Add to source control command on the newly added directory.
Plastic SCM supports the fast-export/fast-import interchange format to get data in and out of a repository. As an alternative to the method described above, you can export the data from your existing SCM tool and then import it into a Plastic SCM repository.
Fast-import/export functionality is available on the command line. The most basic import command to import looks like this:
cm fast-import mycoderepo@localhost:8087 mycode.fast-export
This command will create a new repository named "mycoderepo" and parse the contents of the fast export file, creating branches, changesets, and labels as they are read.
Plastic SCM supports importing incrementally, using a marks file that records what changesets were imported. When a marks file is specified, the fast-export file is parsed and only the changesets that are not found in the marks file are imported. It works like this: The first time you import, tell Plastic SCM to create a marks file:
cm fast-import mycoderepo@localhost:8087 mycode.fast-export --export-marks="mycode.marks"
The next time you import, indicate that you want to skip the changesets that were already imported in the previous marks file:
cm fast-import mycoderepo@localhost:8087 mycode.fast-export –import-marks="mycode.marks" --export-marks="mycode.marks"
Note that the marks file can be the same in both cases. In this case, the marks file is used to import the new changesets and then it is updated with those imported changesets so it is ready for the next use.
If your existing SCM tool supports exporting incrementally using its own marks file, then you can export only the new changesets from your legacy tool and import incrementally in Plastic SCM, as a means to keep synchronized codebases on both systems.
Creating New Revisions
Over the years, most SCM systems have chosen one side or the other in the great debate over how to make changes to the repository. Plastic SCM doesn't make you choose sides - you can proceed in either of these ways:
- Checkout-Modify-Checkin - You declare your intention to create a new revision of an item with a checkout command. Plastic SCM records this in the repository, so that other developers (or managers) can see what you're doing. If you perform an exclusive checkout, it can also prevent other developers from performing a checkout of the same revision. After modifying the item, you use a checkin command to create the actual revision in the repository.
- Modify-Commit - You don't need to declare your intention, just simply make a modification in your workspace. Then, you use a commit command to send the change to the repository, creating a new revision there.
Both methodologies have advantages and disadvantages. For example, checkout-modify-checkin works better with huge source bases, so that the SCM system doesn't have to engage in a time-consuming hunt for modified files. Many developers have gotten used to the convenience of never having to issue a checkout command, so they may prefer the modify-commit option. Let's see how both methodologies work in Plastic SCM.
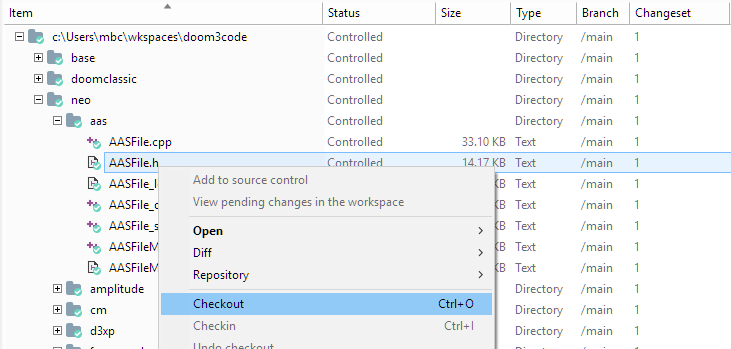
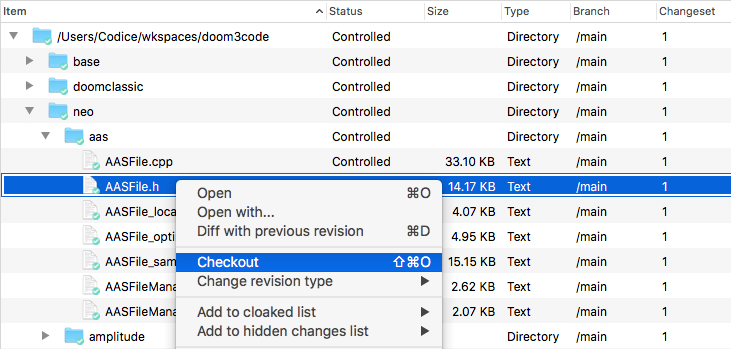
In the Workspace Explorer, the Checkout command appears in the context menu of current selection, which can be a single item or an arbitrary set of items:
Checking out an item creates a checked-out revision - sort of a temporary revision - in the workspace. No data gets copied from the repository by this operation (unlike Subversion's checkout) but there might be a change in your workspace. Part of Plastic SCM's per-user configuration is the option to maintain items as read-only in your workspace until they're checked-out. (It's in the Preferences dialog, on the Other options tab.) If your configuration uses this option, then the Checkout command changes each item's status from read-only to read-write.
This feature is intended to make accidents less likely, not make them impossible. After all, most developers know how to get rid of a file's read-only status. Plastic SCM has very robust security features, but they're focused on the repository, not the workspace.
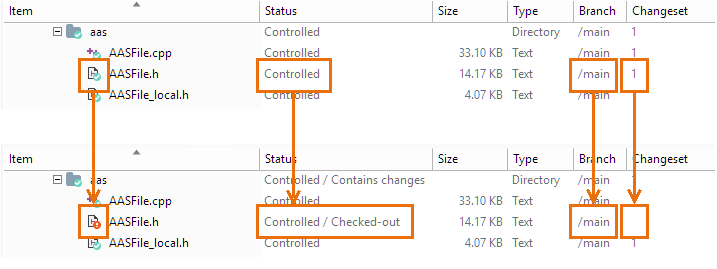
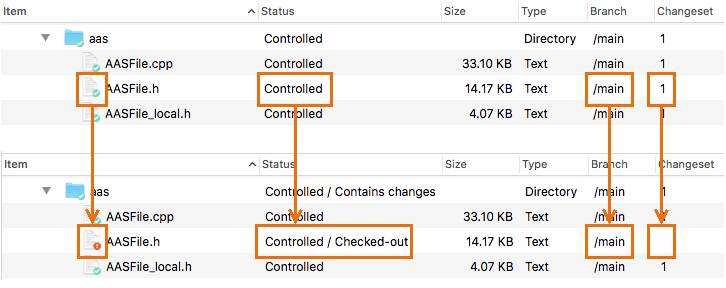
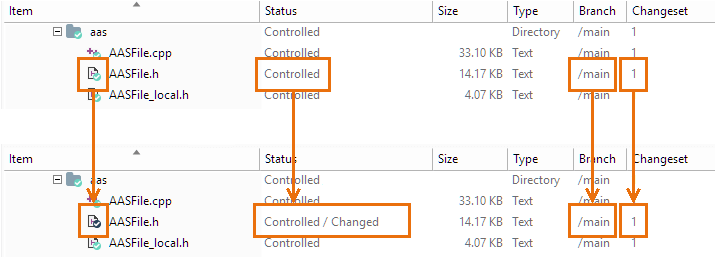
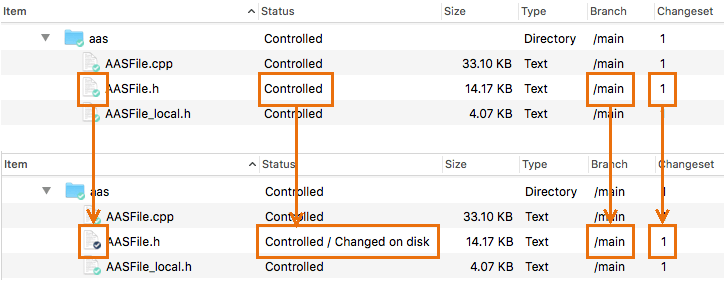
In the Workspace Explorer, a checked-out item's appearance is distinguished in several ways:
- In the Item column, the icon decoration changes from a green checkmark (meaning "under source control, but not checked out in this workspace") to a red dot ("checked out in this workspace").
- The Status column indicator changes from Controlled to Controlled/Checked-out.
- The changeset column appears empty.
As you make changes to a checked-out item (for example, with a text editor), the Workspace Explorer display doesn't change - the item's status remains checked out. To see what changes you've made, you can use the Pending Changes view, which will be described in the next section. First, let's talk about the other working method: Modify-Commit.
To use this methodology, you first make sure not to configure Plastic SCM to maintain items in a read-only state. To do so, click Preferences and select Other options. Uncheck the option Update and Checkin operations set files as read-only. If your workspace had files set as read-only already, just remove this protection from Windows Explorer. Note that this will download all the files in your workspace from the server, so you may prefer to remove the read-only protection using other means.
Then, you just make your changes, without invoking Checkout. Items that you modify show up in the Workspace Explorer as having Changed status (instead of Checked-out) and their icon decoration turns blue (instead of green). Typically, you must refresh the Workspace Explorer to have it notice that certain items have been changed.
When you're done making changes, you use the Checkin command to create new revisions of the modified items. If using the Pending Changes view to Checkin, make sure that Show changed items is enabled in the Options, as described in the next section.
You may have noticed that we said Checkin and not "commit". There is no "commit" command in Plastic SCM - we just wanted to make this description sound familiar to users of the many other SCM systems that do use a "commit" command to implement this methodology.
One of Plastic SCM's most useful tools is the Pending Changes view. It helps you to answer the questions "What items have I changed?" and "How does my workspace differ from the repository?". You can configure the view to display different kinds of items, depending on the mode you want to work with (checkout-modify-checkin or modify-commit).
Out of the box, the Pending Changes view is configured to display only checked-out items. This makes sense when you are using the checkout-modify-checkin model. If you want to use the modify-commit model, on the other hand, it's good to modify some options in the Pending Changes view.
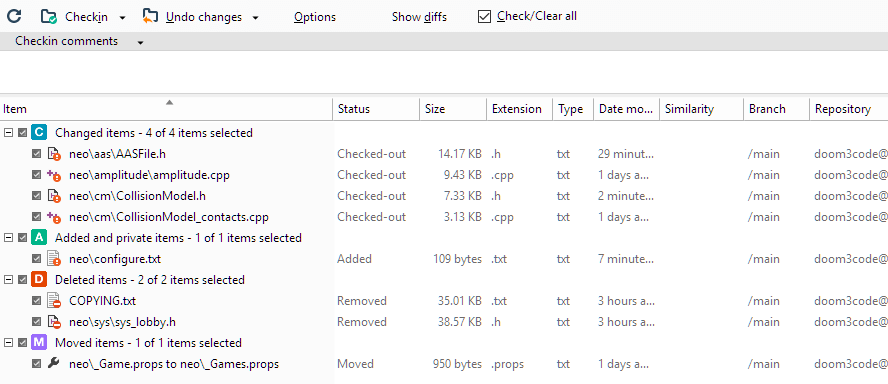
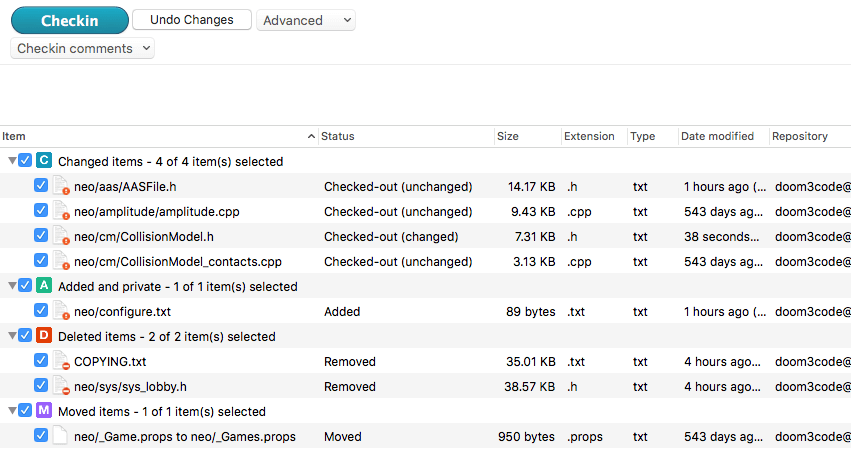
Using the Options button, a dialog box appears. You can have this view search through your entire workspace for one or more of the categories introduced in the preceding sections: Checked-out items, Changed items, Private objects, Ignored objects, Deleted items, and Moved items.
The Pending Changes view is capable of detecting everything you did to your files - even if you didn't tell Plastic SCM about it - and groups those changes in four categories:
- Changed files - Files whose content changed. This category contains checked-out and changed files, as explained before.
- Added and private:
- Private files are files that are outside of monitoring by Plastic SCM. They can be products of the compilation or other types of files that don't need to be versioned. However, private files can be added to the repository at any time.
- Added files are files that have just been added to the repository, but still not checked in. Note that by default, the UI client will normally check in files for you automatically right after adding them, so you are not likely to see files in this state unless you changed the default behavior (in the preferences dialog) or used the command line to add the files.
- The listing of Private objects can include or exclude the ones that you have no intention of placing under source control. Such ignored objects are described in this section.
- Deleted items:
- Items "deleted locally" are controlled files that have been deleted in the workspace, without telling Plastic SCM yet (for instance, by right-clicking the file in the Workspace Explorer and selecting delete).
- Items that are just "deleted" are controlled files that have been deleted through one of Plastic SCM's facilities and they are detected even if the options are not set to scan the workspace for changes.
- Moved or renamed items.
What's the difference between telling Plastic SCM about changes you make and choosing not to? Performance. For huge workspaces (hundreds of thousands of items) it can take some time to scan the file system for changes, depending on the disk cache. Checking out, adding, moving, or deleting the items explicitly in Plastic SCM can avoid that scan, making the Pending Changes view load lightning fast, even in extra large workspaces.
To handle large sets of files, typing a character string in the Filter field instantly restricts the listing to the subset of names that contain the string.
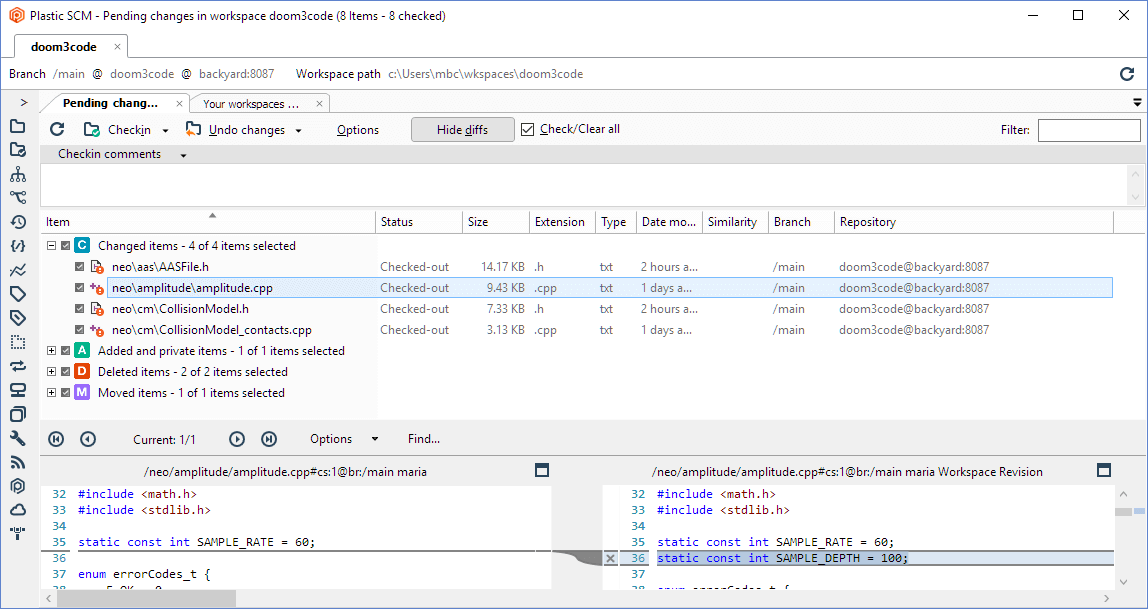
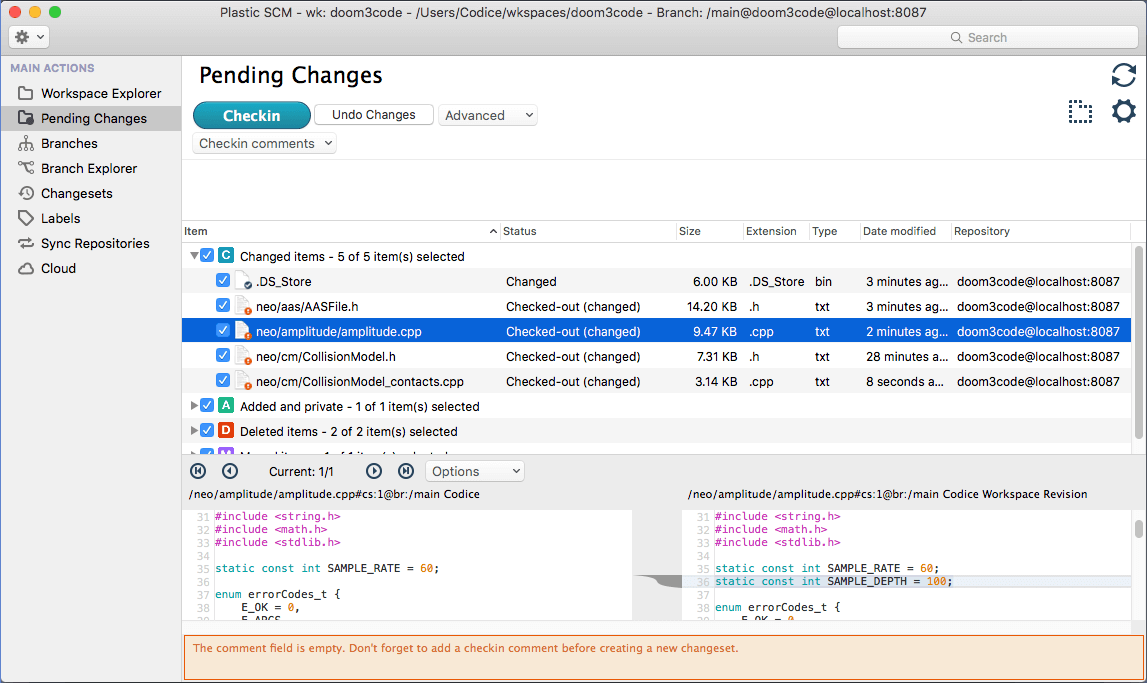
Once you've located the objects that have changes, you can take steps to synchronize the workspace with the repository. You can checkin items that are checked-out (or cancel the check-outs), place private objects under source control, or confirm deleted items. Before doing so, you might want to examine the actual changes in the modified objects. The Pending Changes view tries to makes this easy for you. Just select which item you'd like to see a before-and-after comparison of.
- In Windows, click the Show / Hide diffs button to see/hide the comparison.
- In Mac OS, the comparison shows up automatically.
Once you have verified that everything is okay, type a comment in the Checkin comments box to describe the changes and click Checkin.
In the Workspace Explorer, the icon decoration and status indicator revert to their regular states (i.e. not checked-out). In the changeset column, the number of the newly created changeset appears:
In the preceding sections, we saw how items go through several kinds of Controlled statuses as you modify them:
- Controlled
- Controlled/Checked out
- Controlled/Changed
There's one more status to discuss: "none of the above" ...that is, Private. A workspace is a space in which you do development work, so it tends to accumulate lots of files (and even directories) that shouldn't be placed under source control. This can include editor backup and temporary files, compiler output files, email messages, screen shots, and little scripts that you would never show to anyone else.
The Workspace Explorer displays private files and directories with no icon decoration and no entry in the Revision column. For your convenience, Private objects are grouped together, separate from the various kinds of source-controlled items, and at the very end of the list.
The History view is available in Windows systems for now.
Your workspace contains one revision of an item, but all the other revisions are safely stored in the repository, ready to be accessed. Plastic SCM provides a couple of tools for working with these other revisions.
The History view displays a table that contains all the revisions of one item. The columns in this table provide overview information on each revision: the revision identifier, timestamp, user who performed the Checkin, the Checkin comment string, and the labels (if any) attached to the revision.
You can use the History view to examine the contents of any revision, to revert your workspace to an old revision (because you were brain dead during the last programming session?), and a variety of more advanced operations. It's likely that you'll use this view chiefly to compare an old revision with the one in your workspace. Another popular operation is comparing a revision with its immediate predecessor to determine what changes were made in that particular revision. Comparing revisions is described in section Detailed Monitoring of Changes: The Side-by-side Diff Tool.
In addition to providing a way to "drill down" into revisions, the History view enables you to "rise up" into the context where a particular revision was created. That is, you can jump from a revision to the changeset that includes the revision. See High-Level Monitoring of Changes: Changesets.
Plastic SCM's Flexibility in Day-to-Day Development
As you go about your day-to-day development work, there will be plenty of occasions where you change your mind or just plain make a mistake. Plastic SCM is flexible (!) enough to handle these situations easily. This section introduces a few of these features.
Often, you intend to work on a particular file, and so perform a Checkout, but then change your mind. (Or your boss changes your mind for you.) Or maybe you mistakenly included a particular file in a group of files you submitted to the Checkout command. No problem - just use the Undo checkout command.
Ever had one of those weeks where every good idea you have turns out to be a bad idea? You've created changesets 13, 24, and 35 of a file, and now nothing works. Again, no problem - just use the Revert command to reinstate the file to its state on changeset 13. Those less-than-perfect revisions (were you brain dead again??) remain in the repository (just in case there were some good ideas in there), but they won't break your builds anymore!
Sometimes, your zeal to place all your work under source control goes a little too far. For example, you might have created source-controlled items from backup files and compiler object modules. The Delete command comes to the rescue, creating a new changeset that excludes the item. You can delete the file(s) from your disk, as well, or leave them in your workspace as private objects.
In a large development organization and/or with a source base involving very large files and/or in a slow networking environment, the Update command can take a long time to accomplish its work of determining which objects need to be updated in your workspace and then downloading the actual data. To address this potential problem, Plastic SCM enables you to designate individual files or entire directory subtrees as being cloaked from the Update command (and, less importantly, from the Checkout command, too). Perhaps you're working on real-time graphics performance, so you don't care about the tweaks to the database-query engine or the online help system. You can cloak the directories containing these subsystems, to make your updates proceed more quickly.
The cloaked.conf configuration file controls cloaking. It can be located under your home directory, for use in all workspaces, or in the root directory of individual workspaces.
Learn further about how to configure de cloaked list.
Detailed Monitoring of Changes: The Side-by-side Diff Tool
It's time (finally!) to take a look at Plastic SCM's graphical Side-by-side Diff Tool. A tool that shows differences between revisions of a source-controlled object is obviously an essential part of any SCM system. It's one thing to see that lots of revisions exist, using the History tool or Revision Tree tool; it's quite another to be able to see, and understand, how the revisions differ - how an item has evolved over time.
The Side-by-side Diff Tool is powerful and simple to use - able to show differences in text files, image files, and directories - and we think it's beautiful, too! In keeping with Plastic SCM's flexibility, you can configure the GUI to use alternative difference tools, as well.
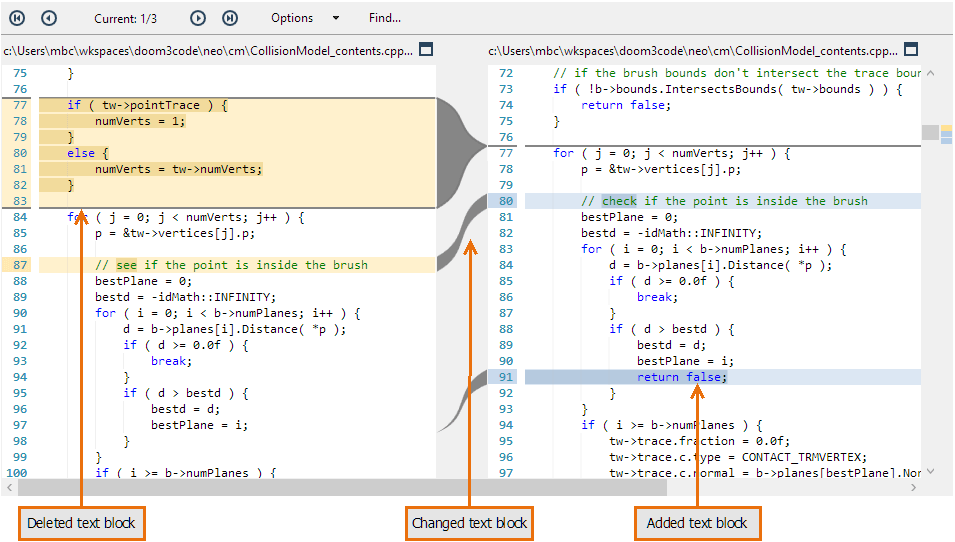
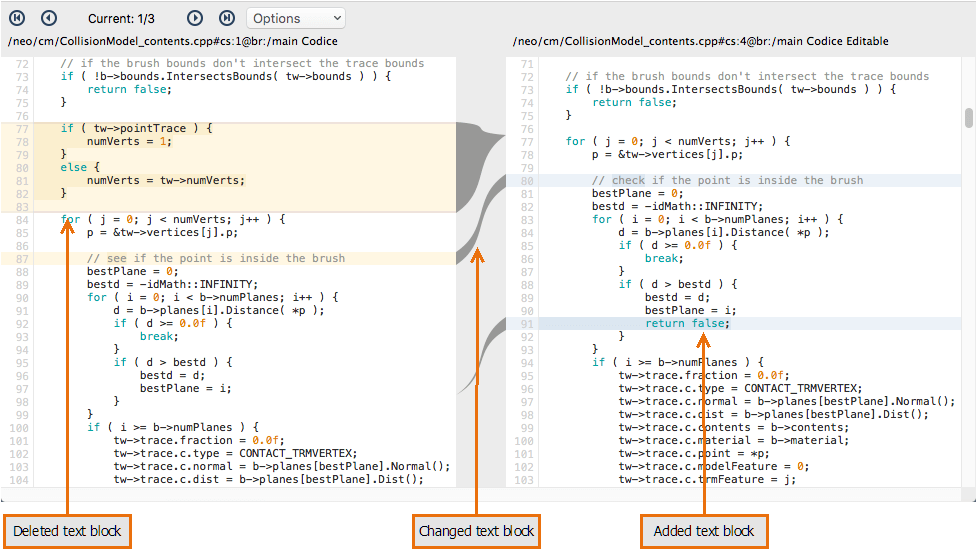
The Side-by-side Diff Tool displays two revisions side-by-side, using colors and shading to clarify exactly where differences occur, down to the individual character. The fat separator bar between the left and right panes makes it particularly easy to see how blocks of code have changed in size, have been deleted altogether, or have been newly inserted. Arrow buttons and a search facility make navigation through large files easy, and the Options menu provides a great deal of flexibility in handling whitespace, line-endings, and character encodings.
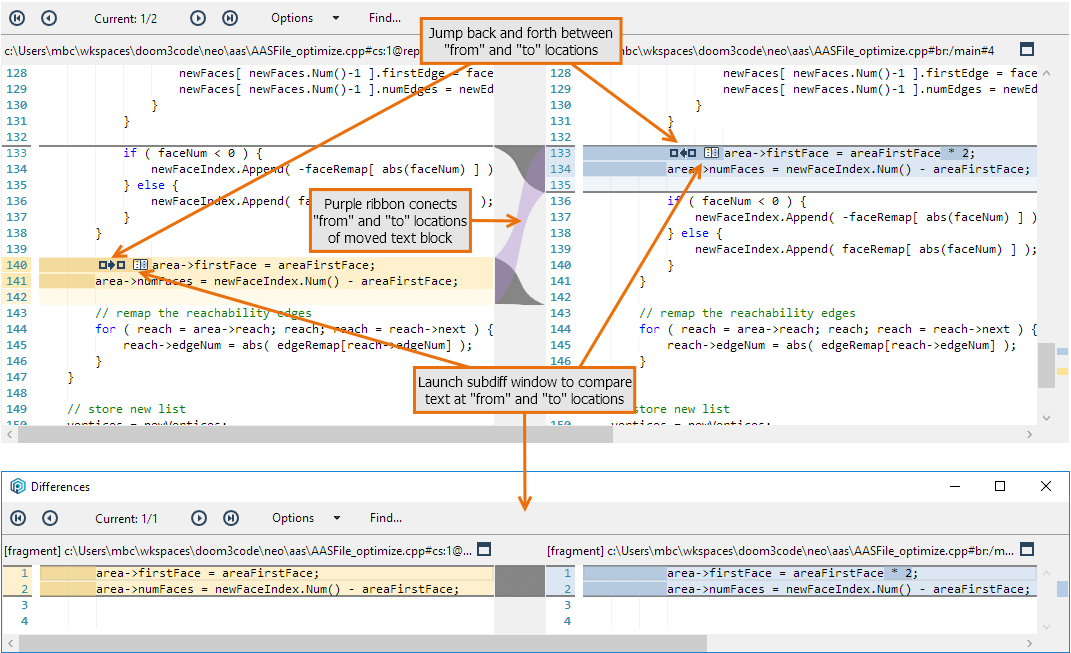
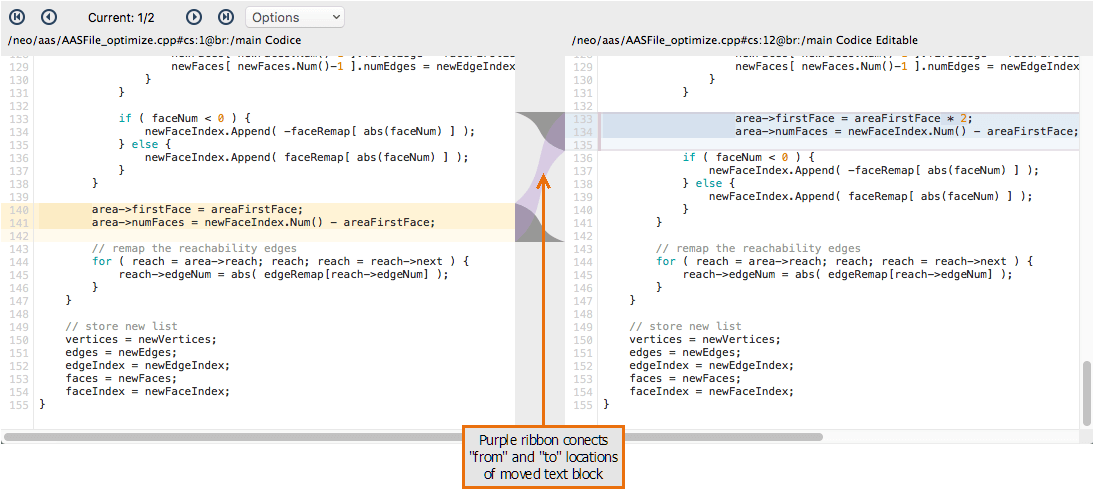
Perhaps the most powerful feature of the Side-by-side Diff Tool is its cross-difference capability, which we spell Xdiff. The Side-by-side Diff Tool can recognize the code blocks that have been moved from one part of the file to another. It can even detect that such blocks that have been revised as well as moved, and can launch a sub-diff window that zooms in on just those revisions.
Binary file comparison is something that many SCM systems don't even attempt. The Side-by-side Diff Tool doesn't work miracles, but it does its best to enable you to compare revisions of an image file (PNG, JPG, GIF, etc.). The two revisions' images are displayed Side by side, so that you can determine the differences by inspection.
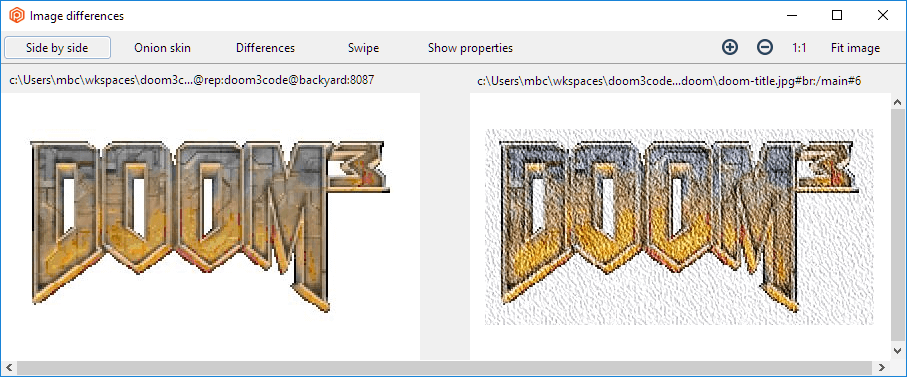
Alternatively, you can have the images superimposed and blended together with a slider to control the blending (Onion skin comparison), which sometimes makes it easier to perform the visual comparison.
Besides, the Swipe option allows you to move a slider from side to side in order to view bit by bit the changes made to the image.
Additional Tools for Detailed Monitoring of Changes
The Side-by-side Diff Tool does an excellent job of showing what has changed in the contents of an item. Sometimes, though, an organization needs to know the who, when, and why of a change. What's the need? Well, the command name "git blame" might provide a hint. Plastic SCM's corresponding command doesn't have a snarky name; we just call it "annotate".
The Annotate view displays the complete contents of a revision, with annotations automatically displayed for each text line. It displays the name of the user who added (or last revised) the line, along with the changeset and revision identifier to pinpoint when the line was added (or last revised). In a parallel development environment, where changes can get propagated from branch to branch to branch, the Annotate view takes care to identify the original source of each change.
The annotations are colored and shaded, making it easy to scan a revision for recent changes or old ones. (For flexibility, the shading colors are configurable.) Selecting a line reveals the changeset's timestamp and comment string in a properties pane at the bottom of the view.
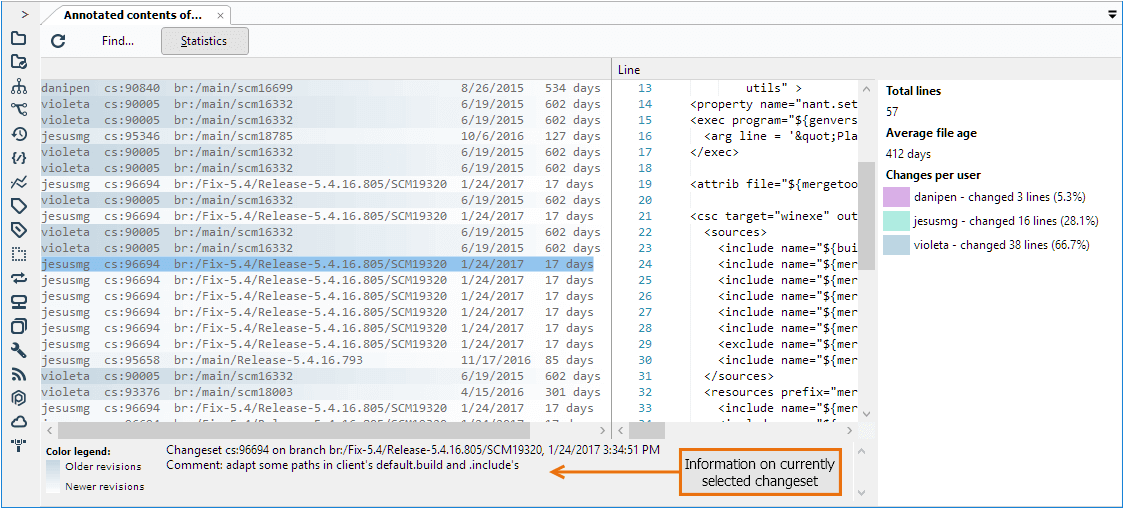
In addition to automatic annotation of text files on a line-by-line basis, Plastic SCM provides for manual annotations, in the form of code reviews. We'll defer discussing this feature until the next section, because it's closely related to another feature: changesets.
High-Level Monitoring of Changes: Changesets
In the preceding sections, we've concentrated on individual file system items in describing how changes are made (by you) and tracked (by Plastic SCM). But in practice, you probably spend most of your time implementing changes that affect groups of items, rather than individual ones. ("I need to add a parameter to the AdjustFrammis function, and also fix all the routines that call this function.") Recent SCM systems, such as Git and Mercurial, have recognized this truth and have deemphasized individual-file changes, stressing instead "changesets" that can affect any number of files.
Well, with Plastic SCM, you can have it both ways. To get the big picture, you can work with changesets. (In fact, you can get an even bigger picture, by working with sets of changesets! Are we flexible, or what?!) When you need to, you can "drill down" to the individual items involved to determine line-by-line differences using the Side-by-side Diff Tool.
Each time a Checkin command is invoked on a group of items, Plastic SCM creates a new changeset, which lists all the newly created revisions. Each repository has its own collection of changesets, numbered sequentially: 0, 1, 2, 3, etc. (Changeset 0 is always the big bang that places the repository's root directory under source control).
A changeset also represents an atomic transaction. If you submit 1000 items to check in, the resulting changeset is guaranteed to contain all 1000 new revisions - if it is created at all. If the Checkin is interrupted, on purpose or by accident, the repository remains unchanged - no new revisions, no new changeset.
Plastic SCM provides multiple changeset-related tools for getting the "big picture" that we alluded to above. This section describes the two basic tools: the Changesets view and the Branch Explorer view.
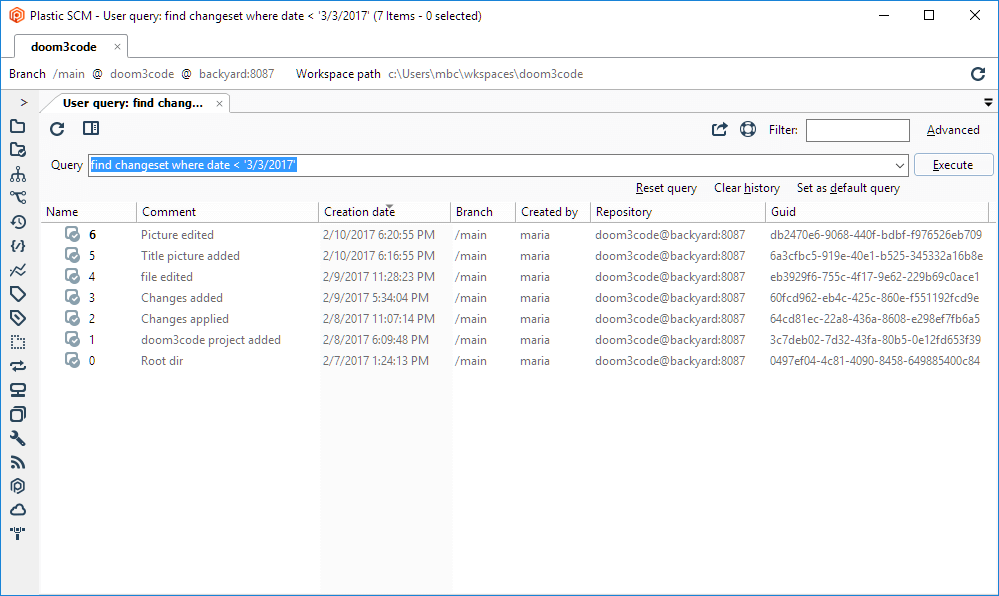
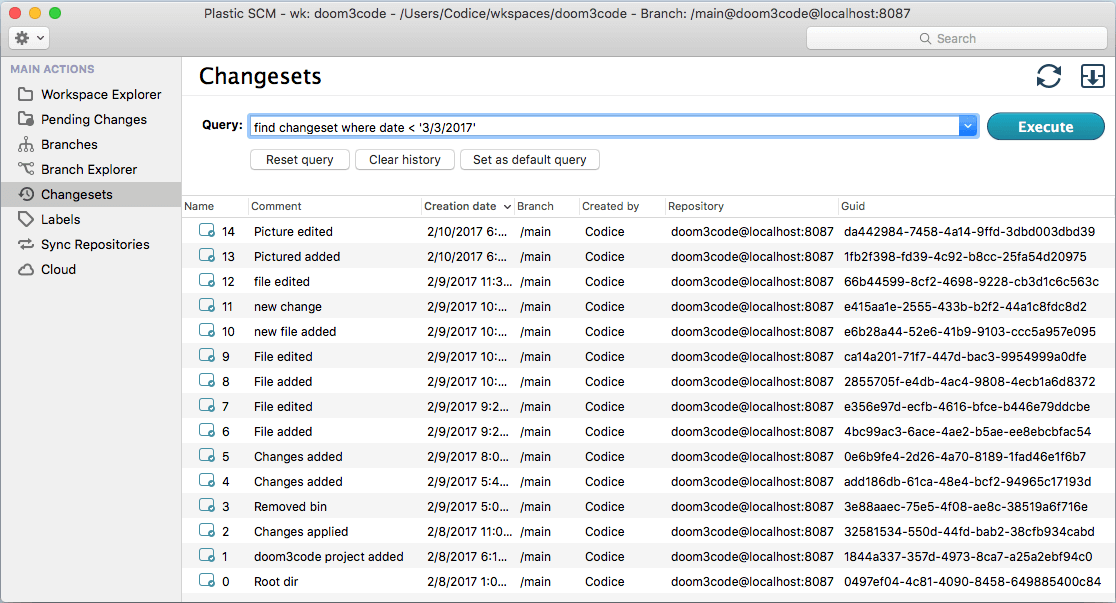
The Changesets view displays a table of recently created changesets for the current repository. Actually, that's just the default; you can modify the query that produced the table, to refine its contents by various criteria, like timestamp or username. (Like this flexibility? See section Advanced Reporting with Queries.)
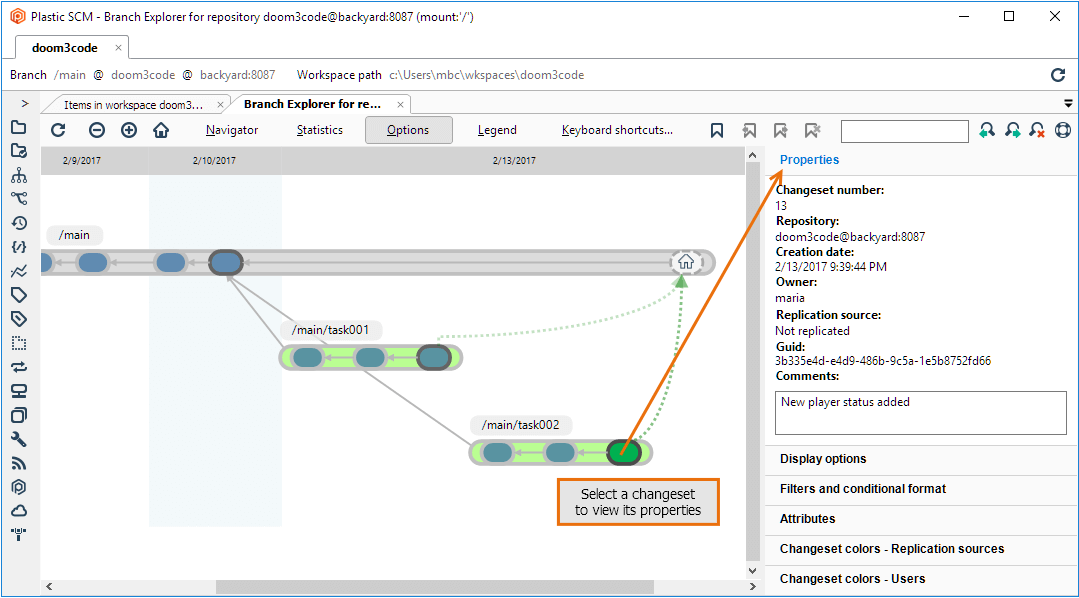
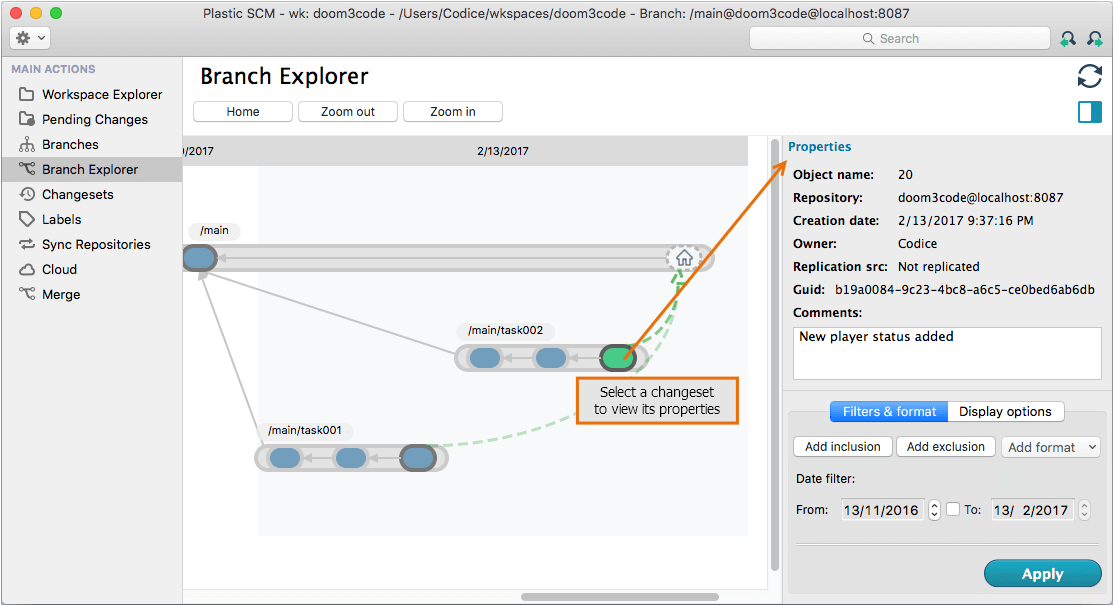
The Branch Explorer view provides a graphical alternative to the Changesets view. It shows a repository's branches along a timeline, with circles representing the branch's changesets. (Each Checkin command produces a changeset consisting of revisions on one particular branch.) In keeping with this chapter's scenario, the example below shows development work. Selecting a changeset displays overall information in the Properties pane, such as the changeset number, timestamp, and Checkin comment string.
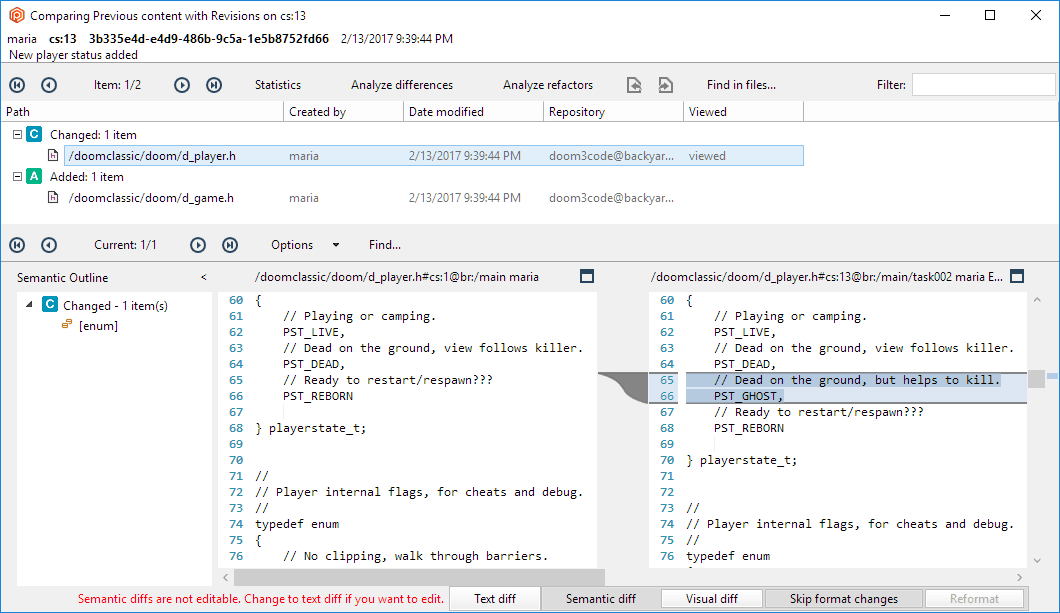
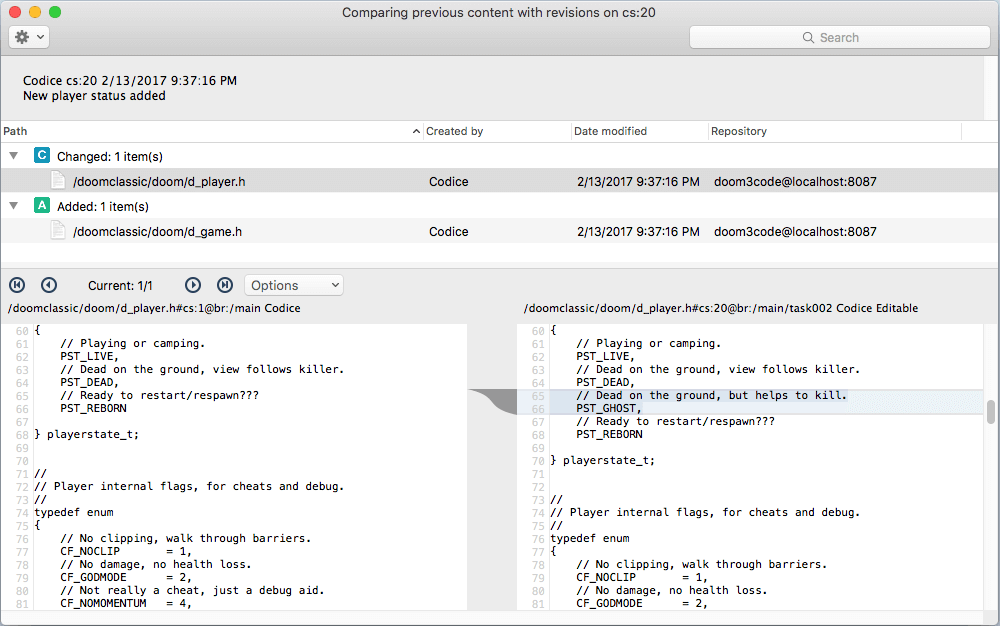
In either the Changesets view or the Branch Explorer view, double-clicking a changeset opens a new view: the changeset content comparison window:
More generally, you can use either the Changesets view or the Branch Explorer view to compare any two changesets by holding down the "Control" key to select them.
The Diff changeset content command, described in the preceding section, provides insight into one set of changes that were recorded on a branch. Now, think bigger - think about scrolling through an entire sequence of Diff changeset content displays, one for each changeset on a branch. That would "play the movie" of all the changes on the branch, organized by changeset. In an environment that uses the branch-per-task methodology, that "movie" would tell the entire story of the work that went into a particular task.
The "movie" is not just a Hollywood fantasy - it's the view produced by the Explore changesets in branch command. The right hand side contains a two-pane Diff changeset content display. Along the left edge are the "movie frames" - that is, the branch's changesets:
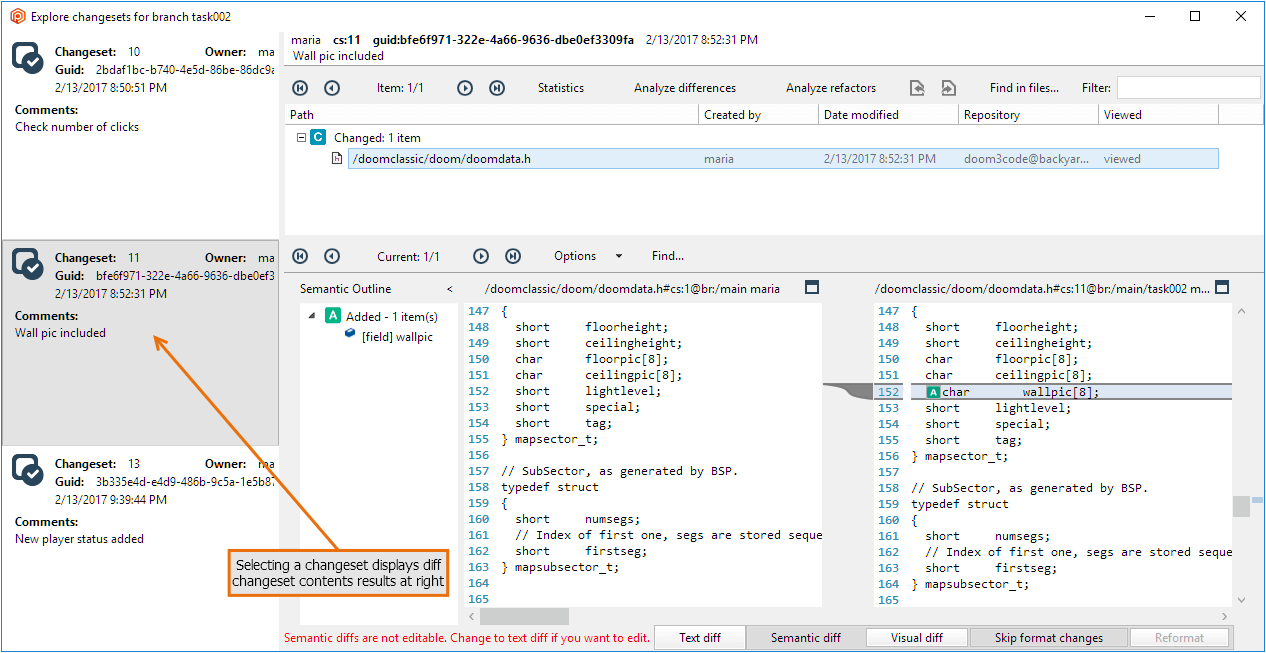
(You might think of this view's "movie frames" as blowups of the boxes that represent changesets in the Branch Explorer.)
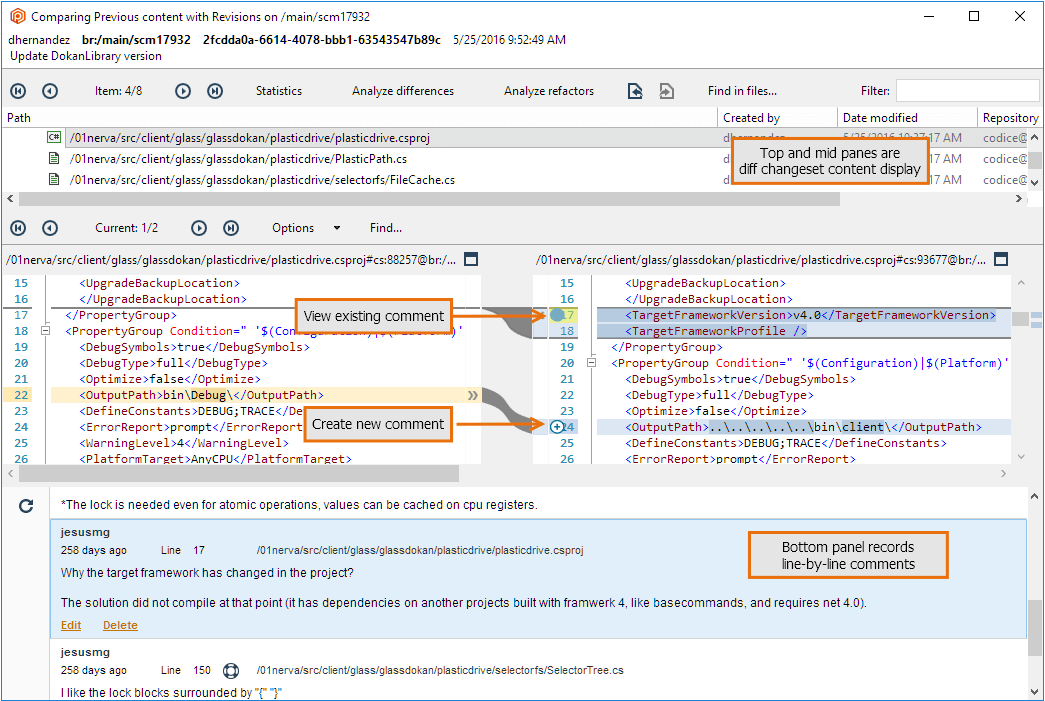
Plastic SCM provides a lightweight code review system to help teams adopt this practice in case they are not doing it already. A code review for a changeset is a cooperative document with contributions from any number of Plastic SCM users. It has a title, a status, an assignee (the user responsible for conducting the review), and an owner (the user who created it). The initial content of a code review is the view produced by the Diff changeset content command. In the lower pane, where the Side-by-side Diff Tool shows the differences between a revision in the changeset and its immediate predecessor, users can click on any line to add comments of any length. Existing comments are displayed in a third pane at the bottom of the window.
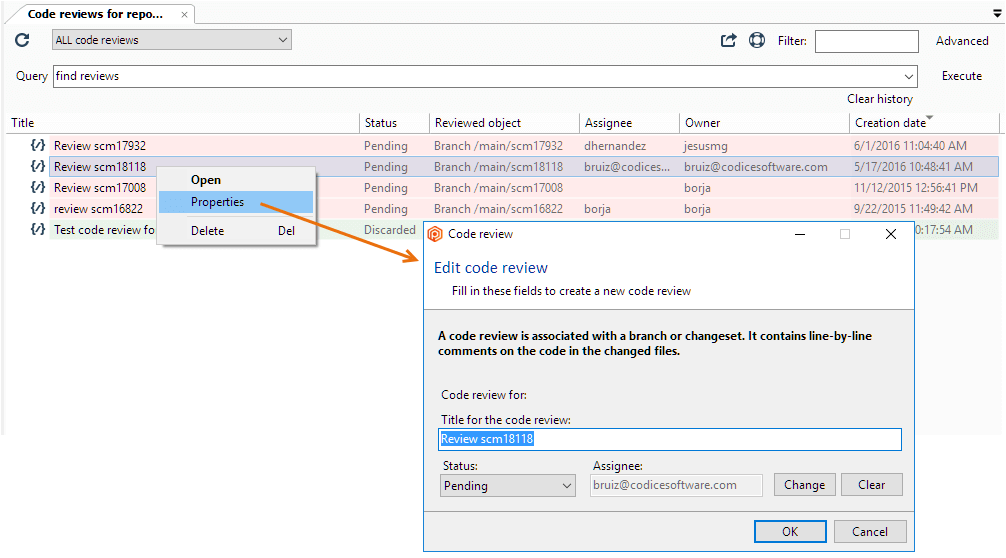
The Code Reviews View displays all of the team's code reviews. You can also restrict the display to just those reviews retrieved by standard queries ("Filters"), by queries you customize, or whose titles match a filter string you enter. Team members can use this view to monitor the code reviews, reassign them, and transition their statuses (Pending, Approved, or Discarded).
Chapter 3: Parallel Development with Plastic SCM
In this chapter, we expand the scenario from working on the main branch only to making full use of Plastic SCM's branching and merging capabilities. We'll revisit many of the tools and features introduced in the preceding chapter, showing how they work in a parallel development environment, in which different projects can proceed concurrently, without interfering with one another. We'll also introduce the 3-way Merge tool, which helps to take the fear and loathing out of parallel development!
You probably don't need to be convinced that organizations work more efficiently (and with fewer screw-ups) when they use the parallel development methodology. But just in case, here's the canonical argument: The only reasonable way for an organization to both work toward the next release and make bugfixes in the current release is to have both activities take place concurrently, and in (controlled) isolation from each other.
There are many parallel development strategies, and Plastic SCM can support them all. The strategy that we highly recommend, and that we'll highlight in this chapter, is branch-per-task development.
Basic Working in parallel
When several developers make changes to the code base in parallel, they want to avoid some common problems:
- They don't want to check in a change that breaks the build and have their colleagues affected by it.
- They want to check in often, even changes that are not fully finished, so they can rollback as needed, but they want to avoid disturbing other developers with unfinished stuff. Something like a sandbox.
- They also want to avoid having a full week of work only in their local hard disks. It's safer to check in often so the work is safe on the fully backed-up server.
- When combining changes from other developers, they want to avoid solving a merge conflict they already solved the last time they merged.
Plastic SCM helps you completely prevent these issues using the branch-per-task development model. In this model, you create a branch for each development task, starting from a stable point in the code evolution (a baseline) and make the changes related to the task in that branch. That branch is your sandbox, so you can Checkin as often as you want and have the branch validated before it is integrated on the main line, where it will be combined with the other tasks to form the next stable baseline. If there is some problem with the task when it has been combined with the other tasks (an integration problem), it can easily be taken out and then reviewed. The great thing is that you have complete control of what goes into your stable baseline or release and ultimately, what is delivered to your customers.
While the branch-per-task model is independent of the tool that you use, it requires heavy use of branching and merging. The good news is that Plastic SCM has been designed around this concept. Not only does its backend support thousands of branches, its GUI helps you visualize and easily manage all those branches.
Establishing Development Baselines with Labels
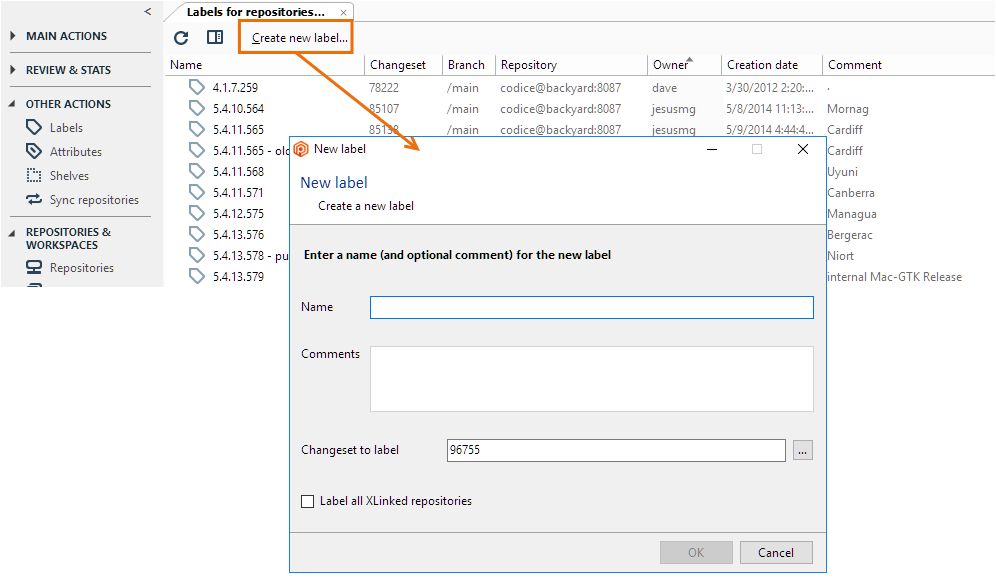
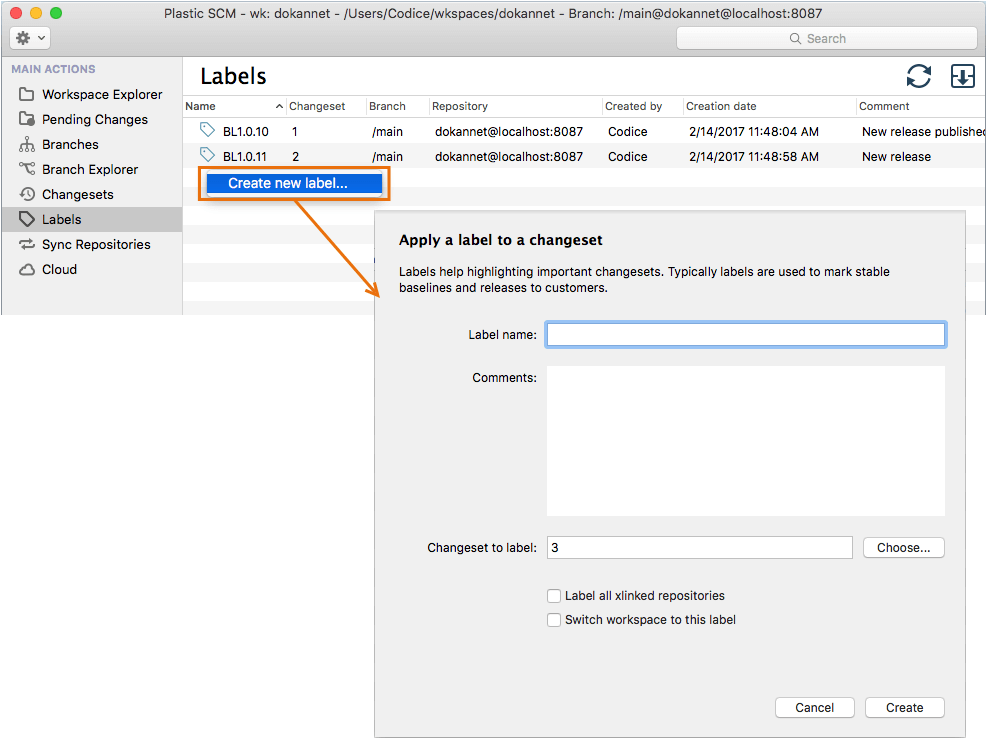
It's an SCM best practice in parallel development environments to establish stable (known to be good) baseline configurations of the source base as often as possible. Baselines are sometimes known as releases. The easiest way to create a baseline is to build the software system in a workspace, successfully run unit tests and system tests, and then attach the same label to the current revision of every item. Plastic SCM makes this very easy:
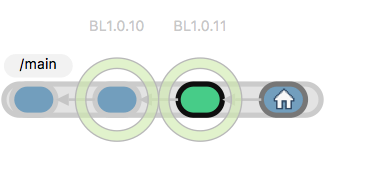
Labels are drawn as circles around the changeset they are associated with in the Branch Explorer:
In general, all new development projects should start with a stable baseline. And in particular, Plastic SCM's preferred branching methodology relies upon baselines. The next section elaborates on some of the concepts introduced in the previous chapter to help you understand how parallel development can be implemented using Plastic SCM.
Revisions, changesets and branches
For each source-controlled item, Plastic SCM maintains a collection of revisions. In the preceding chapter, each item's revisions were organized in changesets that in turn were organized in a single branch. In general, changesets are organized in branches, and new revisions of items are added to new changesets at the end of branches, creating trees of any complexity and depth.
At any existing changeset, any number of new branches can be created. A new revision can be added to the end of any branch (inside a changeset) without affecting any other branch. Thus, a branch acts as an independent line of development.
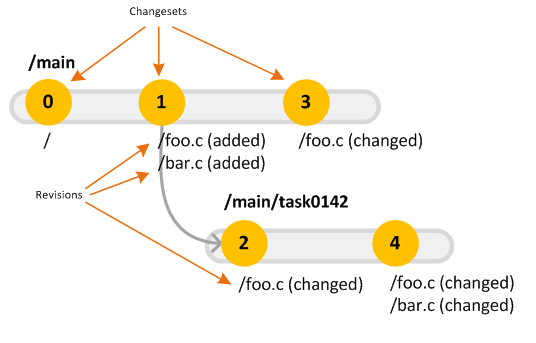
This reflects the fact that each newly created revision, except the initial one (marked with added, in the previous figure), is based on some other revision that already exists - its immediate predecessor. And this, in turn, reflects the way in which a new revision is created:
- Load an existing revision of the item into a workspace, with the Update command.
- Make changes to the item.
- Checkin a new revision of the item.
The existing revision and new revision are forever connected through their changesets in a predecessor-successor relationship. In the previous figure, branch /main/task0142 is created starting in changeset 1. The workspace is then switched to work on that branch. foo.c is changed and checked in, so changeset 2 is created in /main/task0142.
Depending on how development proceeds, different items acquire different-looking revision trees. The most obvious difference occurs when one item is modified by a task that creates revisions on a branch, and another item remains unbranched:

Plastic SCM provides powerful tools to visualize how branches, changesets, and revisions relate to each other. The most interesting is the Distributed Branch Explorer, or simply Branch Explorer. Here is how the sample in the figure above looks in the Branch Explorer:
This display doesn't depict the revision trees of all the repository's items, or even the revision tree of any one item. Instead, it shows how the repository's branches are interrelated:
- Branches are normally children of a particular parent branch. This relationship is established when you create a new branch.
- A branch's full name reflects its parentage. For example, the name /main/task0142 indicates that task0142 is a child of main. The name /main/integration/task4543 would indicate that task4543 is a child of integration, which is a child of main. (You might have been wondering why we've been using the spelling "/main" for a repository's original branch. The initial slash serves as a reminder that branches have parent-child relationships.)
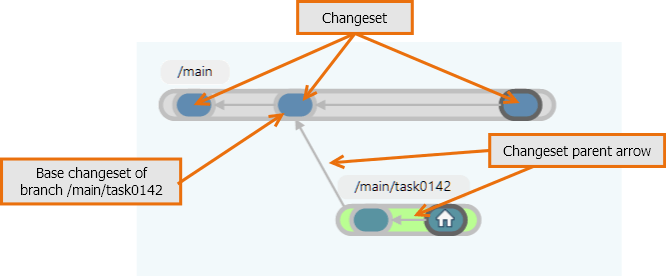
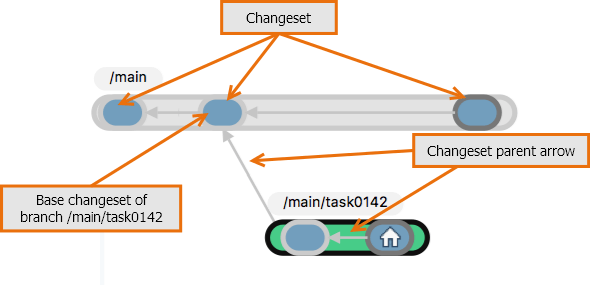
- Changesets inside branches are linked with gray parent arrows to their parent changeset, which can be on the same or a different branch.
- When a new branch is created, its starting changeset is also linked with a parent arrow, even if the branch is empty. This is usually referred as the branch base.
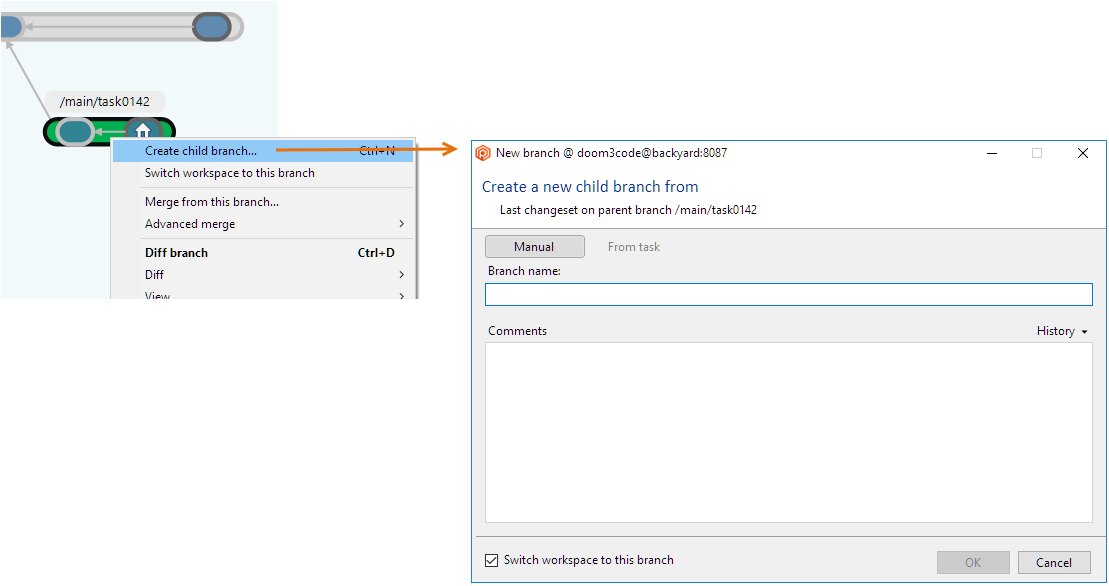
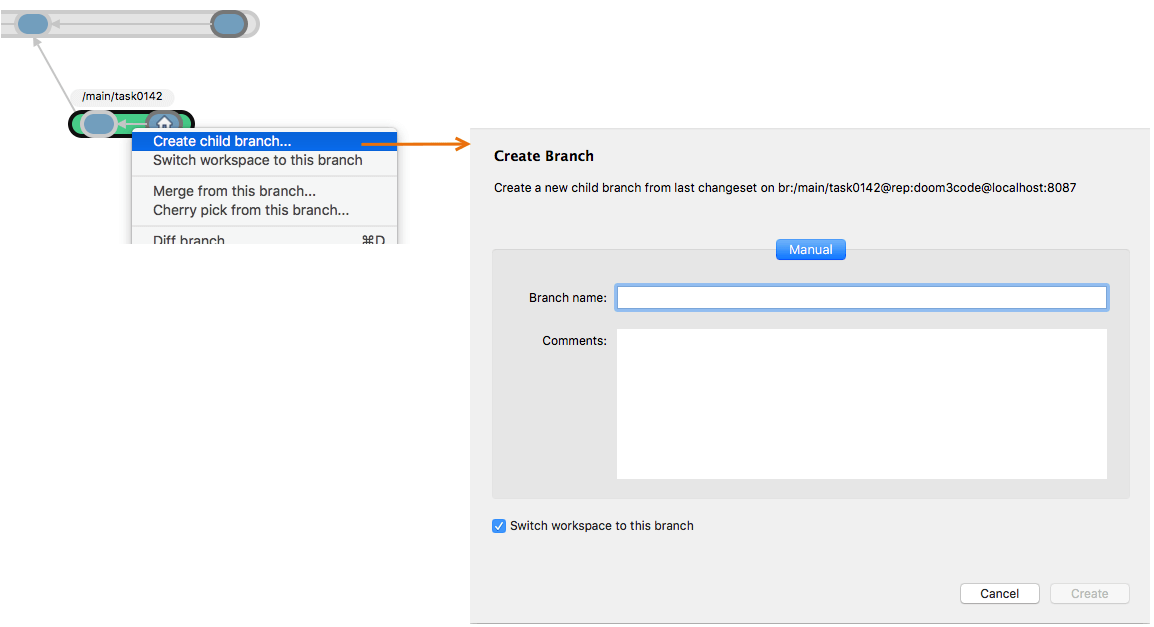
To work on a branch, you first need to create it, either from the Branch Explorer or the Branches view. Right-click a branch and select Create child branch. A simple dialog lets you specify the name of the new branch and some other parameters:
- Branch name - Pretty self-explanatory. Since you are creating a child branch, the full branch name will be /parentBranch/newBranchName.
- Comments - Write any comment you want to associate with the branch. It will appear in the properties of the branch as well as in a column in the branches view.
- Starting point - This is the branch base, where the code will be actually branched:
-
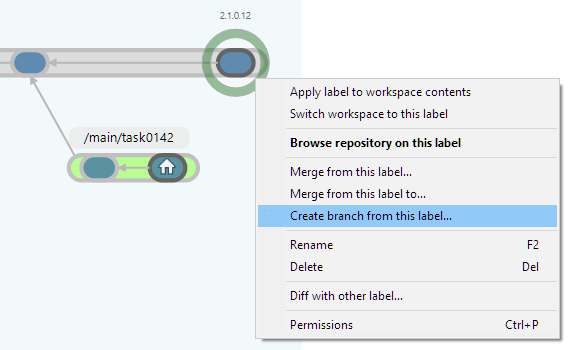
Label - You can choose your branch to start from any label. In the branch-per-task model, you normally create task branches starting from baselines that are set using labels.
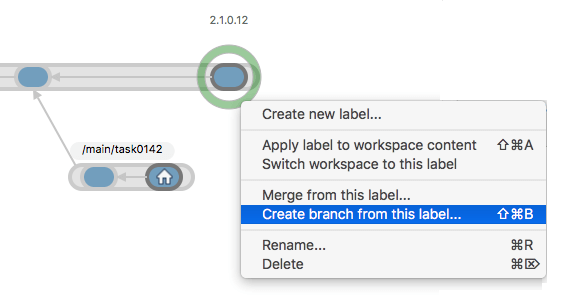
A faster way of creating a branch that uses a label as a starting point is to right-click a label circle in the Branch Explorer and select Create branch from this label. This option is also available in the labels view.
-
Changeset - If you want to branch your code from a changeset because there is no label associated with the point in time you want to branch off, you can also choose a changeset as the base.
Again you can right-click a changeset and select Create branch from this changeset. The Create branch dialog will have the changeset field already filled in for you.
-
Last changeset on parent branch - This option will automatically create the branch starting on the last changeset available on the parent branch.
Note that the starting point is the current last changeset on the branch. If new changesets are created in the parent branch in the future, the starting point of the branch will remain the same changeset (although it is not the last anymore).
When you press the OK button, Plastic SCM will create the new empty branch in the repository with the base that you selected.
If the Switch workspace to this branch checkbox was marked, then the workspace configuration will be changed to use the new branch and the contents updated so that the revisions loaded in the workspace are those indicated by the branch base.
You can see what branch is loaded in the workspace on the top of the GUI window, as depicted in this figure:
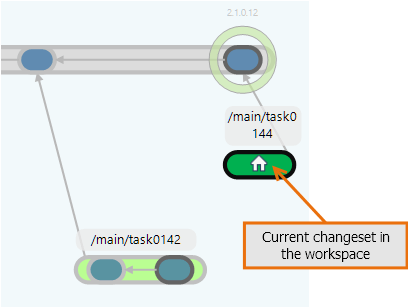
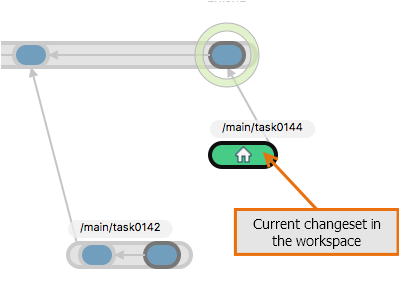
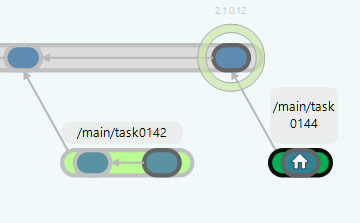
In Plastic SCM, your workspace loads the state of items (revisions) at a specific changeset. When you switch your workspace to a branch, you are telling Plastic SCM that you want to make changes starting on the last changeset in that branch. You can see the current changeset and branch that your workspace is pointing to in the Branch Explorer. It's the one with a small house.
In the picture below you can see too how a new branch looks in the Branch Explorer:
If you switched your workspace to the branch after creating it, you may be wondering why the "home" icon appears on the changeset used as the branch base, instead of the branch itself. The answer is that your workspace always loads the contents of a specific changeset and, since the new branch is actually empty (there are no changesets yet) the changeset loaded in the workspace is still the one you set as the branch base.
As soon as you check in any changes made in the workspace, a new changeset appears in the branch and now the "home" icon is in the changeset inside the branch:
The subsections below describe how work normally proceeds in a parallel development environment: making changes to items, creating new changesets, monitoring your own work, and the work of your colleagues. We'll emphasize the branch-per-task methodology that we consider an SCM best practice. (Actually, the work proceeds in pretty much the same way, no matter what branching strategy you use.)
The Branch Explorer is the essential tool for monitoring ongoing development work. A development manager might live in the Branch Explorer all day long, monitoring development rates (measured by the number of changesets), drilling down to view the contents of individual changesets, viewing the changes in individual items using the Side-by-side Diff Tool, launching new code reviews, and reviewing existing ones. (If these features don't sound familiar, take a look at the preceding chapter!)
A developer can use the Branch Explorer to determine which task to work on. (Need a hint? If Plastic SCM has been integrated with an issue-tracking system [ITS], the Branch Explorer provides a portal to the ITS. See Integrations with Issue Tracking Systems for details.) Joining an existing task is accomplished with a Switch workspace to this branch command. Launching a new task means first creating a new branch and then switching to it, as described above.
Making changes in a parallel development environment is very similar to making changes in a /main branch only environment. In the Workspace Explorer, you can work using either the checkout-modify-checkin or modify-commit methodology.
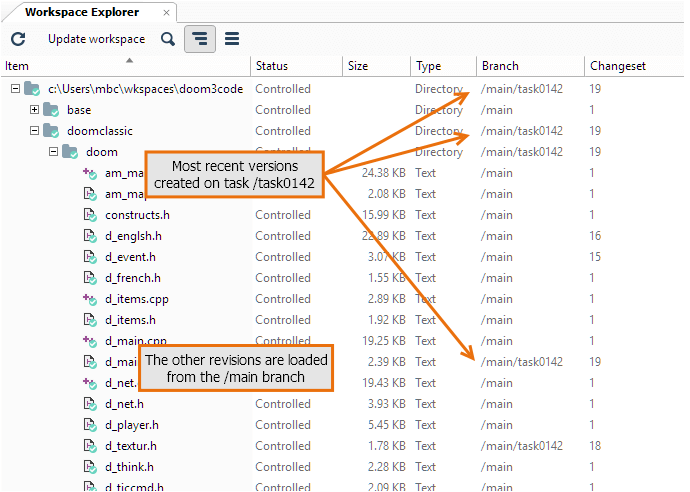
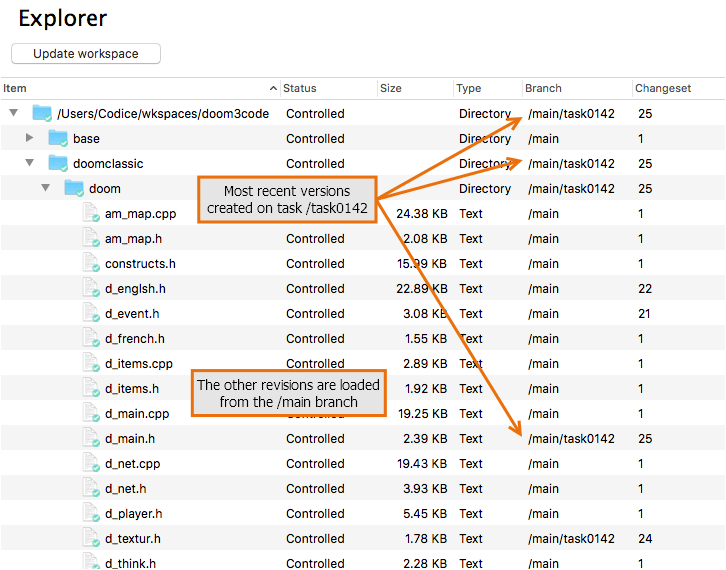
Your workspace's configuration takes care of all the administrative details, as shown here:
For each item, there is a branch and a changeset column, showing the changeset number of the revision currently in the workspace and the branch it belongs to. If you or one of your colleagues made a change in the task, the branch column will show the task branch.
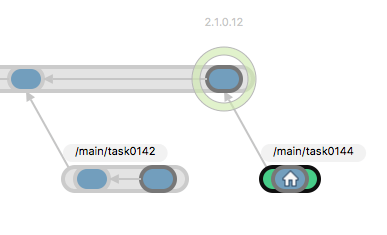
For the items that have not been modified for this task branch, the workspace revisions are on different branches. Only the items that you change have revisions on the branch. The other items are loaded from the parent branch. That is, as they were in the branch base changeset.
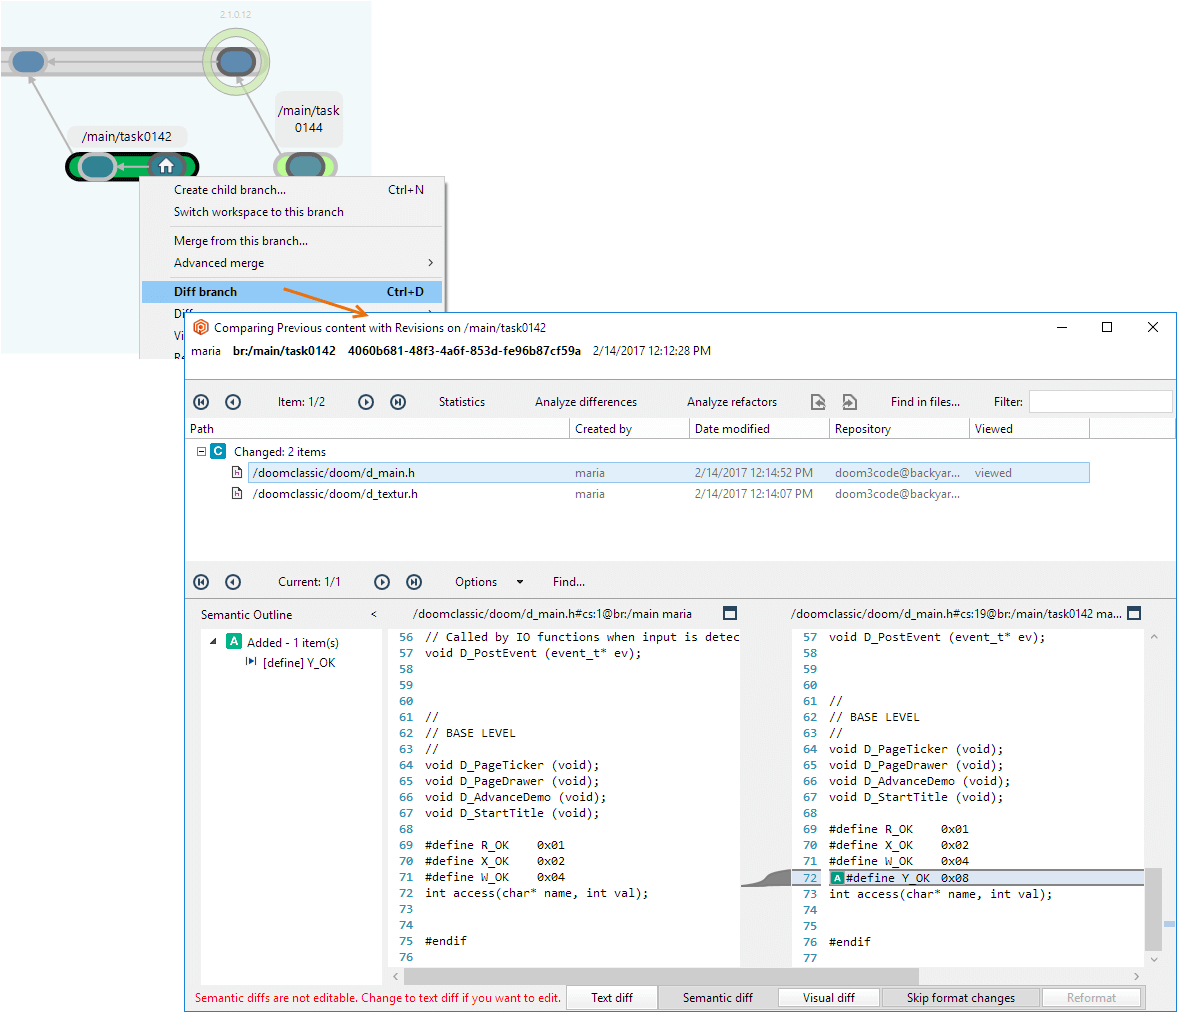
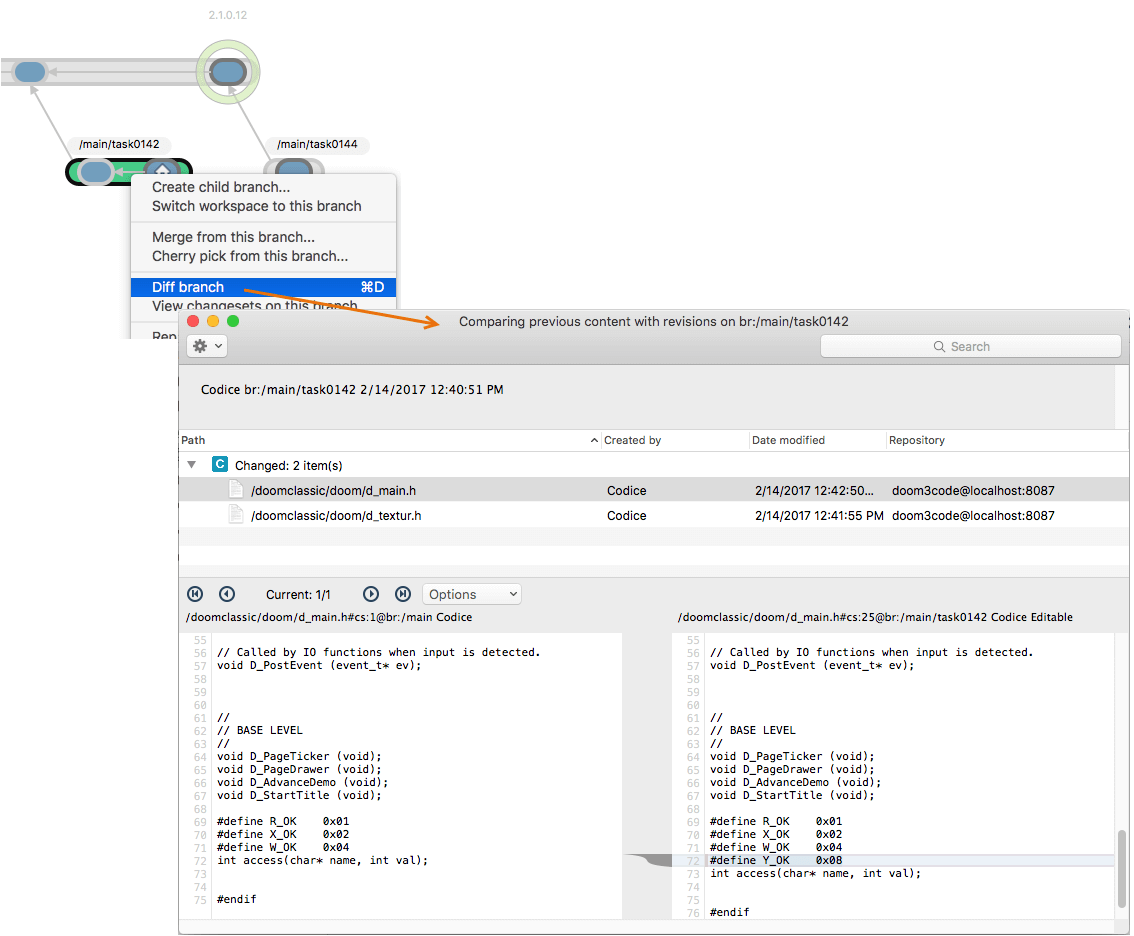
The Workspace Explorer provides item-by-item status of your work. For a higher-level perspective, use the Branch Explorer that shows the complete project evolution. You can drill down to answer the question "What changes have been made for this entire development task?" The beauty of the branch-per-task methodology is that all the changes for a particular development task are localized on the branch. So the question above translates to, "What changes have been made on my task branch?" The answer is provided by the Diff branch command.
For each item modified in any changeset on the task branch, this view compares the last revision on the branch with the revision in the base changeset. Similarly, just as you can create a code review for a changeset (see section Code Reviews for a Changeset) you can create a code review for all the changes made on a branch, using the New code review for this branch command.
New changesets can be added to a branch indefinitely - there's no time limit and no content limit. In the real world (and we highly recommend this be a branch-per-task world) development tasks last just a few days or weeks. This is especially true in agile development environments. At the end of that time, the code is completely written and fully tested, so the feature (or bugfix) is ready to be included in the next internal baseline or public release of the software product. It's an SCM best practice to use the /main branch as an accumulator for all the changes made by such tasks. (Some people think it's an even better SCM practice to use a child branch, such as /main/integration, for this purpose. But we'll keep it simple in this discussion.)
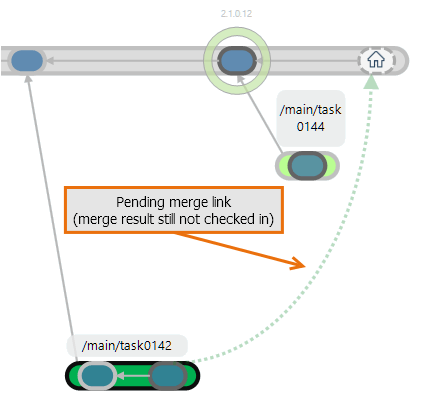
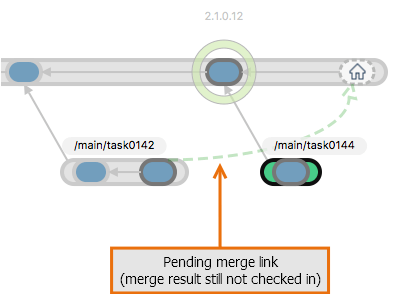
The last baseline was created by attaching a label, say 2.1.0.12, to the most recent changeset on the /main branch. If a development task has made changes to this item, the changes are recorded as new revisions inside changesets on the task branch, say /main/task0142. The changes in the final revision on the task branch need to be merged into the item's /main branch, which may have gotten some new revisions of its own.
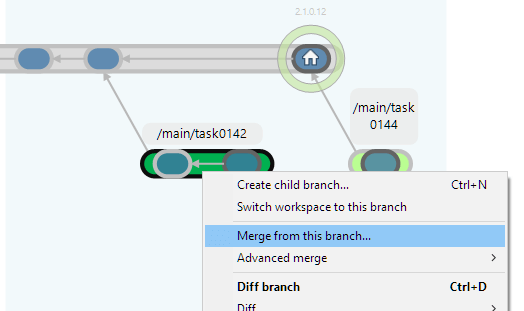
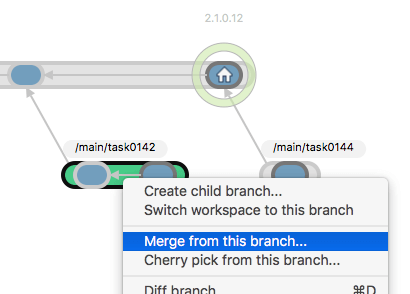
So, how do you merge the changes on branch /main/task0142 with those of branch /main?
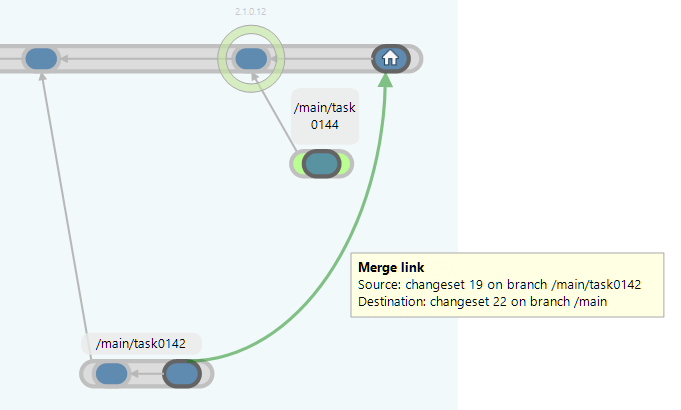
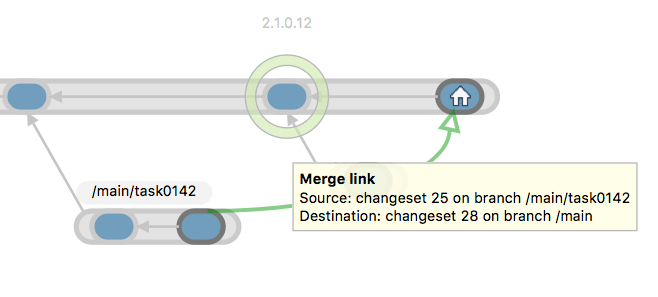
The next figure shows the Branch Explorer after the merge result changes have been checked in. The pending merge dotted green arrow has become a solid green arrow and a new changeset is created.
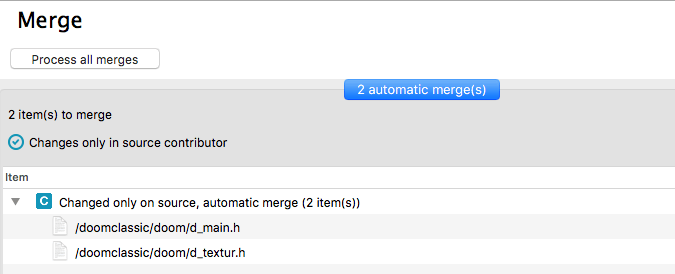
In our little sample, only two files have been changed and there is little action, since the main branch didn't change them. The merge operation was straightforward, simply take the changes on /main/task0142 and get them in /main, no conflicts. But what if one of your colleagues working on task0145 changed some of the files you changed too?
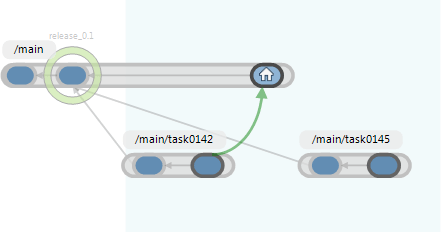
Now, let's merge the branch /main/task0145 to see what happens when two developers changed the same file and the same piece of code.

In this case, there is a new type of change. The file "Form1.Designer.cs" has been changed on both the source and the destination and Plastic SCM points out that it might need to be reviewed manually. Being a text file, this one will be processed in the 3-way Merge tool to merge the changes and let you solve any conflicts that aren't automatically resolved. First, there is an important concept that needs to be described better: the common ancestor.
Every SCM system that supports branching has a tool that enables the changes on two branches to be merged. In Plastic SCM, the merge algorithm looks like this:
- To simplify matters, the algorithm pays attention only to the last changesets on each branch. These changesets are considered to be the cumulative sum of the changes made on their respective branches. These inputs are called the contributors to the merge.
- For each item changed between the base and the contributors, the revisions on each contributor are evaluated to check what kind of merge they need. For each item processed, the output of the merge operation is a file called the merge result.
- Text files are partitioned into text blocks - with a minimum size of one text line - in which they are judged to be the same or different. Many algorithms provide some flexibility as to the meaning of same. Plastic SCM's algorithm provides choices as to how whitespace and line-endings are handled.
For older 2-way algorithms, the automation stops right there, since there is no way to tell which contributor is "right" and which is "wrong". Typically, the merge program simply places both blocks in the merge result file, marking the text lines to show their contributor-of-origin.
Most modern SCM systems, including Plastic SCM, use a 3-way merge algorithm. In addition to the two contributor revisions, this algorithm considers the contributors' common ancestor. Determining the common ancestor is conceptually simple. In Plastic SCM terms, just follow the predecessor-successor links in the changeset tree back in time until you get a collision:
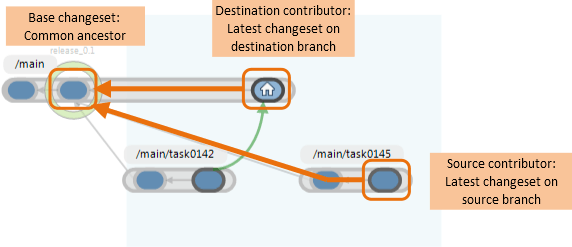
(Actually, there's a more sophisticated way to determine the common ancestor, which takes into account previous merges of this item's revisions.)
How does the 3-way merge algorithm use the common ancestor revision? By changing the way the contributors are partitioned into text blocks:
- Instead of considering how the contributors (call them C1 and C2) differ from each other, the algorithm considers how each of C1 and C2 or differs from the common ancestor (call it A). That is, the text blocks are viewed as changes in content from the common "base" content. There are four cases:
- Text blocks in which only C1 differs from A.
- Text blocks in which only C2 differs from A.
- Text blocks in which both C1 and C2 differ from A, both in the same way.
- Text blocks in which both C1 and C2 differ from A, but not in the same way.
Here's the "highly automated" part: the first three cases are judged to be unambiguous changes from the common ancestor, and so the change automatically goes into the merge result. (Maybe "uncontested changes" would be a better term.) In the fourth and final case, C1 and C2 are termed to have conflicting changes, or more simply, a non-automatic conflict. Human intervention (that would be you) is required to resolve the conflict and determine exactly what goes into the merge result.
When all the dust has settled, the merge result is ready to be checked in as a successor revision to either of the contributors.
Back to our sample, we were about to merge the "Form1.Designer.cs" file found in this figure. The 3-way Merge tool doesn't care which branches the two contributors and the common ancestor come from. In fact, it doesn't know about branches at all, but simply processes three input files. The 3-way Merge tool does know about the development environment, and it observes the SCM best practice that merging should be a "pull" of changes into your own workspace, not a "push" of changes to some other workspace. (Among other things, that's just good manners!) In essence, the 3-way Merge tool is a fancy text editor. It starts with an existing revision on the workspace's branch, performs a Checkout, and replaces it with the merge result file.
Accordingly, the 3-way Merge tool uses an already known terminology to refer to the contributors:
- The contributor on the workspace's branch (the "merge to" branch) is called the destination.
- The contributor on the other "merge from" branch is called the source.
- The common ancestor, the common version from which both contributors started, is called the base.
The 3-way Merge tool has its own window, showing the source, base, and destination revisions in side-by-side resizable panels, and the merge result in another panel at the bottom:
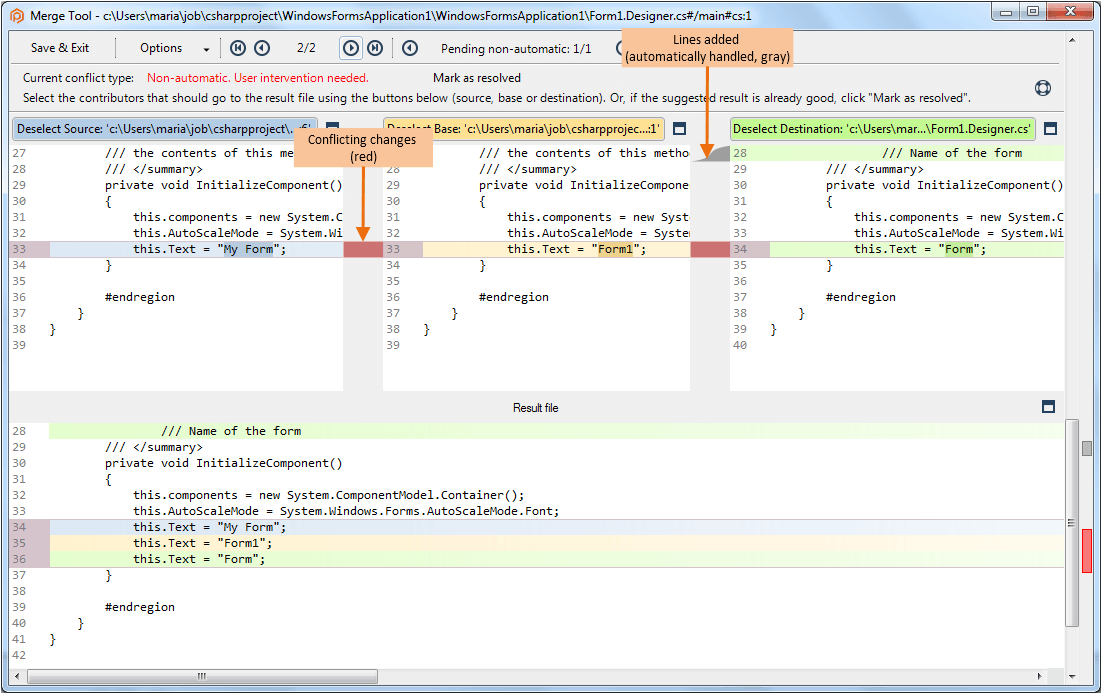
You can browse through all the change blocks, which most people do when first using the tool (that is, when they don't yet trust it). After a while, you'll skip the automatically-handled changes and just visit the conflict text blocks, which require your attention. In deciding what text should go into the merge result, you can use the content from one, two, or all three of the inputs. And you can manually edit the text, to get precisely the result you want.
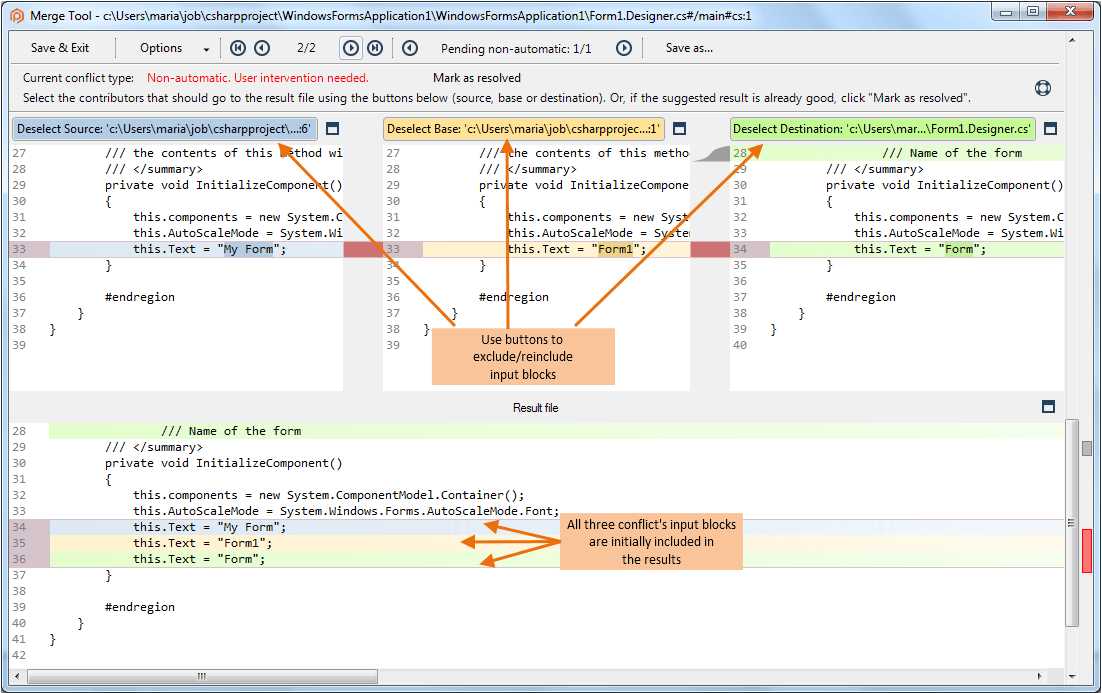
The process of merging files repeats until there are no more conflicts left. When you see that the Merge view is empty, the merge is complete and the items are left checked out in the workspace waiting to be checked in. This is the perfect time to validate the result of the merge by building your source code and running some tests to verify that the last integrated task didn't break anything.
Once everything has been validated, it's time to check in your code using the Pending Changes view and finish the integration of the branch.
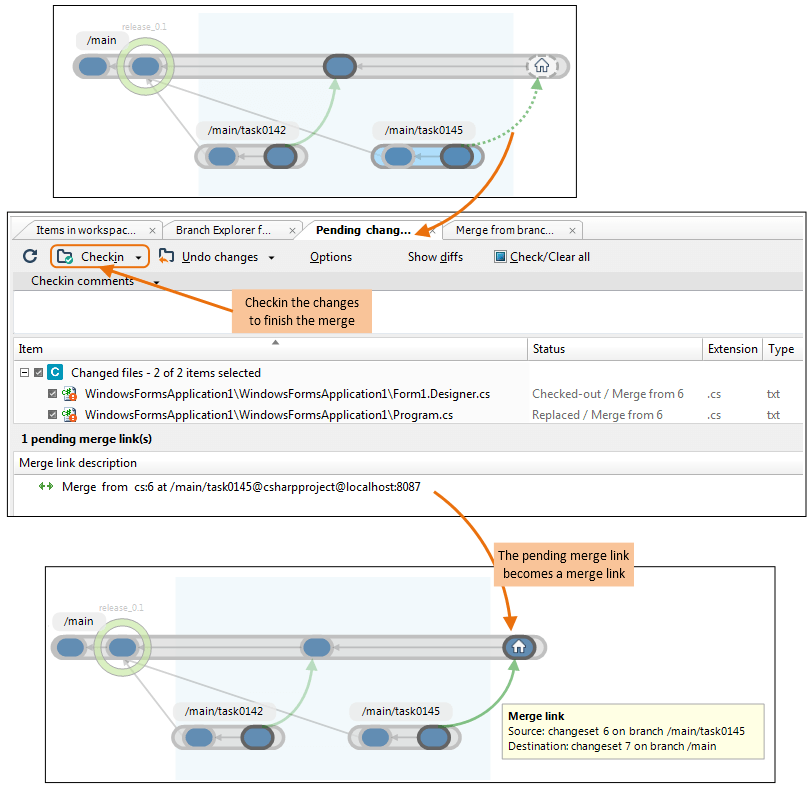
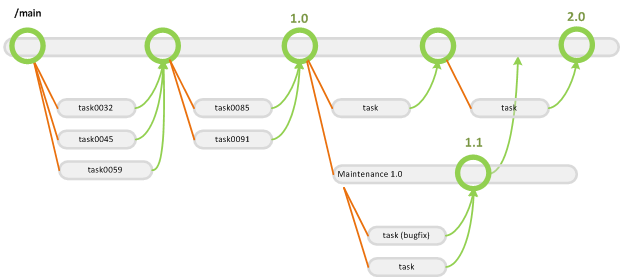
In the branch-per-task model, there is one last step once you have finished integrating the task branches: Labeling the new state so that it can be used as the baseline for the next development cycle.
The pattern is repeated release after release, adding new functionality or bugfixes to the releases until the project is ready to ship. Actually, that special "1.0" release will be just another label for Plastic SCM. Later, you'll probably want to create another branch for the maintenance of 1.0 where you can also apply a branch-per-task pattern. That branch will run in parallel with the new functionality development of version 2.0 of your project.
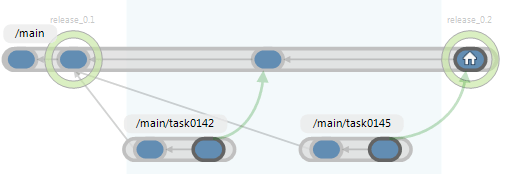
When first introducing the notion of common ancestor, we mentioned that the obvious way to determine two changesets' common ancestor is not the only way. Now, let's clear up all the mystery, by exploring a scenario (a common one) that takes advantage of a more sophisticated common-ancestor analysis.
This figure shows the standard "merge from a task branch to its parent" situation, but with a twist: you thought your task was finished, but it wasn't! (Perhaps a newly written unit test flushed out a nasty bug.) So you go back to work, using the same branch. After some time passes, you're finished (again) and ready to merge (again). At this point, the item's revision tree might look like this:
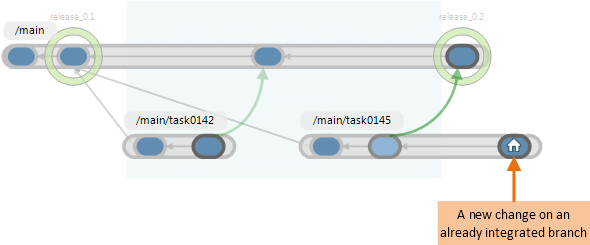
When the 3-way Merge tool processes this item, it could determine that the same labeled baseline revision is the common ancestor of the two new contributors. This would mean that the 3-way Merge tool must do a lot of the same work in this second merge as it did in the first merge. Sure, most of it is automatic, but if there were any conflicts requiring manual intervention in the first merge, you'll have to resolve them manually again the second time around, and that's just plain irritating.
Our Merge system is smarter than that. It knows that in a text-merging context, a merge link in a revision tree is equivalent to a predecessor-successor link. Using this knowledge, it finds a much closer common ancestor for the second merge:
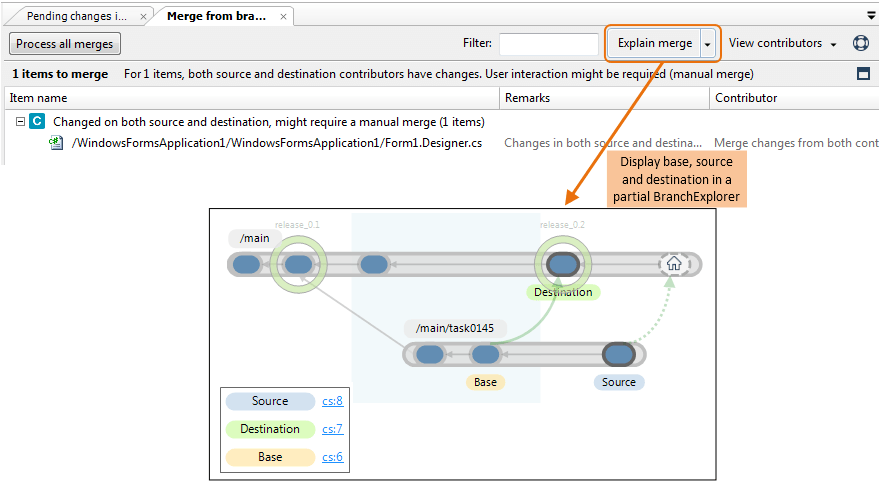
You can always see the selected contributors and bases in merge operations by clicking the View contributors button in the top right of the Merge branch view.
All this SCM wizardry has a very practical, very beneficial effect: During the second merge, the 3-way Merge tool doesn't have to repeat all its previous work and you don't have to redo manual conflict resolutions from the first merge. With Plastic SCM, you never have to perform the same merge work twice! Hallelujah!
Using the 3-way Merge tool's terminology, we can say that a different base revision is identified for use in the second merge. Or this: the first merge rebases the item's task branch, with respect to future merges to the parent branch. And that provides a transition to the next section.
Working on the same branch
Let's describe now a different scenario, where you and your teammates work on the same branch. What happens if they make changes on the same branch as you? A situation like this:
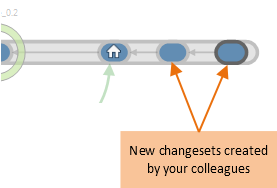
When you try to check in, a window will appear (see the next figure) saying that somebody created new changesets on the branch you are working on, so you can decide how to deal with this situation.
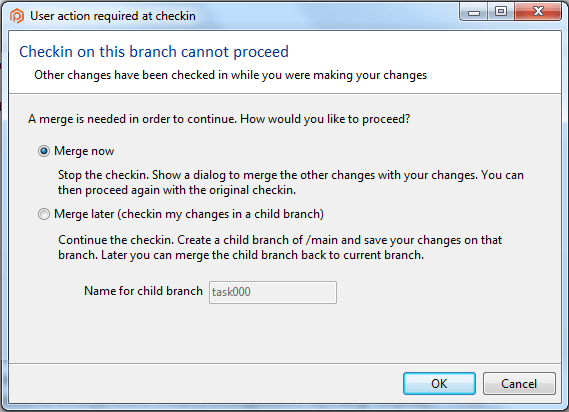
You can do one of two things:
- Merge now: Merge your changes together with the latest changes from your colleagues, and check in the result at the end of the branch as a new changeset.
- Merge later: A new branch is created starting on the current changeset loaded in the workspace, your workspace switched to it and your changes are checked in there. This way, they can be merged later.
Problems solved with the branch per task approach
If you recall the beginning of the chapter, we mentioned several problems related to the way branches are used. Let's have a look at those issues again and see how they are handled using the two approaches that we have seen.
- Developers don't want to check in a change that breaks the build and have their colleagues affected by it.
- If everyone works on the same branch, this will happen often, since by definition everybody will publish their changes to a single line.
- However, using a branch for each task, the changes for each task are isolated on their own branch and the other developers are not affected by any issue that the task introduces. At integration time, tasks are integrated in a controlled way and any faults can be fixed, either right at integration time or by undoing the merge for the task and having the responsible developer look at it again.
- Developers want to check in often, even changes that are not fully finished, so they can rollback as needed, but they want to avoid disturbing other developers with unfinished stuff.
- Using a single branch for everyone makes the version control system a way to publish changes, so changes are only checked in when they are ready. Meanwhile, they stay on the developer's machines.
- Using branch per task, developers can check in to their own branches as often as desired, since unfinished changes are again isolated on the branch and not seen by others.
- They also want to avoid having a full week of work only in their local hard disks. It's safer to check in often so the work is safe on the fully backed-up server.
- As soon as changes are checked in to the task branch, they are saved in the server's database. Since checking in on a task branch doesn't affect other developers, you can do it as often as you want and your changes are safely backed up in the server.
- When combining changes from other developers, they want to avoid solving a merge conflict they already solved the last time they merged.
- Plastic SCM merge tracking fully addresses this issue, as described in the section called Merging from the Same Branch Again.
Continuous Integration tools have been in place for years to detect a broken build as soon as it happens. They let developers know that the mainline's current status is broken and they should not use it for the time being. While this mitigates the risk of being affected by a broken build, it's a reactive approach. A better and more proactive solution is not letting the problem happen in the first place. (Imagine that!) Using the branch-per-task pattern, changes made by one developer are isolated from other developers and later merged together in a controlled integration. Since developers always start their tasks from stable baselines that are guaranteed to build and pass tests in green, broken builds affecting the team are totally avoided.
Other advantages of the branch-per-task methodology are detailed here:
- Changes for a specific task are easy to compare, integrate, and disintegrate.
- Furthermore, deciding what tasks form the next project release occurs in a controlled way. The tasks are implemented with a stable starting point and stay on their branch. When the time comes to create the next stable starting point, the integrator decides what tasks to integrate and builds the next release by picking exactly the needed tasks in a controlled way. Developers are not affected by the integration, because they start their branches on the latest stable release.
- This cycle of stable baselines with tasks fits very well with agile methodologies, where the products of the short iterative sprints are normally stable releases made of a series of completed tasks.
Sometimes you'll be working on a branch and for some reason you need to get the latest changes from the parent branch. This can be the case when you are working on a task branch that is taking some time and a new stable baseline has been created since you started. You may want to rebase your branch to the latest stable baseline.
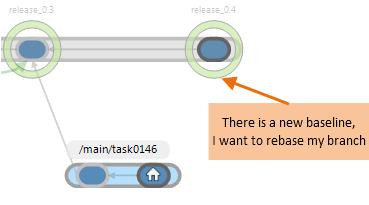
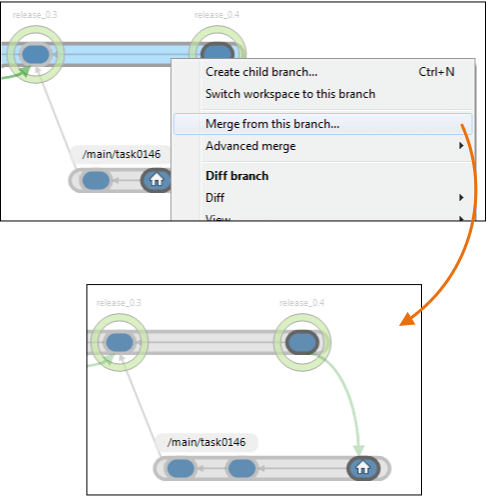
Rebasing means getting the latest changes from the parent branch. In the sample shown in the previous figure, you are working on your task branch (/main/task0146) and a new stable release (release_0.4) appears on the /main branch, so you want to get those changes on /main/task0146. Doing so is pretty straightforward. You just merge from the /main branch:
Chapter 4: Distributed Development with Plastic SCM
In these days of instantaneous global communications, it's common for development teams to be split among multiple offices, multiple countries, and even multiple continents. Even if a team is co-located in a single office, high-speed Internet connectivity lures more and more developers into working from home. (Especially on days with lousy weather!)
This chapter introduces Plastic SCM's support for distributed development, emphasizing (as always) its flexibility. Plastic SCM has a client-server architecture, but that doesn't box it into a corner (think: monolithic, centralized, slow-moving). Instead, the architecture's implementation is flexible enough to support both completely centralized development and completely distributed, independent development - and points in between, too.
All Plastic SCM servers can exchange development data with each other, to keep a distributed development team working smoothly.
Distributed Development Scenarios
This section surveys several development models, from "not at all distributed" to "completely distributed". Each invocation of the Plastic SCM installer that chooses to install the server software creates a server installation - or, to use the standard term, a Plastic SCM site. Each site can accommodate any number of repositories, all managed by a single repository server process (which is typically implemented as a single operating system process).
The term "site" usually connotes a geographical location, but not necessarily in this context. A single machine might host multiple Plastic SCM sites, with each repository server accepting requests from clients on a different network port.
This traditional client-server model applies to many development organizations. Any number of developers, each using Plastic SCM client software, can access the source base at a single site. Connectivity can be provided through a local-area network, a wide-area-network, or even dial-up phone lines.
In this single-site scenario, no replication of the source base occurs.
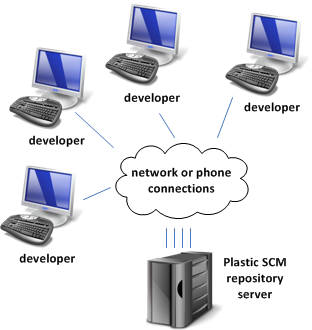
This model makes sense for a development organization that is split into a number of subgroups. Typically, the subgroups are dispersed geographically, but there might be other reasons for creating them, like if there are security issues or performance issues when too large a group hits a single server machine. Each subgroup uses a different Plastic SCM site. Since the subgroups are working on a single project, or on related projects, some or all of the repositories exist at multiple sites. Source-controlled data is periodically replicated (copied) from site to site, so that the subgroups can use each other's work. Replication also includes metadata related to the source data, such as labels, merge links, and access-control settings (see below).
Plastic SCM's replication scheme is designed for efficiency. Each server installation can get just enough source data to meet the needs of its developer subgroup. The unit of replication is the branch, not the entire repository, as with Git and Mercurial.
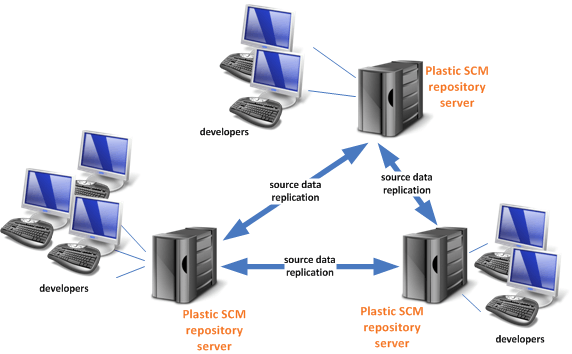
It makes sense to distinguish two multi-site development methodologies, because they are handled differently by Plastic SCM:
- Restricted branch development - A branch can be developed at only one site at a time. For example, if one site's developers are working on branch /main, then all other sites are forbidden to work on that branch. In some SCM systems, such as ClearCase, the lucky site is termed the "master" of the branch.
- Unrestricted branch development - All branches are always open for business at all sites. Each site's changes for branch /main are kept separate (placed on a sub-branch) when source data is replicated from site to site. Eventually, the separate changes can be integrated with each other, using standard branch-to-branch merge techniques.
The restricted methodology is easy to implement using Plastic SCM's access control lists (ACLs), which are included in the metadata that accompanies the source data during a replication operation. The unrestricted methodology uses Plastic SCM's already well-established (see the preceding chapter) branch-and-merge capabilities. For more on how these methodologies work at the ground level, see How Items Evolve in a Distributed Environment.
In this model, each developer installs both the Plastic SCM client software and the Plastic SCM server software on his machine. For day-to-day work, the developer uses the local repositories at his own personal site - no network connectivity needed! Developers can push and pull changes from each other's sites, much as they would with Git or Mercurial. In fact, using this peer-to-peer model feels very much like those "repository-less" DVCSs, because the default database used by the Plastic SCM repository server in such installations is lightweight, completely embedded, and maintenance-free.
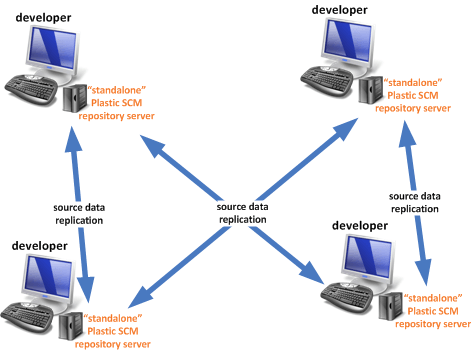
Groups of developers using the peer-to-peer model tend to be loosely (often, very loosely) organized. Think open-source development. Almost certainly, the unrestricted development methodology described above will be in effect, giving each developer maximum flexibility in choosing what to work on.
The models in the preceding sections are not mutually exclusive. It takes just a few seconds to redirect the Plastic SCM client software from one repository server to another. A developer might work unplugged from the department's site for long periods of time (while working at a customer location, while on pseudo-vacation) using the site on his or her own machine during that time. When that person returns from their trip, they can reconnect to the department's site and push all their changes back to the central repository.
Replication and Authentication
It would be foolhardy for any networked application to accept incoming data from an unidentified sender. With Plastic SCM, all replication operations between two sites are initiated by a user identity, which is authenticated at both sites.
Plastic SCM allows repository servers to use a variety of user-authentication schemes. If both the repository servers involved in a replication data transfer use the same user database, authentication is easy as pie; a valid user at one site is automatically valid at the other site. There are plenty of more difficult cases to consider, given all the supported authentication schemes. Plastic SCM covers them all, providing enough command-line options and configuration files to clear all authentication hurdles. You may want to check the Distributed version control guide for more details about this setup.
How Items Evolve in a Distributed Environment
This section examines how source-data replication, the essential core of distributed development, works at the individual item level. We cover both of the cases described in the section titled Multi-Site Development.
Plastic SCM aspires to make parallel development across sites just as easy as parallel development across branches. The scenario begins with both sites synchronized. Changeset #1 is the most recent on the branch. Then, as shown in the next figure:
- Development takes place concurrently at both sites:
- at site A, a developer creates changesets /main #2 and /main #3.
- at site B, a developer creates changesets /main #2 through /main #4.
- The three new changesets are replicated from site B to site A. To prevent a "collision" from occurring at revision /main #2, the incoming revisions are placed on the branch, but a multi-headed branch is created.
- The developer at site A performs a merge from the multi-headed changeset - perhaps immediately, but there's no rush - combining the changes on the various heads on the /main branch to get a new unified head.
Practically the only difference between "working on a branch" and "working at another site" is the need to initiate replication operations to send or retrieve source data. As usual, Plastic SCM provides a simple-to-use graphical interface. The section titled Replication in Practice goes through the replication GUI and highlights how to merge together the multiple heads of the branch.
In the preceding section's example, changeset #2 on the /main branch was created concurrently at two different sites. The two changesets have different contents (presumably), which means that /main#2 is not in all cases a global changeset identifier, unique across the entire distributed development environment.
Some SCM systems consider the lack of global uniqueness to be a bad thing, and so they forbid it, leading to restrictions and administrative overhead, such as "mastership" of branches. Plastic SCM makes a tradeoff: Dispense with a guarantee that changeset identifiers are globally unique, and get a distributed development system that is more powerful and just as easy to use. Internally, all the objects in the Plastic SCM repository have a Globally Unique Identifier (or GUID) that is used to really identify the objects when performing replications. That's the reason why if you create a new branch with the same name on different repositories and later on you replicate them, they are actually different branches.
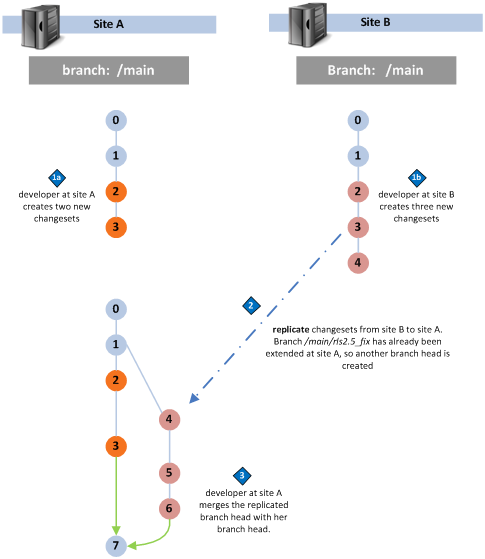
The figure below shows how it looks in the Branch Explorer:

Restrictions often make life simpler, if not more enjoyable. In a distributed development environment where only one site at a time can develop a branch, replicating revisions is straightforward. The next figure shows how a branch /main (but it could be any branch) might evolve at two sites. The scenario begins with the sites synchronized. At both sites, the item's repository has revision #1 as the most recent revision on the branch. At this point, site A has mastership of the /main branch. Development proceeds as follows:
- At site A, a developer creates changesets /main #2 and /main #3.
- The two new changesets are replicated from site A to site B. (The operation can be either a push initiated at site A, or a pull initiated at site B.) The two new changesets are added to the item's revision tree in the site B repository, enabling developers there to use them.
- Mastership of branch /main is transferred, so that developers at site B can now modify this branch.
- At site B, a developer creates changeset /main #4.
- The new changeset is replicated from site B to site A (again, either a push or a pull). New changeset /main #4 is added to the site A repository, enabling developers there to use it.
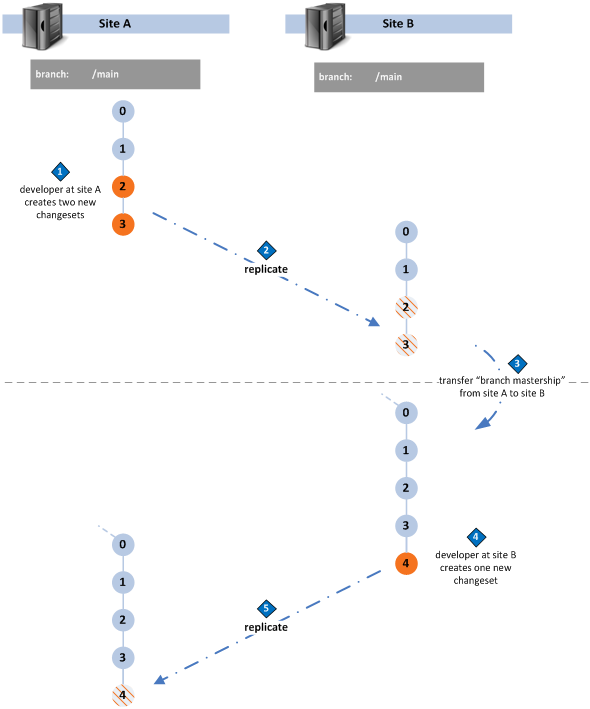
Since there is never any contention for the next spot on the branch, any number of sites can take turns extending it.
Replication in Practice
The Plastic SCM replication scheme is designed to be practical and efficient. It does not attempt to make the copies of a repository at several different sites into exact replicas of each other, because there's no practical need for that. And it doesn't clone entire repositories, because there might not be a need for all the source data at a new site.
The unit of replication for Plastic SCM is the branch. In a distributed environment using the branch-per-task methodology, it's particularly easy to set up different sites with just the necessary source data, and nothing more.
The Branch Explorer, the launch pad for so many of the parallel development operations described in the preceding chapter, provides replication commands, as well.
To run a typical replication operation, you just fill in a few fields in a dialog box, and then click the Replicate button:
There's an attractive progress display for the replication operation. Once finished, a summary window is displayed. Now the Branch Explorer shows the replicated data.
In the next figure, the branch was replicated to the remote site when it was on changeset 7. Then you made some changes and the folks at the remote side made changes as well. When you pull the branch from the remote server, you get a multi-headed branch:
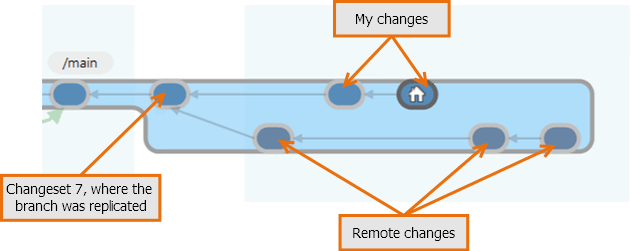
A multi-headed branch is like a branch inside a branch. Now, to reconcile your changes together with those made in the remote server, you just need to merge from the last changeset:
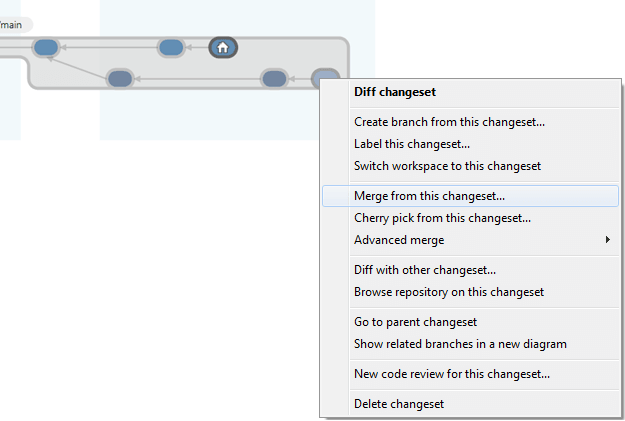
This will show a regular 3-way Merge window, with the changed files from the 3 changesets that came from the remote site. This is a normal merge, pretty much like the one that happens when you merge a branch. You can process all the merge items and once you check in, you'll see something like this:

Now your changes are merged with those of the remote site. Optionally, now you can push the branch to the remote server. This will replicate the new changeset you just created to merge everything together and the branches will then be synchronized on both sides.
For maximum flexibility, Plastic SCM supports both online (immediate) transfer of replicated data between sites and offline (deferred) data transfer:
- Online transfers - When you initiate a replication operation, the data is sent to or from the remote site immediately.
- Offline transfers - When you initiate a replication operation, the data is placed in a replication package file. It is your responsibility to see that the file is transferred between the sites. At the destination site, an Import replication package command incorporates the replication data into the local copy of the repository.
Chapter 5: Interfaces, Integrations, Extensibility
(How many buzzwords can you cram into a chapter title?) The purpose of this final chapter is to show that Plastic SCM does not live in its own little world, but plays well with others.
"Others" includes you, the human user, so we'll discuss Plastic SCM's own graphical and command-line interfaces. Humans tend to never be satisfied with what they already have (the grass is always greener!) so we'll discuss Plastic SCM's facilities for extending its functionality.
"Others" also includes the vast landscape of software development tools, so we'll discuss how Plastic SCM works with issue-tracking systems and with integrated development environments.
The Graphical User Interface
Some SCM tools are targeted at the back-room guys who still secretly prefer character displays ("green screens") to bitmap displays. Plastic SCM is different; it has been designed from the ground up as a graphical user interface (GUI) product. You can perform virtually all your day-to-day work in a single, well-organized GUI window.
These days, most development is fast-paced, requiring developers to be agile. While everyone agrees that continual context-switching is easy for computers but hard for humans, it's just a fact of life. A developer is likely to be juggling multiple projects, which translates to multiple repositories and workspaces. Accordingly, the GUI makes them top-level items - literally. At the very top of the window are buttons that provide access to the available repositories and workspaces. To support fast context switching, the developer's own workspaces are organized as a set of tabs just below those buttons - clicking a tab instantly makes it the active workspace, restoring its entire work context from the last time you used it. Below the set of workspace tabs is an information bar for the active workspace.
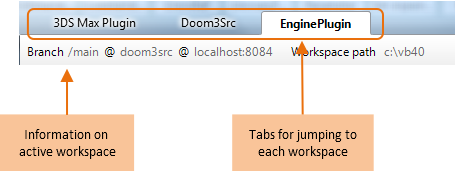
The main portion of the GUI window is a region that displays the active workspace's work context. It can include any number of sub-windows, called views, organized in tabs. These views are opened using the launch buttons on the left.
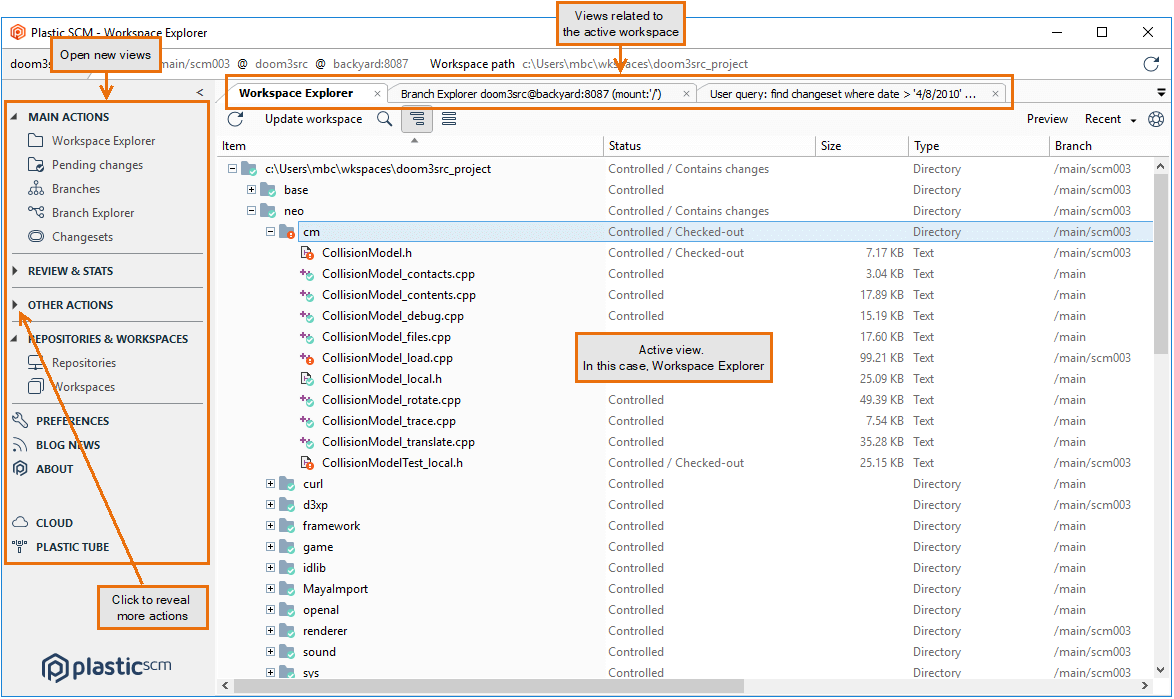
The launch buttons are grouped in categories that can be expanded by clicking on them.
The list of views can get as long as you wish, often reflecting your "drilling down" into your data. You might start with a list of all repositories, open a Branch Explorer view for one repository to get an overview of the repository's branches, drill down into one of the branch's changesets to see the individual revisions, and compare one of those revisions with its predecessor. As you complete your work in each view, you close it, thus popping it off the top of the ordered list of views.
(Several views, such as the Code review and the Revision tree, open in completely independent windows, rather than in the active workspace's work context.)
The preceding chapters have presented many examples showing the GUI's views. In this section, we provide quick description of the views available through the launch buttons on the left of the work context area. For further details on these views, see the PLASTIC SCM GUI GUIDE.
- Main Actions
- Items - A Windows Explorer-like display of the workspace's contents. This includes revisions downloaded from the repository and private objects not under source control. The display includes columns that display an object's status (for example, Checked out), its changeset number, and the repository it belongs to.
- Pending changes - A table that lists the items that have been modified in this workspace and/or private objects that are candidates for placing under source control.
- Branches - A table that lists the branches in the workspace's repository.
- Branch Explorer - A graphical display of the branches in the workspace's repository, showing their hierarchical relationships.
- Changesets - A table that shows the revisions created by a particular Checkin.
- Review and stats
- Code reviews - A listing of all the code reviews created for branches and/or changesets.
- Change statistics - Bar charts that analyze sets of revisions in the repository, showing how much they differ from their predecessors (number of change blocks) and who made those changes.
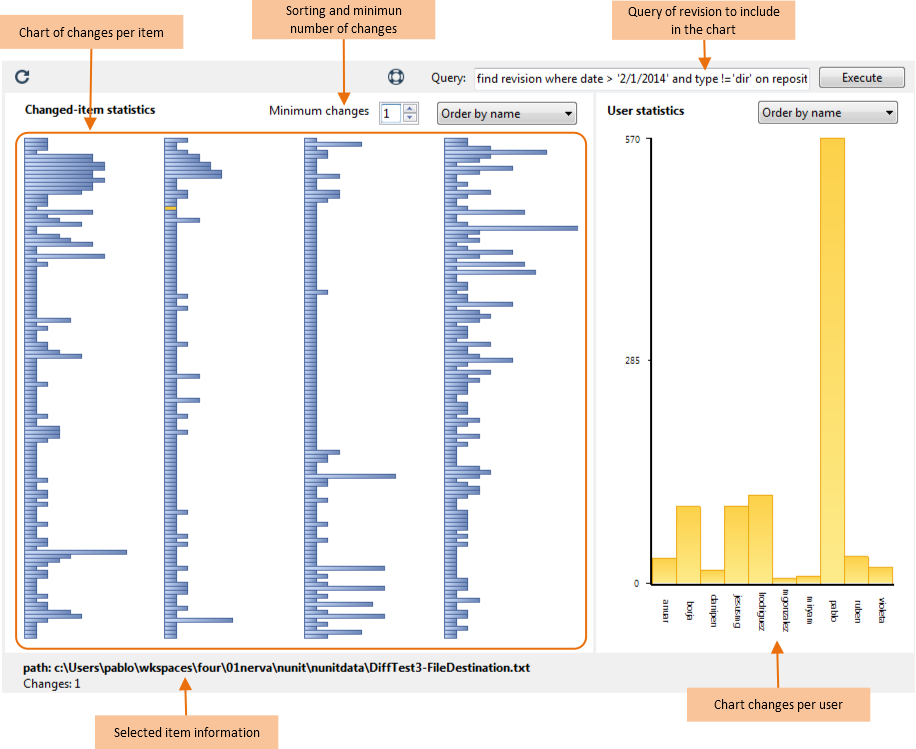
- Other actions
- Labels - A table that lists the labels defined in the workspace's repository.
- Attributes - A table that lists the attributes defined in the workspace's repository. See Placing Attributes on Repository Objects.
- Shelves - A table that lists all the shelves (changes) saved locally in the workspace.
- Sync replication - A view that lets you automate the synchronization of all the changes that happened between different repositories or servers using replication.
In the above descriptions, it's actually more precise to say "repositories" instead of "repository". Way back in the first chapter, we mentioned that you can assemble any number of repositories together into the desired tree structure. This is achieved at the workspace level, by using Xlinks, a powerful feature to use components in your workspace. For more details about Xlinks, see the PLASTIC SCM XLINKS GUIDE.
Some of the views listed above contain a table produced by a simple query in Plastic SCM's SQL-like query language. For example, the Labels view is, by default, produced by this query:
cm find labels
We say "by default", because you can customize the query using the view's Advanced mode. In the example below, the new query locates all labels whose names begin with RELEASE_.

In this particular case, you probably didn't need to use Advanced mode at all. Typing a character string in the view's Filter field restricts the display to rows containing that character string (anywhere, not just in the Name field). You can even use the query and filter facilities together - the query is executed first, then the filter is applied to the query results. The contents of the view can be easily exported to a file using the Export view data button.
For more on Plastic SCM's query facilities, see Advanced Reporting with Queries.
The Command Line Interface
Plastic SCM has a complete command-line interface (CLI), implemented as a single program named cm ("configuration management"). With more than 90 commands, the CLI enables you to accomplish all the same work as with the GUI - either more slowly (if you're sitting at the computer) or more quickly (if you've written a script to do the work).
Each CLI command has two names: an official spelled-out one (such as switchtobranch) and an abbreviated form (stb). We suggest using the official names in scripts, to make them more self-documenting and using the abbreviated names at the keyboard, to avoid cramping.
For the most part, the CLI commands use long, double-dash option names:
cm checkin --symlink
...but certain "traditional CLI" options have their old single-dash names:
cm add -R
For quick help on a command, use the --usage option:
cm checkin --usage
For complete help on a command, use the --help option:
cm checkin --help
As you'd expect, the CLI allows you to use simple filenames and long pathnames to identify file system objects. But a repository also contains many other kinds of objects with names: branches, labels, and so on. In many cases, the CLI can use context to determine the kind of object specified by name. In this command...
cm label BUILD431 c:\myworkspace
...it's clear that BUILD431 refers to a label object. But in other cases, an object prefix is required to prevent ambiguity. For example, the CLI has a command named getfile that displays the contents of particular revision. You can specify a revision with a changeset identifier:
cm type myfile.txt#cs:34523
...or with a label:
cm cat myfile.txt#lb:RLS3.5
The object prefix cs: indicates that a changeset number follows; the object prefix lb: indicates that a label name follows. See the sections on Placing Attributes on Repository Objects and Advanced Reporting with Queries for other situations that call for object prefixes.
One of the CLI's coolest features is its command output formatting capability. Here's an example of the default output format of the dir command (sure, Linux people, you can use ls instead):
> cm dir
12/12/2011 19:10 dir br:/main#13 .
855 22/11/2011 15:32 txt br:/main#1 Common.props
564 22/11/2011 15:32 txt br:/main#1 Curl.props
1198 22/11/2011 15:32 txt br:/main#1 Debug.props
509 22/11/2011 15:32 txt br:/main#1 Dedicated.props
1533 22/11/2011 15:32 txt br:/main#1 DoomDLL.props
924 22/11/2011 15:32 txt br:/main#1 Game.props
886 22/11/2011 15:32 txt br:/main#1 Game-d3xp.props
551 22/11/2011 15:32 txt br:/main#1 idlib.props
Perhaps you're interested only in the filename and the revision identifier, and you want to make sure the output is arranged in neat columns. Just use the --format option:
> cm dir --format="{5,30} {3}"
. br:/main#13
Common.props br:/main#1
Curl.props br:/main#1
Debug.props br:/main#1
Dedicated.props br:/main#1
DoomDLL.props br:/main#1
Game.props br:/main#1
Game-d3xp.props br:/main#1
idlib.props br:/main#1
Or maybe you prefer to swap the columns, but want to include the file size:
> cm dir --format="{3,-15} {0,6} {5}"
br:/main#13 .
br:/main#1 855 Common.props
br:/main#1 564 Curl.props
br:/main#1 1198 Debug.props
br:/main#1 509 Dedicated.props
br:/main#1 1533 DoomDLL.props
br:/main#1 924 Game.props
br:/main#1 886 Game-d3xp.props
Integrations with Issue Tracking Systems
Plastic SCM does not include its own issue tracking system (ITS), but does provide integrations
with many popular web-based ITSs. The integrations are essentially similar to each other. All of
them support the branch-per-task methodology that we've been recommending throughout this manual.
At this writing, the supported ITSs are:
- Bugzilla
- DevTrack
- MantisBT
- Trac
- JIRA
- OnTime
- Version One
- FugBugz
- Rally
Read the
PLASTIC SCM EXTENSIONS GUIDE
to see the ITSs supported by Plastic SCM.
For most ITSs, a simple dialog launched from Plastic SCM's Preferences window configures the integration.
The configuration settings include the Web URL of the ITS server, along with authentication settings
(if necessary) to enable Plastic SCM to communicate with the ITS server.
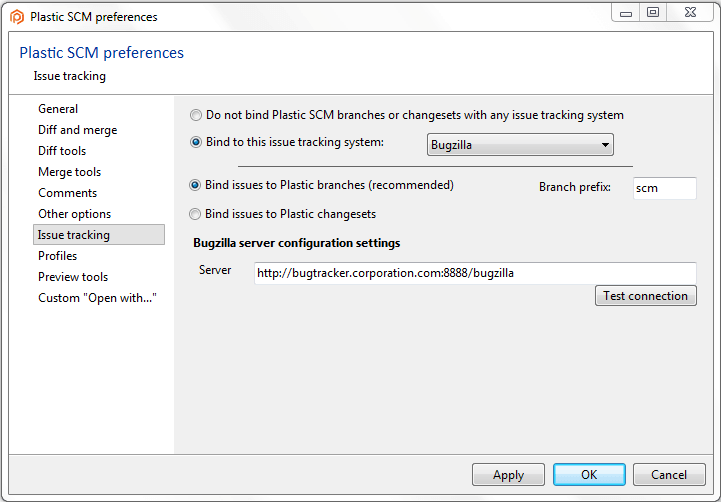
A crucial piece of configuration data is the branch prefix (in some cases, several such prefixes).
This enables newly created Plastic SCM branches to be linked automatically with particular ITS issue records.
The principal features of an ITS integration are as follows:
-
Establishing the branch-to-issue-record link - Whenever a Plastic SCM branch is created with a
leaf name that begins with a configured branch prefix, the integration automatically links it to a
particular issue record. For example, if the configured branch prefix is iss, then a new branch
named /main/iss00328 might be linked with issue record #328.
-
Displaying the issue record's data in the Branch Explorer - The issue record's title field
below the branch name:
 Important fields from the issue record appear in the Branch Explorer's Extended Information panel when a
linked branch is selected, under the issue tracker section.
-
Jumping to the actual issue record - Double-clicking the Extended Information panel launches an
ITS session (if necessary) and opens the linked issue record.
Integrations with Development Environments
Many developers resist leaving their current window just to perform SCM operations. (Or for any other
reason... do they think that Emacs is the operating system?) To address this issue, Plastic SCM can
embed itself - partially, at least - within several popular integrated development environments (IDEs).
At this writing, the list includes:
- Visual Studio
- Eclipse
- IntelliJ IDEA
- Microsoft Office
Read the
PLASTIC SCM IDE INTEGRATIONS GUIDE
to see the IDEs supported by Plastic SCM.
The integrations for the programmer's IDEs make many Plastic SCM commands available; the Microsoft Office
integration offers just a few commands, because the source files are in binary format (and the target
audience just might be a little less SCM-tolerant).
The Plastic SCM integration with each particular IDE tries to be a good citizen. To the extent that the
IDE has built-in facilities for integrating with SCM systems, our integration uses them. For example,
the Eclipse integration:
-
Uses the standard File > Import command to create a new Eclipse project from an existing
Plastic SCM repository.
- Provides a Plastic SCM perspective.
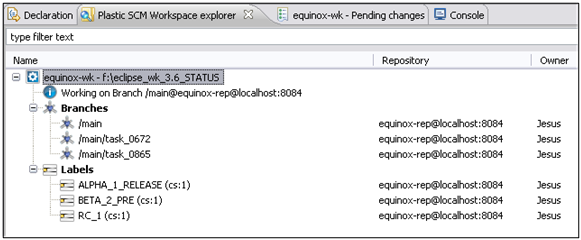
-
Locates Plastic SCM commands on the Team submenu of a file's context menu.
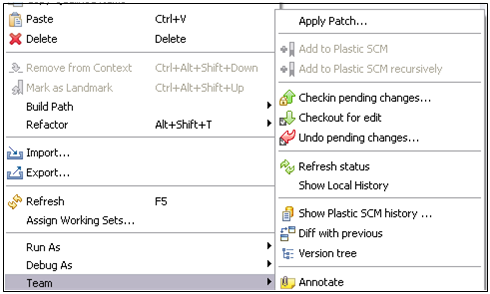
-
Enables use of the Team Synchronizing perspective to organize Checkins, Updates,
and Merges.
If the IDE supports refactoring operations (rename, delete, move) through its own command structure,
the integration detects such changes and performs the corresponding Plastic SCM commands automatically.
Eclipse integration uses icon decorations and/or color-coding to indicate each source-controlled
item's Plastic SCM status: checked-in/checked-out, private, and so on.

The various IDE integrations implement additional features, as well. For example:
-
The Visual Studio integration provides commands for opening various views (Pending changes, Labels,
Repositories, Preferences, and so on), just as if you were using the Plastic SCM GUI.
-
The Eclipse integration can work with the Mylyn task-management plug-in.
-
The Visual Studio and IntelliJ IDEA integrations enable you to work completely unplugged - with no
connection to any Plastic SCM server. (This is useful if you forget to set up a local Plastic SCM
installation on your own machine.) During this time, you can issue a limited set of Plastic SCM commands;
the integration caches them, and then executes them for real when you reestablish a connection with the server.
Extending Plastic SCM
In this final section of the INTRODUCTION TO PLASTIC SCM, we take a look at some features that enable you both to personalize the system for your development organization and to extend its capabilities.
The Parallel Development with Plastic SCM chapter showed that the ability to attach labels to revisions plays a fundamental role in organizing the SCM environment. Plastic SCM attributes generalize that capability. You can attach an attribute-value pair to many repository objects. For example, management might decide to classify the baselines created over the past year, based on how they perform in system tests. An easy way to record the classification is to attach attributes to the labels that define the baselines:
- To the label that defines a good baseline, attach an attribute named baseline_quality with the value pass.
- To the label that defines a bad baseline, attach the same attribute, but with the value fail.
The Attributes view in the Plastic SCM GUI displays a table of attributes defined in the active workspace's repository.
Each development organization comes up with a set of policies for using its SCM system. Here are some examples:
- All branch names must begin with iss and end with the number of an existing record in the issue-tracking system.
- All Checkins must have a comment of at least 25 characters.
- All Java source modules must produce good JavaDoc.
Developers hate it when a manager tells them what to do, but they're more accepting of restrictions imposed by software. Thus, it makes sense to automate such policies! Plastic SCM's trigger mechanism monitors the invocation of these commands:
| add |
mkworkspace |
repository create |
| checkout |
setselector |
branch create |
| checkin |
|
mklabel |
| update |
|
attribute create |
(These are the CLI names for the commands.) Each time one of these commands is invoked:
- Pre-execution triggers - A user-specified program is executed before the Plastic SCM command executes. (It can be a prescribed sequence of programs.) Any such program can cancel execution of the Plastic SCM command.
- Post-execution triggers - A user-specified program is executed after the Plastic SCM command executes. (Again, it can be a prescribed sequence of programs.)
- Server-side and client-side triggers - The checkout and checkin commands are special. You can configure pre-execution trigger programs to execute both on the client machine and on the server machine. The same goes for post-execution trigger programs.
Typically, a trigger program is implemented as a shell script/batch file or a script written in Ruby (or Perl or Python or ...) but you can specify any executable.
A trigger program needs to know the context in which it's running. Names of file system objects and repository objects are passed to the program through its standard input device. Other aspects of the context, such as the username under which the Plastic SCM command was invoked, are communicated through environment variables. The configuration file for the repository server includes a TriggerVariables section, which you can use to define additional environment variables for trigger programs to use.
The figure below shows that the Plastic SCM GUI can produce a nice bar chart or two. If the statistics that the Change statistics view shows by default are not exactly the ones you need, you can used the view's Advanced mode to customize the query that produces them, as described in section Customizing a View following that figure. That's an example of the SCM-level query facility, which is available through the CLI's find command in addition to various places in the GUI.
Plastic SCM's higher-level query facility operates at the SCM level. It uses the file system objects, repository objects (metadata), and relationships among them that we've described in this guide. Syntactically, it's quite similar to SQL, but does not implement all the SQL bells and whistles.
Here are some examples of SCM-level queries, invoked through the CLI's find command:
Find all the revisions that have a particular label:
cm find "revision where label = 'BL002'"
Find all the revisions that have a particular label:
cm find "revision where label = 'BL002'"
Find all the labels attached to a particular revision of an item:
cm find "label where revision = ' myfile.txt#br:/main#61'"
Find all the subbranches of /main that were created by (and thus are owned by) user eduardo:
cm find "branch where parent = 'br:/main' and owner = 'eduardo'"
Find all items that were removed from revision /main#2 of the current directory:
cm find "removed where dirrev = '.#br:/main#2'"
If your ambition is to create a full-blown reporting system based on the find command (an ambition we strongly encourage!), you'll appreciate the fact that it supports formatting of command output (see section Formatting Command Output), XML-format output, and various Unicode encodings.
Last updated
May 12, 2017
We updated some screenshots because we changed the repository-related dialogs replacing their server text boxes with a combo box containing a list of recently used servers.
Feb 15, 2017
Several screenshots are now updated. And also, you can see them in the Mac OS platform.
May 23, 2015
Added references to learn how to configure the ignored and cloacked lists.


