As part of our platform consolidation, this content will be moving to Unity.com by March 31st, 2025.
Preview the new location and updated resources here.
Projects often need to reuse existing components that have been developed and are actively used as part of other projects. Plastic SCM encourages using separate repositories for different projects, and components and access shared components by "mounting" them in the project repository through Xlinks. This section will introduce Xlinks and how to use this powerful feature to share components among projects that evolve in parallel.
An Xlink is pretty similar to a symbolic link, like those found in Unix operating systems. It is a directory entry in your repository tree that points to another directory in a different repository. An Xlink, however, will also contain information about the specific version of the target directory to which it is pointing.

Xlinks can point to repositories with other Xlinks inside them, so Xlink component mounting can address really complex development scenarios.
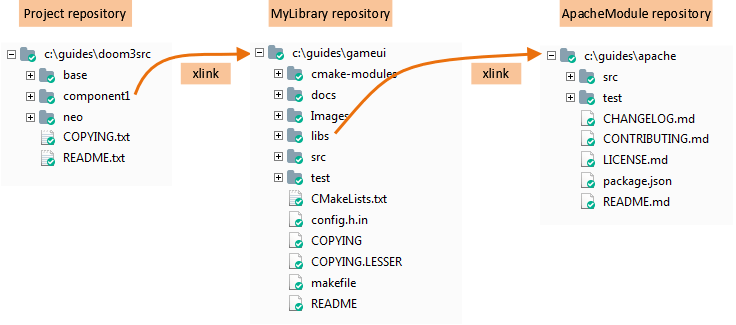
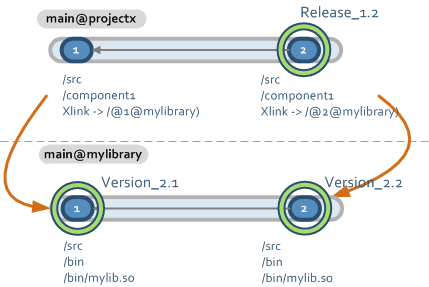
Xlinks pointing to a given version of the target directory let the user specify, for instance, that project X on version 1.1 is using version 2.1 of library Y. When a new version of the library is labeled, say 2.2, the code of the project can be updated to use it and maybe version 1.2 of project X uses library Y 2.2.
Since Xlinks are versioned, the Xlink in old project X version 1.1 still points to library Y 2.1 and the original configuration can be completely rebuilt without any issue. The following figure depicts how it looks like:
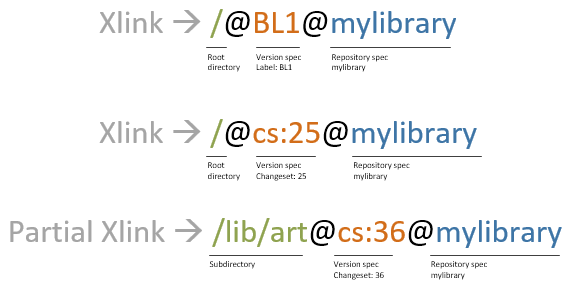
An Xlink is defined with the following arguments:
Partial Xlinks are available on Read-only Xlinks (see below). "Writable partial Xlinks" are not supported yet because they would overly complicate the merge (what if you have conflicts on parts you are not mounting?).
Note: At this point, you need to use the command line to create partial Xlinks. GUI support will come soon.
Important: Do not use partial read-only Xlinks with Gluon workspaces. Plastic Gluon doesn't handle partial read-only Xlinks. If you use this feature with Gluon workspaces, you'll get an inconsistent workspace.
These are some examples of Xlinks definitions:
You can create two different types of Xlinks, depending on what you want to do with the target repository:
In the Workspace Explorer of the GUI client, you'll notice that the Type column contains wXlink where it used to be Xlink for read-only Xlinks.

The command used to create the Xlink in the example referred to in section What is an Xlink looks like this:
cm xlink component1 / 1@mylibraryIn the example above:
It is also possible to specify a label instead of a changeset. Since a label is actually a pointer to a changeset, the two specifications are interchangeable. To do so, keep in mind that specifying an xlink with a label only uses the label to retrieve the changeset to which it points and sets the xlink to it. This means that if the label is moved afterward, the Xlink will still point to the original changeset.
To create a partial Xlink (read-only):
cm xlink component1Src /src/dll cs:478@mylibrarywhere /src/dll is the subdirectory where the partial Xlink will be mounted.
You can create a Writable Xlink in the command line specifying the -w modifier:
cm xlink -w component1 / 1@mylibraryXlinks can also be created from the GUI client that Plastic SCM provides. You'll note the new option in the Workspace Explorer context menu:
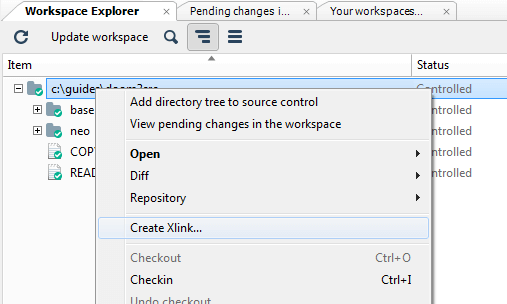
You can create an Xlink by right-clicking any directory or existing Xlink and selecting the Create Xlink option. It will create a new Xlink inside the selected directory. This is what the new dialog looks like:
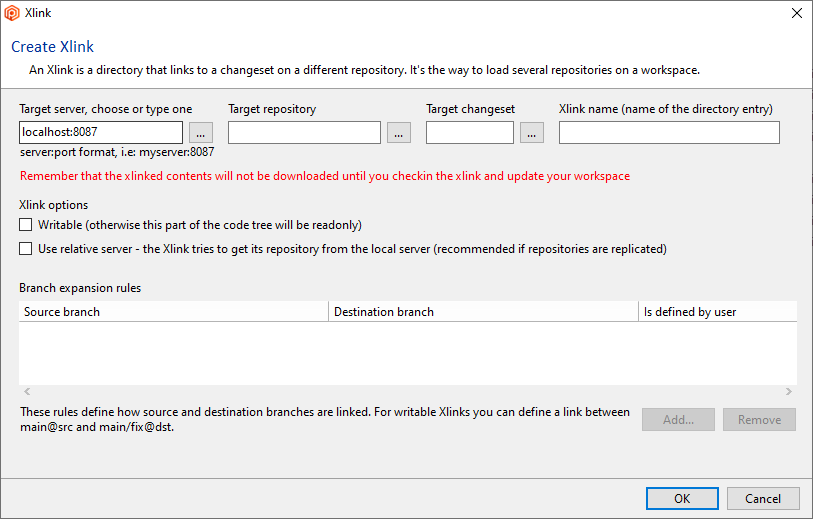
In this dialog, you can configure the name and the Xlink's target changeset. To select the target changeset:
In this dialog box, you can also set the Writable and Relative server options for the Xlink. And also the expansion rules if you are creating a writable Xlink.
The Xlink is created in the workspace and appears as a pending change in the Pending Changes View (or cm status --added command), as shown here:

Once it is checked in, the Xlink needs to be updated. So, the contents of the mounted directory are downloaded into the workspace. This can be done in the GUI by clicking the Update workspace button:
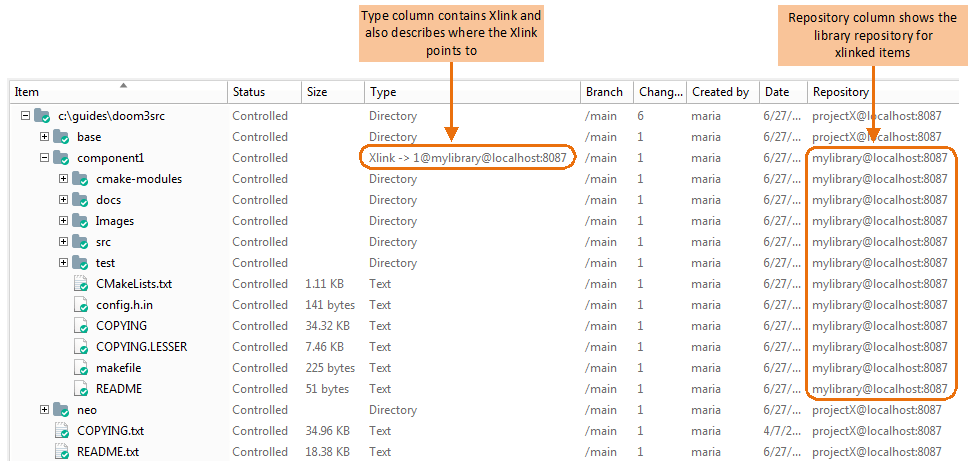
The target of an existing Xlink can be modified using the -e modifier of the xlink command. In this case, the syntax is similar to the creation syntax. But the Xlink must exist already.
The following example modifies an existing Xlink component1 to point to changeset 5 on repository mylibrary:
cm xlink -e component1 / 5@mylibraryXlinks can also be modified by using the Plastic SCM GUI client. When you right-click an existing Xlink, the following context menu will pop up:
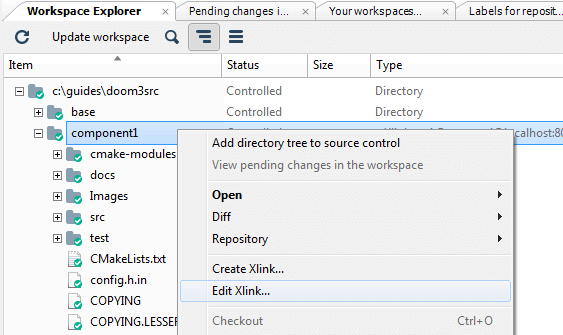
When you click the Edit Xlink option, a dialog box will pop up:
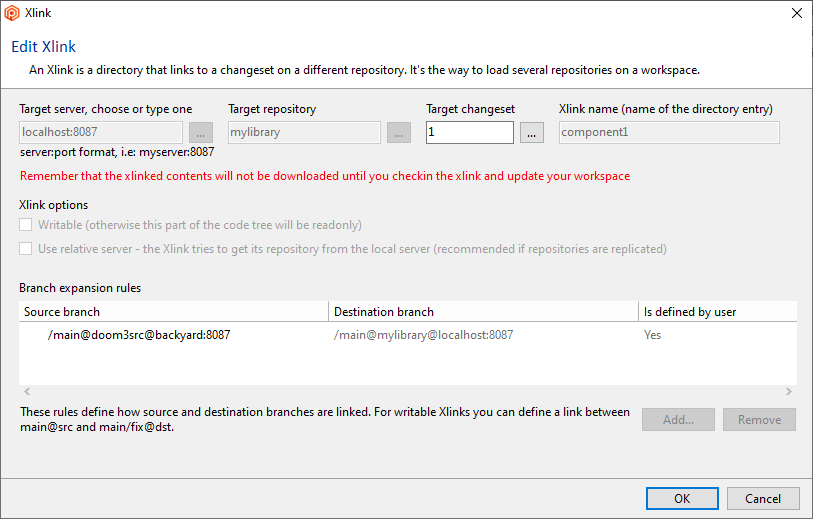
You can edit the target changeset of the Xlink. You can also edit the expansion rules if you are modifying a writable Xlink.
The Plastic SCM GUI views display the information of the top-level repository loaded in the workspace. But, what if you want to see the Branch Explorer or the Changesets views of an Xlinked repository?
The Workspace Explorer makes this easy through the Repository submenu. When you right-click an item inside an Xlinked repository, the Repository submenu lets you open the most important views for the repository where the item is located: i.e. the Xlinked repository. For your convenience, the first entry in the menu contains the repository name of the item:

The Xlink Expansion Rules define how branches are created on the Xlinked repositories and how the branches in the parent repository relate to the branches in the Xlinked repository.
The regular scenario is very simple. First, the developer defines a new Xlink from the quake repo to the zlib repo. Then, they set the wXlink between changesets on the main branches of each repo.

The expansion rule for the wXlink at this point will be straightforward:
Since the two Xlinked changesets are on branches with the same name and the same level (top-level branches in this case), expanding the wXlink is very simple, as explained below:
At this point, the expansion rules will be as follows:

Note that Plastic has automatically created a new rule ( Is defined by user = No ) to track the new branch expansion that happened.
New automatically created rules will be created if more branches are automatically expanded through the branch hierarchy.
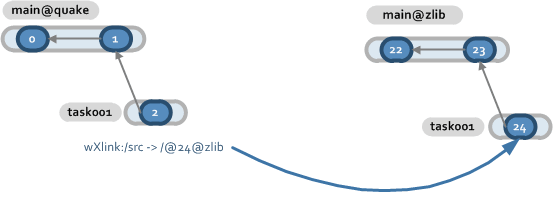
Consider now the following common example. Suppose you have to create a new wXlink, but you create a task branch to do the job. So, you're isolated while you test the new layout, and it will be merged later to the main branch.
Your scenario will be as follows:

In this situation, you don't really want to create an Xlink expansion rule from main/xlink-creation@quake -> main@zlib, nor use this rule to set how branches are created on the Xlinked repo. Most likely, you'll want to eventually Xlink the main branches.
Plastic SCM will detect this situation and will inform you as follows:
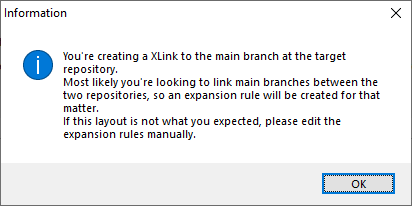
And will create a rule main@quake -> main@zlib:

Now suppose that just after creating the wXlink on the branch task001, you need to modify a file inside the wXlink. Since the main to main wXlink is already defined, the branch expansion will work correctly and will automatically create a /main/xlink-creation branch inside the zlib repo:
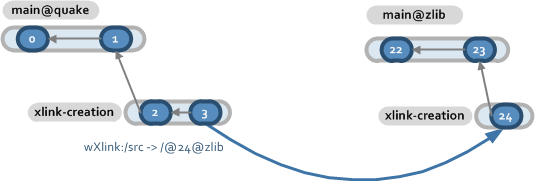
And the expansion rules at this point will be as follows:

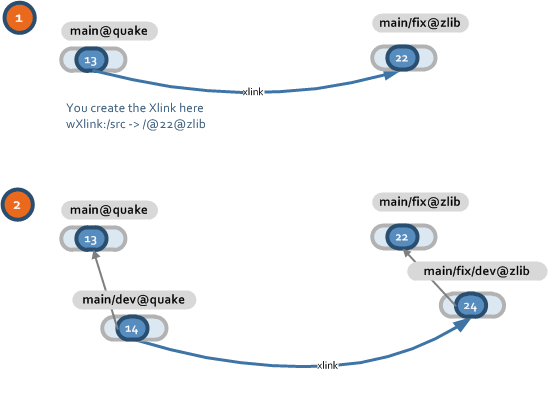
So far, the created wXlinks have been symmetric: main linked to main, main/task001 to main/task001, and so on.
Expansion rules are especially helpful when asymmetric links are required. Suppose you need to link the branch main@quake to branch main/fix@zlib. The initial expansion rule will be set this way, and it will enable a parallel asymmetric evolution as the following picture shows:
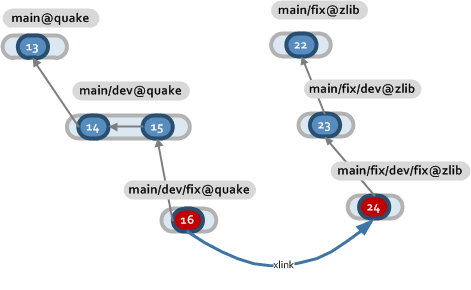
The initial versions of Plastic SCM with Xlink support didn't include Xlink expansion rules. The expansion was controlled by matching branch names, so while simple asymmetric hierarchies were supported, complex cases were not. Consider the following example:
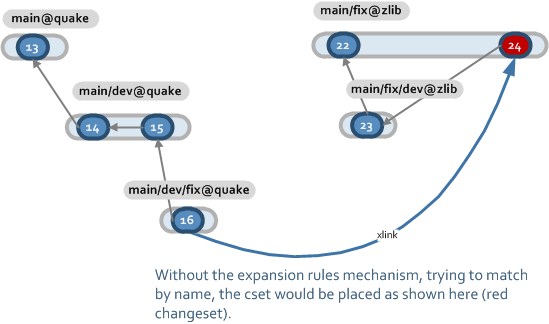
That will be handled in the following way now:
Some projects need to set more than one Xlink to the same repository, maybe because they depend on two different versions of the same component.
Consider the following example:

The erp repo Xlinks twice to the zlib: one for the server code that uses the most up-to-date 1.9 version of zlib, and one for the iphone code that uses the older version 1.7.
Once the Xlinks are setup, let's inspect /server/zlib:

Please note how the Is defined by user is set to true. In Plastic internals jargon, this rule is a traveling rule which means: it doesn't apply to the current branch and has to travel to the final one (like when you create a rule in /main/task001 for main@quake -> main@xlinked , it has to travel to main during the merge) or it hasn't been applied yet. Consider now the situation where you make a change inside /server/zlib. The situation will be:

Where the /server/zlib wXlink has been updated to point to the newly expanded branch main/server@zlib while the other wXlink hasn't been modified yet.
At this point, if you edit the wXlink /server/zlib, you'll see the rule has been modified, and it is now as follows:

The rule now applies to the branch association, so it is no longer considered as a traveling rule (or defined by the user).
This is a complex scenario, and understanding how it works helps to understand Xlink branch expansion rules.
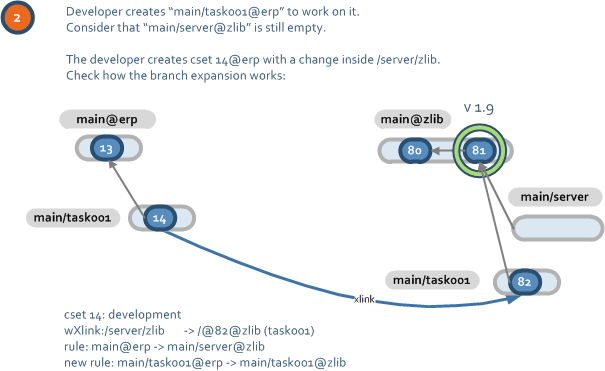
Initially, an Xlink is created from main@erp to main@zlib with a rule main -> main/server (main/server branch is still empty):

Then the developer creates main/task001@erp and makes a change inside wXlink.
Please note how the branch expansion doesn't happen as initially expected only because main/server is empty and it doesn't contain changesets to start /main/server/task001 from, so main/task001@zlib is created instead:
The developer merges main/task001@erp back to main, and the following happens (now the rule is used as expected). The rule defined by the user is finally used when the correct conditions are met:
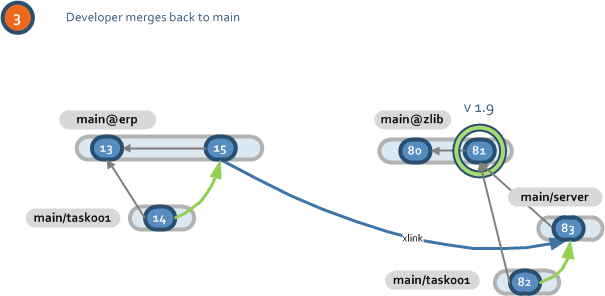
Merging a branch also affects the auto-expanded branches in the wXlinked repositories. The merge operation is done on the top-level repository (the repository to which the workspace is pointing). It will then evaluate any new versions of wXlinks that have been created and consider the changes in the linked repositories in the merge process.
In this sample scenario, we have the same 2 repositories used in previous sections: ProjectX and MyLibrary. ProjectX is the top-level repository and contains a wXlink component1 pointing to MyLibrary. In ProjectX, we have created two child branches: task0127 and task0243.
We then made changes in the file events.h, located in the Xlinked MyLibrary repository in both branches. This, indeed, expanded branches task0127 and task0243 to the MyLibrary repository:
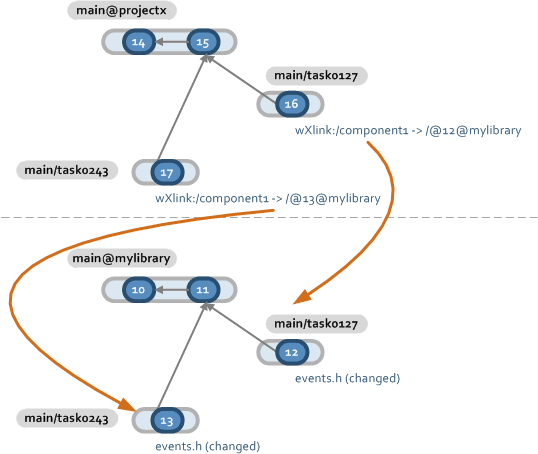
Now, what happens when you merge from branch task0127 to branch task0243, as depicted in the figure below?
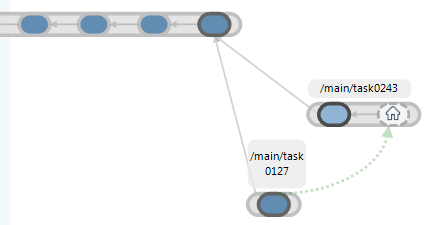
The merge operation will consider the changes made to the wXlink in both branches and then evaluate the changes in the wXlinked repositories themselves to include them in the merge. So, as a user, you'll have to resolve any possible conflicts as you would with a normal "single repository" merge.
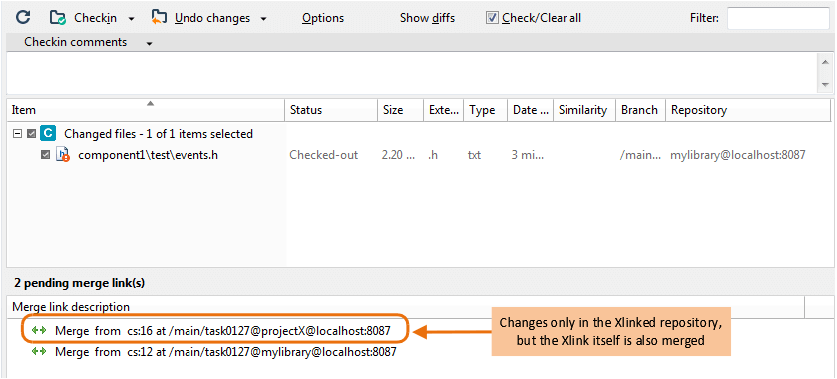
Now the merging of Form1.cs is resolved but, what about the wXlink? The answer is that the merge operation will also update the WXlink to point to the result of the merge in the MyLibrary repository. That is, as a result of the merge operation, there is a new version of Form1.cs with the merged changes, and the WXlink in the ProjectX repository will point to this new changeset. For this reason, the Pending Changes view shows a pending merge link for the ProjectX repository, as depicted in the next figure:
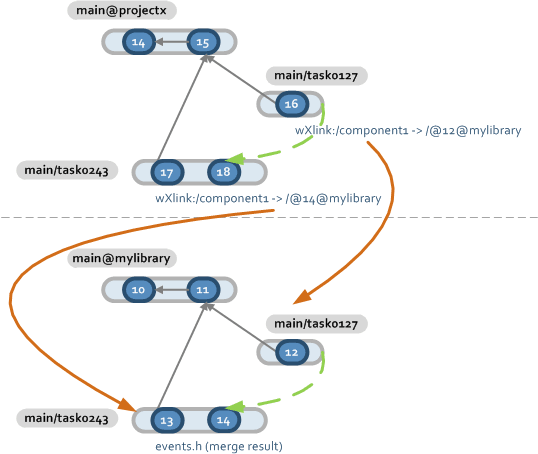
The overall result is that you only need to tell Plastic SCM "I want to merge this branch" in your workspace, and the merge operation will handle the changes made in wXlinked repositories.
When Xlinks are replicated, the target they point to is still the original one. So, say that you are replicating a repository with an xlink component1 pointing to changeset number 6 on repository MyLibrary on server mainserver.location1.com:8087. The destination of your replica is on another Plastic SCM server at otherserver.location2.com:8087. When you replicate the top-level repository, the Xlink in your replicated repository will still point to mainserver. If it is reachable from the location2.com network, the data for MyLibrary repository will be downloaded from location1.com.
Most of the time, you'll want to replicate the MyLibrary repository to location2.com as well and perform any changes in the local replica.
To tell the Xlink that you want to use the MyLibrary repository found in your default server (that of the top-level repository), you need to create the Xlink with a relative server.
This is achieved with the -rs modifier when the Xlink is created, as in the following example:
cm xlink -rs component1 / 6@mylibraryWhen this link is replicated, it'll try to locate MyLibrary repository in the local server rather than mainserver.location1.com.
The Xlink will be pointing to the right changeset even if the number changes because it uses the changeset GUID rather than the changeset number to locate it.
Read the Plastic SCM book to learn how replication works.