As part of our platform consolidation, this content will be moving to Unity.com by March 31st, 2025.
Preview the new location and updated resources here.
Note: The PlasticSCM documentation site is migrating to the Unity Gaming Services documentation site. The content in this guide is integrated into the Tutorials and concepts sections.
In this lesson, you'll:
These are the supported operating systems: Microsoft Windows, Linux, and macOS.
Complete the Plastic Server and Client installation steps related to your operating system.
You must configure:
This section will help you understand the terminology used to describe concepts in Plastic SCM. Since these terms will be used throughout this tutorial, you must understand their meaning.
Here are a few concepts that you'll need to know:
|
Repository |
The repository typically contains a project: 
|
| Workspace |
The directory where you store your sources: 
|
|
Items |
The content of your workspace - files and directories: 
|
|
Branch |
The place in the repository where you're currently working. You can create new branches then switch to them, compare their content, merge them, replicate them, and much more: 
|
|
Changeset |
The individual checkin you made: 
|
|
Label |
A label is a name assigned to a specific changeset. It represents the state of your code on a specific branch and point in time. 
|
Welcome to the Plastic SCM world! This lesson uses a straightforward scenario to walk you through setting up your project using Plastic SCM. This lesson covers:
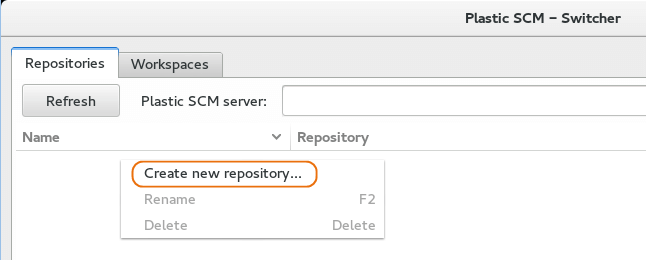
Remember, the repository is the "database" where changes are stored.


Windows - Create a new repository
Linux - Create a new repository

macOS - Create a new repository


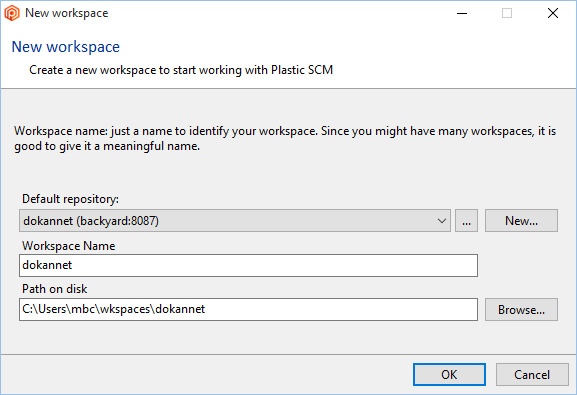
Windows - Create a new workspace

Linux - Create a new workspace
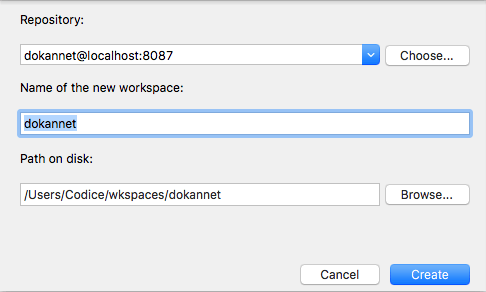
macOS - Create a new workspace
Plastic automatically chooses dokannet as the name for the workspace and the workspace path to store the data locally.
The workspaces list updates each time you create a new workspace.

Complete the steps to add code to your new workspace. The example below uses a sample code uploaded to GitHub.
Navigate to the actions bar on the right and click the Branch Explorer menu option:

Right-click the main branch > Replication > Sync with Git:

In the Repository URL field, enter the following: https://github.com/PlasticSCM/dokannet:

Click the Sync button to download (synchronize) the code into your workspace:

Close the dialog.
Complete the steps in Windows.
Open your terminal and run:
cm sync dokannet@localhost:8087 git https://github.com/PlasticSCM/dokannetYou'll get a similar output:

Complete the steps in macOS.
Open your terminal and run:
cm sync dokannet@localhost:8087 git https://github.com/PlasticSCM/dokannetYou'll get a similar output:

Navigate to the Branch Explorer view and refresh the page. You'll see a new changeset. Complete one of these steps to update the workspace with the downloaded code:

The Branch Explorer looks like this:

To view the Workspace Explorer in your workspace, navigate to Main actions > Workspace Explorer:

Your workspace will have the downloaded code:

Plastic SCM marks all files and directories as Controlled. This means they're under the Plastic SCM control.
The Branch Explorer will render the repository's history graphically.
The image below shows a branch and two changesets. The current changeset (circle with the house icon) and the initial changeset (the solid circle on the left), which Plastic SCM created by default during the repository creation.
Right-click the current changeset (circle with the house icon) and click Label this changeset:

Enter BL00 in the label name field and enter a comment:

Your Branch Explorer looks like this:

Labels are used to mark stable releases in your project. To "save" a secure status that you can recover later if you wish, right-click the current changeset (circle with the house icon) and click Switch workspace to this label:

Your code is constantly changing. Once you deploy your project, you will continually be modifying files.
This lesson covers managing every change in your code under version control and seeing the differences with older versions of your files with the Plastic SCM GUI.
Checkout in Plastic SCM means:
To checkout, right-click the file and select the Checkout menu option:

Plastic SCM marks the file as checked-out:

In the DokanNet folder in the Workspace Explorer, there are bin and obj subdirectories. These folders will never need to be
checked in,
so they need to be added to the ignored list.
The ignored list contains rules that lets Plastic SCM know that it should ignore specific files and not track them.
Right-click the obj folder and click
Add to ignored list, and select the obj option:

To add every obj folder in all your workspaces to the ignored list,
select the Apply rules to all workspaces checkbox:

Repeat the process for the bin, and you see something like this:

You can add private items to the ignored list. Then, an ignore.conf file will
be created containing the ignored items.
If you also add the ignore.conf file to the ignored list, it'll stop appearing in the
Pending changes view.
Run a checkout and open the file you want to edit.
In the example scenario, to modify the DokanNet.cs file, run a checkout and open the file to edit it.

Modified line 119 and replaced DOKAN string with DOKAN-NET string.
Navigate to the Pending changes view to see the files you've modified so far:

The Pending changes view lists the files you previously checked out. Notice the changed file - this is the file the IDE modified when it's opened.
Click the Show diffs button to see the line that you modified:

The Show diffs button allows you to inspect the differences in every file before checking them in.
When you've completed the changes in your file, you can perform a checkin to save them. Enter a comment first, then click the Checkin button:

Navigate to the Branch Explorer to see the current state of the repository. You see something like this:

In the branch, there are now three changesets:
Right-click the current changeset.
Click Diff changeset:

Click Diff with previous:

Click Diff with previous:

You'll see a comparison of the previous content with the current one in a new window. This window has three sections of information:

In this lesson, you'll be able to move, rename, and delete a file.
This lesson teaches you how Plastic SCM performs these common file operations and how it reverts to a previous revision.
For example, to move the license.txt file, right-click
the license.txt file and select Cut:

To move the license.txt file to the \sample directory,
paste the license.txt file in that directory using the Paste
context menu option.
After you perform this operation, your Workspace Explorer looks like this:

The Pending changes view shows what you've modified so far:

The picture above explains the steps you just performed: source and destination of the move and the status changed to moved.
You can now check in the change. Don't forget to add a comment to document the change. For example, license.txt file moved to 'sample' directory.
The next operation is deleting a file that is under the Plastic SCM control.
Right-click the readme.txt file and select the Delete menu
option:

In the Delete confirmation dialog, choose whether you want to keep the file on disk or not:

If you want to remove a file from the version control, but want to keep it in your disk (like a temporary file that you mistakenly added), select the Do not delete items on disk option.
For this scenario, select the Do not delete items on disk option.

If you want to remove a file from the version control but want to keep it in your disk (like a temporary file that you mistakenly added), select the Remove item(s) from version control option.
For this scenario, select the Remove item(s) from version control option.

If you want to remove a file from the version control, but want to keep it in your disk (like a temporary file that you mistakenly added), select the Remove item(s) from version control option.
For this scenario, select the Remove item(s) from version control option.
The Pending changes tab looks like this:

Notice the file is listed twice:
In the Workspace Explorer, notice that the status of the deleted file is Private. This means that the file is not under source control anymore, and it is displayed without a customize icon and no entry in the Type, Branch, or Changeset columns:

If you switch to the Pending changes view, you can Checkin the deleted item. Don't forget to enter a comment briefly explaining the change:

Renaming a file is equivalent to moving the file. But a rename operation is a move inside the same directory.
Right-click the file you wish to rename and select Rename:

Enter a new name:

The Pending changes view now looks like this:

Notice that the status of the file has changed to Moved. This is because Plastic SCM knows the file is renamed.
You can now Checkin the moved item. Don't forget to enter a comment briefly explaining the change:

In the below scenario, you'll learn how to undo the changes you've made in your workspace.
Start by modifying the DokanNet\DokanNet.cs file. Checkout the file and
add the following edits:

Save the changes and navigate to the Pending changes view to see the modified file. Click the Show diffs button to compare the previous content with the current one. The diffs look like this:

You can undo the changes you've made to the file.
Complete any of the following actions:
 ." Click Save.

Click the Undo changes button in the toolbar to undo all the changes on every selected item. Confirm the undoing changes:

Click the Undo button in the toolbar to undo all the changes on every selected item. Confirm the undoing changes:

In this lesson, you'll learn all about the Transparent Version Control feature.
The Transparent feature eliminates the worry associated when moving or renaming files and losing the synchronization with the version control. With Plastic SCM, you can work with your files, change them, move them around, create new ones or remove them.
When you're ready to check in your changes, navigate to the Pending changes view. Plastic SCM detects all the actions and records them to the repository with a single click.
The previous lesson followed the checkout-edit-checkin workflow. Using this workflow, you have to tell Plastic SCM that you will perform a specific operation on a file.
In these scenarios, you'll use the very extended edit-checkin workflow, popular on most open-source version controls (SVN, CVS, Git, and many others).
In Plastic SCM, this is called transparent working mode because Plastic SCM can detect everything you've done in your workspace and propose it for checkin.
Open the DokanNet\DokanNet.cs and DokanNet\DokanOperation.cs
files in the IDE tool, but don't check them out.
Modify the DokanNet\DokanNet.cs file by deleting line 149:

Modify the DokanNet\DokanOperation.cs file by uncommenting the range from line
43 to line 49:

Navigate to the Pending changes view to check what you've modified. The Pending changes view detects the files you've modified. Because you didn't check them out before editing, the status value is Changed instead of Checked-out:


Check in the changed files. Don't forget to enter a comment.
The next step is to move a file in your workspace and let Plastic SCM detect it.
Move the lic.txt file from the sample\ folder to
the root folder. Complete this step outside of Plastic SCM, for example, using Windows Explorer. Note that
this operation involves both the move and rename operations.
Open the Pending Changes view. Plastic SCM detects the moved file, and the status is Moved locally. Note the Similarity column. This column shows the percentage of similarity between files. Plastic SCM tries to match moved files with private files to determine if it's the same file. Only locally moved items have a value in this column:

The Similarity value is 100% which means it's the same file.
You may decide to move a previously modified file.
Modify the DokanNet\DokanNet.cs by adding a new line. But
don't check it out:

Open Windows Explorer and move the changed DokanNet\DokanNet.cs file to the DokanNet\Properties directory.
This is what the Pending changes view looks like after moving the file:

Status is set to moved locally. Similarity is set to 99,49% because you modified the file before moving it. Plastic SCM can detect it as the same file because the content matched at 99%.
Open Windows
Explorer and delete the DokanNet\Proxy.cs file.
After deleting the file, the Pending changes view looks like this:

Note that the status column is currently set to Removed locally, which means that the controlled file was deleted from the workspace outside Plastic SCM.
You can move directories in Plastic SCM. For example, open Windows Explorer and move the RegistoryFS folder from the sample directory to the DokanNet directory:

Note that the Status is set up to Moved locally, and the Similarity column contains 100%.
Plastic SCM identifies and displays only the directory that was moved instead of displaying all files inside as moved.
At this point, you can Checkin in all the changes. Don't forget to add a comment when you check in all files (deleted and moved) to document the change:

Navigate to the Branch Explorer to see the current state of the repository:

Right-click the current changeset.
Click the Diff changeset button:

Click the Diff with previous button:

Click the Diff with previous button:

Now you see a comparison of the previous content with the current one. And, the diff looks like this:

There are several diffs and you can show each of them by clicking the arrows.
In this lesson, you'll learn all about branches. Branches offer a way to isolate different lines of development from each other, often called Parallel Development.
Branching is a concept that is very fundamental to source control.
The basic concept of a branch is a line of development that exists independently of another line and shares a common history. A branch always begins its life as a copy of something and moves on from there generating its own history.
Branching is a very efficient process. You can easily work with feature branches or go even further and use task branches, the model that Plastic SCM recommends.
Plastic SCM implements task-driven development very efficiently through the well-known branch per task pattern. To learn more, click the following links:
In simple terms, a baseline is a label.
It's a snapshot of your code at a given point in time. It's a mark, a tag that you can use to rebuild this status later if you need to.
To create a label, open the Other actions left action bar > Labels:

Your Labels view looks like this:

Click the Create new label button.
Right-click the Labels view and select Create new label:

Right-click the Labels view and select Create new label:

In the New label dialog, enter the name and comment for the new label. This example uses Baseline01 for the name:

Note the Changeset to label field. It tells Plastic SCM where the label is applied. The default value is the current changeset loaded in the workspace. In this example, the changeset is number 7.
Now, you've got another label to mark a stable release in your project. Once the label is created, your Branch Explorer looks like this:

Navigate to the Branch Explorer to create your first branch.
The current changeset on your workspace is represented with a house icon. Right-click this changeset and click Create branch from this changeset:

In the New branch dialog, enter scm001 for the branch name and a comment:

The Plastic SCM team works with the Branch per task model. This means that every development task is a new branch.
Select the Switch workspace to this Branch checkbox to start development in the new Branch.
Navigate to the Branch Explorer and check the current state:

Select the new branch and click the Options button in the toolbar. On the right, you will see the properties of the branch:

Now to make some changes to the branch!
Navigate to the Workspace Explorer to add the readme.txt file.
Right-click the file and select Add to source control:

The file is now added and checked out:

Navigate to the Pending changes view and check in the change to confirm the added file:

Now, modify the readme.txt file by adding a line at the beginning. First,
check out the file and double-click to open it, or right-click the file and select Open.
Navigate to the Pending changes view and check what you've modified:

You can now enter a comment and checkin the change.
Navigate to the Branch Explorer to check our new branch.
Now you have two changesets in the scm001 branch: the first one you created when you added the readme.txt file, and the second one with the latest change:

Now to add a new change in the branch. Navigate to the Workspace
Explorer, checkout the lic.txt file, and open it. To modify it, delete
lines 10 and 11:

Navigate back to the Branch Explorer. You can see a house with a dashed circle outline. This is the icon for checked-out changesets:

The house with dashed a circle outline means:
Navigate to the Pending changes view to see what you modified. Then, add a comment and run a Checkin:

If you go back to the Branch Explorer, you can see the current state of the current scm001 branch:

The example above shows several checkins in the scm001 branch.
If you checkin often, it will be easy for you to understand all the changes. This means that you are self-documenting the code.
You can read more about it at the Self-documented development through inch-pebble checkins blog post.
Lesson 5 covered working on the main branch, creating new branches, switching to them, and making changes.
This lesson will show you how the merge process works in Plastic SCM.
Navigate to the Branch Explorer and check the current status. To go back to the main branch, right-click the main branch and click Switch workspace to this branch:

You see something like this:

Complete the steps to create another branch from the last changeset on the main branch:
Your Branch Explorer looks like this:

Navigate to the Workspace Explorer.
Check out the lic.txt file and modify it by adding a new line at the top.
In the Pending changes view, you can see this modification:

Add a comment (for example, Added new line) and run a Checkin.
Navigate back to the Branch Explorer to see the current state of your workspace:

Right-click the current branch and select the Switch workspace to this branch to return to the main branch:

The Branch Explorer before the merge will look like this:

Right-click the scm001 branch and select Merge from this branch:

The Merge from this branch view looks like this:

Note the columns:
Click the Process all merges button at the top of the toolbar to process the merge:

Your first merge is complete! There aren't any merge conflicts. And the main branch contains the changes made on the scm001 branch.
Navigate to the Branch Explorer to see the current status of the workspace:

In the figure above, there are two new things to note:
This is because you created a merge from the scm001 branch to the main branch, so a new changeset is going to be created after the checkin action.
Navigate to the Pending changes view:

Note that:
You can now Checkin the changes from the merge. Don't forget to add a comment explaining the change. For example: Merge from scm001 branch to the main branch.
Navigate to the Branch Explorer to see the current status of the repository:

Make a merge from scm002 branch to main branch. Right-click the scm002 branch and select Merge from this branch:

Merge from branch view:

Note the two columns marked:
If you want to dig deeper to learn more about the merge, click the Explain merge button at the top in the toolbar. The Merge explanation view looks like this:

Note the 3 important terms:
Return to the Merge from branch view and click Process all merges.
The Branch Explorer looks like this:

There is a new changeset pending check in so navigate to the Pending changes view and check the modified file.
The Pending changes view lists the file you previously merged. Click the Show diffs button to see the line you've modified:

You can inspect the difference before the checkin merge operation to ensure that the code has been correctly merged.
Enter a comment (for example, Merge from scm002 branch to main branch) and click the Checkin button.
Navgigate to the Branch Explorer to create a new baseline.

Your Branch Explorer looks like this:

A Baseline is a line that forms the base for any construction, comparisons or calculations. The objective of a baseline is to reduce a project's vulnerability to uncontrolled change by fixing and formalizing change by controlling critical points in the development life cycle.
Baseline02 is where you would make up the Unit Tests that can help you ensure the code quality.
In this section, you'll modify the same section of code in the same file.
You'll create two new branches.
Navigate to the Branch Explorer and right-click the current changeset. Then, select Create branch from this changeset and enter scm003 as the branch name and add a comment:

Or right-click the main branch and select the Create child branch.
Check out the DokanNet\Properties\DokanNet.cs file and modify it by adding new lines at
line 117.
Navigate to the Pending changes view and check what you've modified:

Checkin the file. Don't forget to comment (for example, Adding new conditions on DokanNet.cs file to document the change.
Navigate to the Branch Explorer to see the current status of the repository:

Right-click the main branch and select the Switch workspace to this branch to return to the main branch:

To create the second new branch from the Baseline02 label, navigate to the Branch Explorer, right-click the current changeset and select Create branch from this changeset. Enter scm004 as the branch name and add a comment:

Check out the same DokanNet\Properties\DokanNet.cs file by adding new lines
also at line 117.
Navigate to the Pending changes view and check what you've modified:

Don't forget to comment (for example, Adding new lines on DokanNet.cs file) and Checkin the file.
Navigate to the Branch Explorer to see the current state of the workspace:

Return to the main branch by right-clicking the main branch and selecting Switch workspace to this branch. The current state of the repository looks like this:

Remember that you modified exactly the same section of code in the same file. This action makes the merge much more complicated.
To perform this merge, first, you'll merge from the scm003 branch to the main branch. Then, you'll merge from the scm004 branch to the main branch.
Start by going to the Branch Explorer. Then, Right-clicking on the scm003 branch and click Merge from this branch.
The Merge from branch view looks like this:

Currently, there changes are only in the source contributor. Click Process all merges and the merge will run automatically.
Navigate to the Branch Explorer to check the current state of the workspace:

There is a new pending merge link so go to the Pending changes view. Don't forget to write a comment (for example, Merging from scm003 to main) before running Checkin:

Navigate to the Branch Explorer to see the current state of the workspace:

The scm003 branch is merged.
Complete the same steps to merge the scm004 branch.
Mergetool window:

You can learn more about how the merge works by referring to these four important terms:
Each one of them has a different color to help you better understand the merge process.
You can see the code added in the scm003 branch (source), and the scm004 branch (destination). At the bottom, you will see the final result with both contributors.
If you agree with the Destination, click Deselect Source:

Once you've reviewed the file, click the Save and Exit button at the top of the toolbar.
Navigate to the Branch Explorer to see the current state of the workspace:

In the Pending changes view, you can check the file you've modified. Remember to add a comment before youCheckin:

You can compare the two merges you have performed:
The last scenario followed a 3-way merge. This involved modifying the same file in the same place in two different branches. The resulting file is the one created after the changes are combined, and you decided which would be the final code.
A 2-way merge is more straightforward because it doesn't consider the base file (common ancestor) to calculate the merge.
Navigate back to the DokanNet\DokanOperations.cs file and make a couple of simple
changes. Then merge the code with the 2-way merge tool. Check out the results in the figure
below:

Learn more about merge by reading the following documentation: