This guide will explain how to configure SemanticMerge to be used from Git.
Since there are several different ways to use Git (from command line to different tools) the guide will cover the different options.
semanticmergetool -s $REMOTE -d $LOCAL and it MUST be semanticmergetool -s $LOCAL -d $REMOTE according to git documentation: $LOCAL is set to the name of the temporary file containing the contents of the diff pre-image and $REMOTE is set to the name of the temporary file containing the contents of the diff post-image.
Configuring SemanticMerge to be used as diff and merge tools for Git is rather simple. There are two options:
.gitconfig file on your operating system.In order to configure SemanticMerge we will run the following commands:
git config --global diff.tool semanticdiff
git config --global difftool.semanticdiff.cmd "C:/Users/pablo/AppData/Local/semanticmerge/semanticmergetool.exe -s \"$LOCAL\" -d \"$REMOTE\""
git config --global difftool.prompt false
Which will produce the following .gitconfig file (except the [user] part that I added for completeness):
[user]
  name = pablo
  email = pablo@semanticmerge.com

[diff]
  tool = semanticdiff

[difftool "semanticdiff"]
  cmd = C:/Users/pablo/AppData/Local/semanticmerge/semanticmergetool.exe -s \"$LOCAL\" -d \"$REMOTE\"

[difftool]
  prompt = false
To invoke SemanticMerge as a diff tool, we're using the following command line:
semanticmergetool.exe -s $LOCAL -d $REMOTEWhenever you run the semanticmergetool with only two params (left and right of the diff), it will work as a diff tool.
Run the following command to get help about the available params:
semanticmergetool -h
We enclose $REMOTE and $LOCAL (git params) in quotation marks to make sure the command is correctly invoked even if the paths contain spaces.
C:/Users/pablo/AppData/Local/semanticmerge/ path for SemanticMerge. You will, obviously, have to replace the path with the right one where the semanticmergetool.exe is located in your computer.
git config --global merge.tool semanticmerge
git config --global mergetool.semanticmerge.cmd "C:/Users/pablo/AppData/Local/semanticmerge/semanticmergetool.exe -d \"$LOCAL\" -s \"$REMOTE\" -b \"$BASE\" -r \"$MERGED\""
git config --global mergetool.semanticmerge.trustExitCode true
git config --global mergetool.prompt false
git config --global mergetool.keepBackup false
Which will produce the following .gitconfig (except the [user] part that I added for completeness):
[user]
  name = pablo
  email = pablo@codice.es

[merge]
  tool = semanticmerge

[mergetool "semanticmerge"]
  cmd = C:/Users/pablo/AppData/Local/semanticmerge/semanticmergetool.exe -s \"$REMOTE\" -d \"$LOCAL\" -b \"$BASE\" -r \"$MERGED\"
  trustExitCode = true

[mergetool]
  prompt = false
  keepBackup = false
To invoke SemanticMerge as a merge tool, we're using the following command line:
semanticmergetool.exe -s $REMOTE -d $LOCAL -b $BASE -r $MERGED
Where $REMOTE, $LOCAL, $BASE and $MERGE are git params with the following meaning:
$REMOTE - It's the file you're merging (also known as "theirs" or "source". "source" is the name we use internally, that's why the param is -s).$LOCAL - It's the file you're merging to (a.k.a. "yours" or "destination". "destination" is the name we use internally, that's why the param is -d).$BASE - The common ancestor of the two files. Git calculates the right common ancestor (or base) using its internal merge algorithms and does a good job (although our own Plastic SCM does even a
better one :P).
$MERGED - The file where the merge result will be written.C:/Users/pablo/AppData/Local/semanticmerge/ path for SemanticMerge. You will, obviously, have to replace the path with the right one where the semanticmergetool.exe is located in your computer.
[mergetool]
  prompt = false
  keepBackup = false
But it is up to you to use them or not.
prompt means git won't ask you to confirm that you really want to launch an external tool when you run git mergetool to solve a merge.keepBackup means git won't store .orig files..gitconfig file
The final result is equivalent to running the commands, but you might prefer to edit the .gitconfig file directly. (Check the git documentation to locate .gitconfig. In Windows, it will normally be inside your user directory (c:\users\pablo in my case)).
The content of the .gitconfig file with SemanticMerge configured is:
[user]
  name = pablo
  email = pablo@semanticmerge.com

[diff]
  tool = semanticdiff

[difftool "semanticdiff"]
  cmd = C:/Users/pablo/AppData/Local/semanticmerge/semanticmergetool.exe -s \"$LOCAL\" -d \"$REMOTE\"

[difftool]
  prompt = false

[merge]
  tool = semanticmerge

 [mergetool "semanticmerge"]
  cmd = C:/Users/pablo/AppData/Local/semanticmerge/semanticmergetool.exe -d \"$LOCAL\" -s \"$REMOTE\" -b \"$BASE\" -r \"$MERGED\"
  trustExitCode = true

[mergetool]
  prompt = false
  keepBackup = false
C:/Users/pablo/AppData/Local/semanticmerge/ path for SemanticMerge. You will, obviously, have to replace with the right one where the semanticmergetool.exe is located in your computer.
prompt (both for diff and merge tools) and keepBackup, but it is up to you to configure them this way or not.
--nolangwarn argument.
-a argument to the merge command as follows:
cmd = C:/Users/pablo/AppData/Local/semanticmerge/semanticmergetool.exe -d \"$LOCAL\" -s \"$REMOTE\" -b \"$BASE\" -r \"$MERGED\" -a
SemanticMerge can also be invoked to diff and merge from Tortoise Git. Let's see how to achieve it.
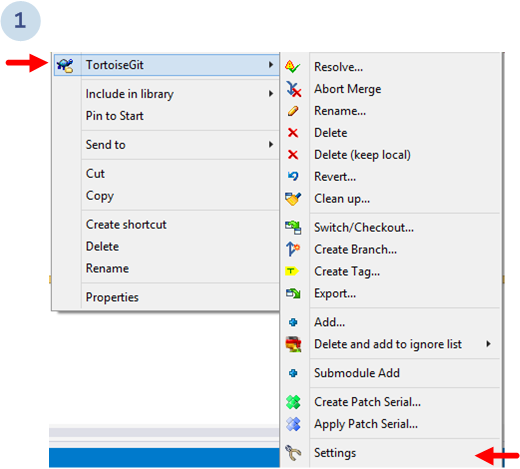
To configure SemanticMerge as diff tool, let's go to the Tortoise Git Settings:
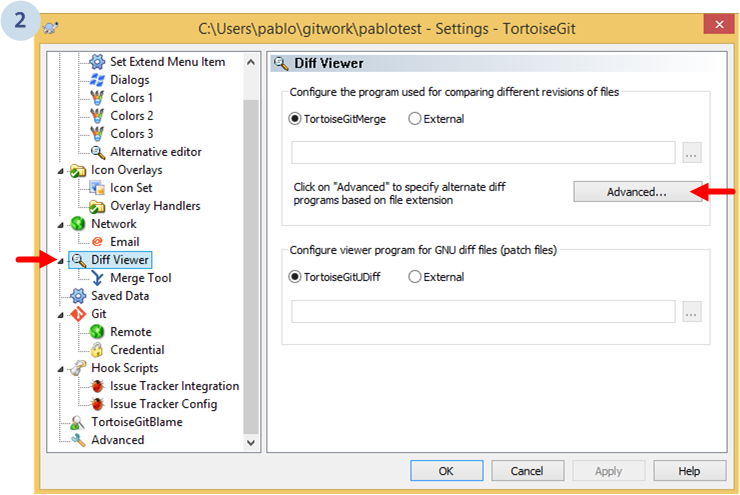
Then, the following dialog will show up. Go to Diff viewer and then click the Advanced... button to configure a new external diff viewer:
Then, a new dialog with all the configured tools based on file extensions will be displayed:
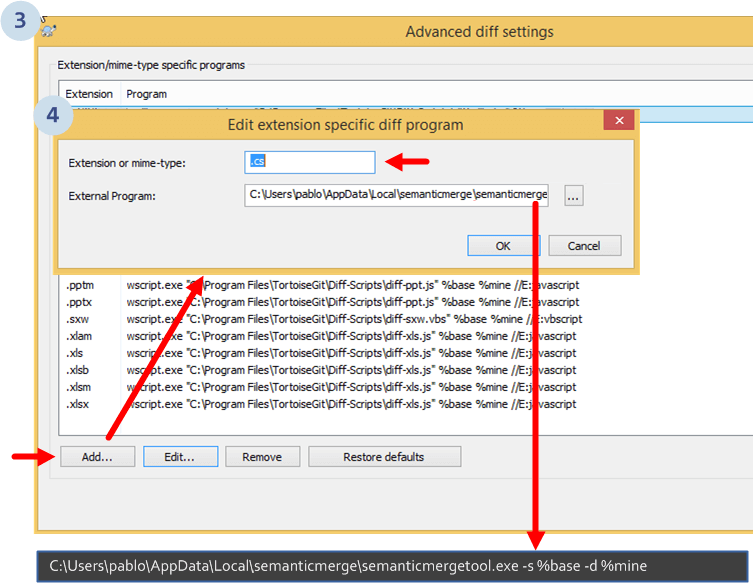
In the example, we're configuring the tool to run with C# (.cs) files. But you can configure it for any of the other supported extensions like Java (.java), Visual Basic .NET (.vb) and more coming soon.
The "external program" line introduced is:
C:\Users\pablo\AppData\Local\semanticmerge\semanticmergetool.exe -s %base -d %mine
C:/Users/pablo/AppData/Local/semanticmerge/ path for SemanticMerge. You will, obviously, have to replace the path with the right one where the semanticmergetool.exe is located in your computer.
Once it is configured the list with all available tools, it will look like the following:
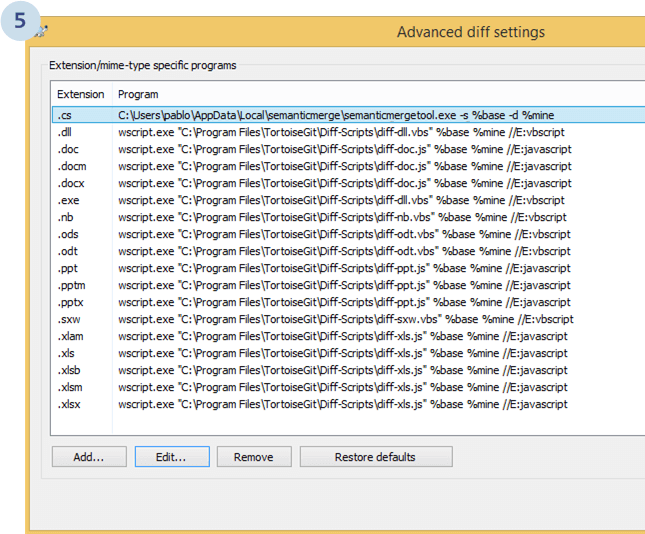
And now, if you run diff from Tortoise Git, the SemanticDiff will show up.
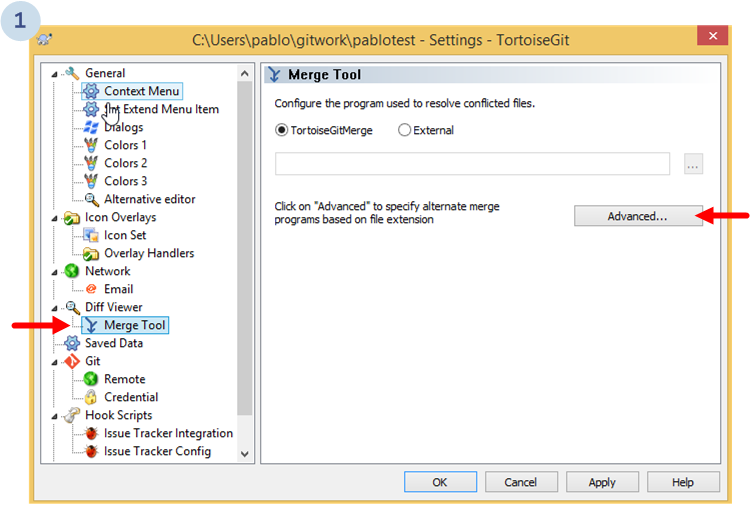
First, go to the Preferences dialog. Select Merge Tool on the left. Then, click the Advanced... button on the right:
This will show up the merge tool configuration dialog as follows:
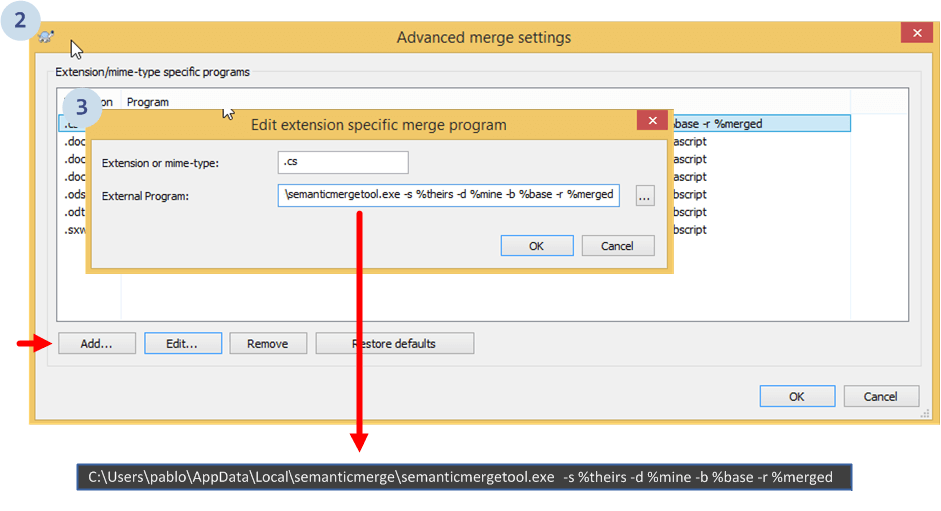
The command used to configure the tool was:
C:\Users\pablo\AppData\Local\semanticmerge\semanticmergetool.exe -s %theirs -d %mine -b %base -r %merged
Now, whenever a conflict resolution is needed, you can run SemanticMerge as follows:
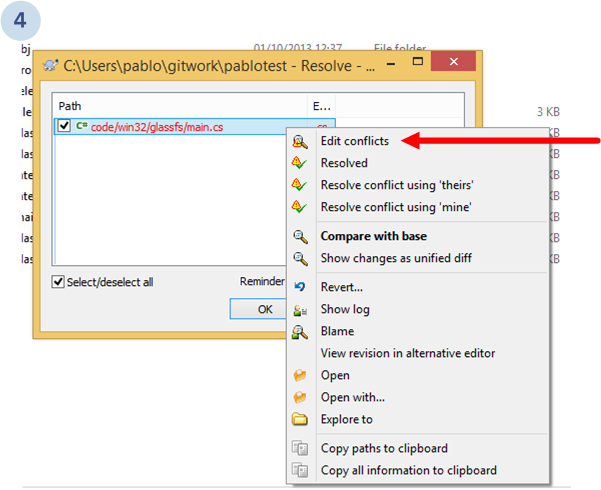
...which will launch SemanticMerge.
In case you want to use an external text merge tool instead of the built-in one, then it is recommended to use the SemanticMerge launch options configuration file instead of setting all the arguments in the configuration textbox provided by Tortoise Git.
Check Launch options configuration file for more information.
In case you use the semanticmergetool.conf configuration file, then you do not need to set all the extra arguments like -emt or -edt in your tool configuration, because they will be obtained from the configuration file.
Atlassian Source Tree allows to configure external diff and merge tools, so it is rather simple to plug SemanticMerge. In fact, both the merge and the diff tool are configured on the same screen.
Go to the Tools menu, and then click the Options option:

Then, select Custom for both the External diff tool and the Merge tool (as the following image shows).
In both cases, the command value will be the path to the semanticmergetool.exe.
The arguments will be exactly as the ones configured for the git command line:
-s \"$LOCAL\" -d \"$REMOTE\"-s \"$REMOTE\" -d \"$LOCAL\" -b \"$BASE\" -r \"$MERGED\"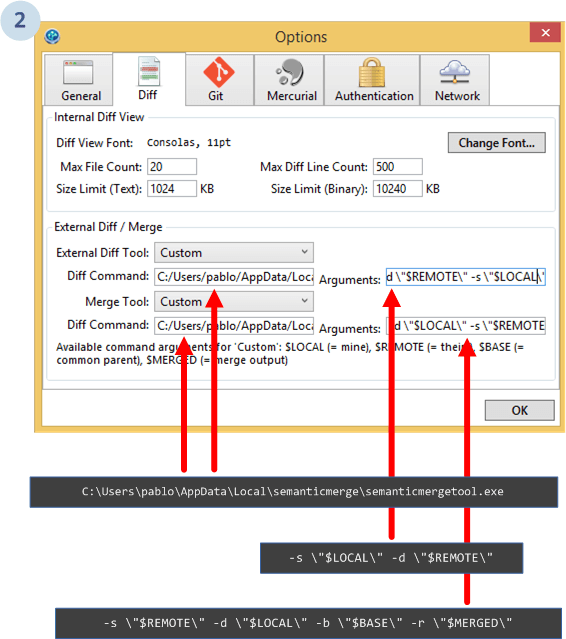
-a argument to the merge arguments as follows:
-s \"$REMOTE\" -d \"$LOCAL\" -b \"$BASE\" -r \"$MERGED\" -a
--nolangwarn argument.
In case you want to use an external text merge tool instead of the built-in one, then it is recommended to use the SemanticMerge launch options configuration file instead of setting all the arguments in the configuration textbox provided by Atlassian.
Check Launch options configuration file for more information.
By default, SemanticMerge will use Xmerge, which is included in the installer for Windows, as the default diff and merge tools for text blocks.
If you are on Linux or macOS, or if you want to use a different tool, then you will need to configure an external diff and merge tool.
Let's see how to configure Kdiff3 as the external diff and merge tools:
The command line to run SemanticMerge will add two new params:
-edt - Which means "external diff tool".-emt - Which means "external merge tool".And the params will be configured this way:
-edt="kdiff3.exe ""#sourcefile"" ""#destinationfile"""
-emt="kiff3.exe -b=""#basefile"" ""#sourcefile"" ""#destinationfile"" --L1 ""#basesymbolic"" --L2 ""#sourcesymbolic"" --L3 ""#destinationsymbolic"" -o ""#output"""
And the final SemanticMerge command will be as follows:
semanticmergetool.exe -d \"$LOCAL\" -s \"$REMOTE\" -b \"$BASE\" -r \"$MERGED\" -edt="kdiff3.exe ""#sourcefile"" ""#destinationfile""" -emt="kiff3.exe -b=""#basefile"" ""#sourcefile"" ""#destinationfile"" --L1 ""#basesymbolic"" --L2 ""#sourcesymbolic"" --L3 ""#destinationsymbolic"" -o ""#output"""
And the .gitconfig file using Kdiff3 will be:
[user]
  name = pablo
  email = pablo@semanticrocks.com

[diff]
  tool = semanticdiff

[difftool "semanticdiff"]
  cmd = C:/Users/pablo/AppData/Local/semanticmerge/semanticmergetool.exe -s \"$LOCAL\" -d \"$REMOTE\" -edt=\"'c:/program files/kdiff3/kdiff3.exe' '"#"sourcefile' '"#"destinationfile'\"

[difftool]
  prompt = false

[merge]
  tool = semanticmerge

[mergetool "semanticmerge"]
  cmd = C:/Users/pablo/AppData/Local/semanticmerge/semanticmergetool.exe -d \"$LOCAL\" -s \"$REMOTE\" -b \"$BASE\" -r \"$MERGED\" -edt=\"'c:/program files/kdiff3/kdiff3.exe' '"#"sourcefile' '"#"destinationfile'\"  -emt=\"'C:/Program Files/KDiff3/kdiff3.exe' -b '"#"basefile' '"#"sourcefile' '"#"destinationfile' --L1 "#"basesymbolic --L2 "#"sourcesymbolic --L3 "#"destinationsymbolic -o '"#"output' \"-e2mt=\"'C:/Program Files/KDiff3/kdiff3.exe' '"#"sourcefile' '"#"destinationfile' --L1 "#"sourcesymbolic --L2 "#"destinationsymbolic -o '"#"output' \"
  trustExitCode = true

[mergetool]
  prompt = false
  keepBackup = false
-e2mt param - It is the configuration for 2-way merge as described in the section Support for two way merge.
There are conflicts where two developers added a new method but not exactly with the same contents. If that happens you will need to configure a 2 way merge tool since the built in tool is not able to handle the case.
Consider the following scenario:

Two developers added the same method in parallel as the image shows. During the merge, SemanticMerge will detect that the same method has been added twice, instead of adding the same method twice in two different locations as a regular text based merge tool would do. But if the methods bodies are not exactly the same, a 2-way merge will be needed to combine them together.
When such a conflict is detected, SemanticMerge will display the 2 merge option:
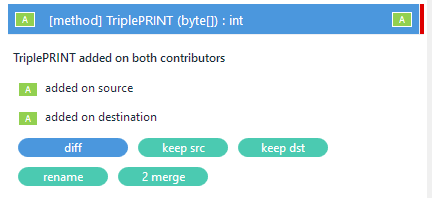
The 2 merge (which means 2-way merge) button will run the tool defined in the -e2mt argument.
The configuration for 2-way merge is as follows:
[user]
  name = pablo
  email = pablo@semanticrocks.com
[diff]
  tool = semanticdiff

[difftool "semanticdiff"]
  cmd = C:/Users/pablo/AppData/Local/semanticmerge/semanticmergetool.exe -s \"$LOCAL\" -d \"$REMOTE\" -edt=\"'c:/program files/kdiff3/kdiff3.exe' '"#"sourcefile' '"#"destinationfile'\"
[difftool]
  prompt = false

[merge]
  tool = semanticmerge
[mergetool "semanticmerge"]
  cmd = C:/Users/pablo/AppData/Local/semanticmerge/semanticmergetool.exe -d \"$LOCAL\" -s \"$REMOTE\" -b \"$BASE\" -r \"$MERGED\" -edt=\"'c:/program files/kdiff3/kdiff3.exe' '"#"sourcefile' '"#"destinationfile'\"  -emt=\"'C:/Program Files/KDiff3/kdiff3.exe' -b '"#"basefile' '"#"sourcefile' '"#"destinationfile' --L1 "#"basesymbolic --L2 "#"sourcesymbolic --L3 "#"destinationsymbolic -o '"#"output' \" -e2mt=\"'C:/Program Files/KDiff3/kdiff3.exe' '"#"sourcefile' '"#"destinationfile' --L1 "#"sourcesymbolic --L2 "#"destinationsymbolic -o '"#"output' \"
  trustExitCode = true

[mergetool]
  prompt = false
  keepBackup = false
In case you need to configure SemanticMerge for a different tool than the ones included in this guide, remember it is a very easy process.
All you need to know is how SemanticMerge is invoked.
To run SemanticMerge as a diff tool, you will invoke it this way:
semanticmergetool -d remotefile -s localfile
where:
localfile is the file you have in your working copy.remotefile is the one to compare to.
You can also think about it as -s defining the "source" (the left side of the comparison, the origin of the changes) and -d defining the destination (the right side of the comparison).
You will have to replace remotefile and localfile with the corresponding variables used by the tool you're configuring. In Git command line, they will be replaced with $REMOTE and $LOCAL, but in Tortoise Git they will be %base and %mine.
Also note that normally you will wrap the variables with quotation marks to be able to handle correctly paths that contain spaces:
semanticmegetool -d \"$LOCAL\" -s \"$REMOTE\"
Check the semanticmergetool.exe -h command for more options.
In case you have to configure SemanticMerge as external diff tool for your preferred version control system, IDE or GUI, remember how to launch SemanticMerge as a merge tool:
semanticmergetool -s REMOTE -d LOCAL -b BASE -r MERGED
where:
REMOTE is also known as "theirs". It means the code you are merging from or the "source of the merge". You use the -s argument to define it.LOCAL is also known as "yours". It's the destination of the merge, or the code you're merging "to". You use the -d argument to define it.BASE is also known as the "common ancestor". You use the -b argument to define it.MERGED is the result of the merge, the file that will be written with the result of the merge operation. It is defined with the -r argument.
Remember that you will have to replace this names with the correct variables used by your tool ($REMOTE, $LOCAL, $BASE and $MERGED for Git command line but %theirs, %mine, %base and %merged for Tortoise Git).
Also remember that you will normally wrap the variables with quotation marks to be able to deal with paths that contain spaces. This way, the way to configure the tool inside the Git command line is as follows:
semanticmergetool -s \"$REMOTE\" -d \"$LOCAL\" -b \"$BASE\" -r \"$MERGED\"
Please check the semanticmergetool -h tool to find all the possible command line options, including symbolic names that can be passed to the tool to better understand the merge.
Let's see the steps to get SemanticMerge configured with Team Foundation Server as both diff and merge tool.
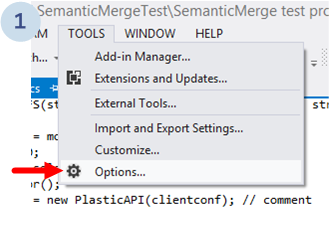
Go to Tools > Options:
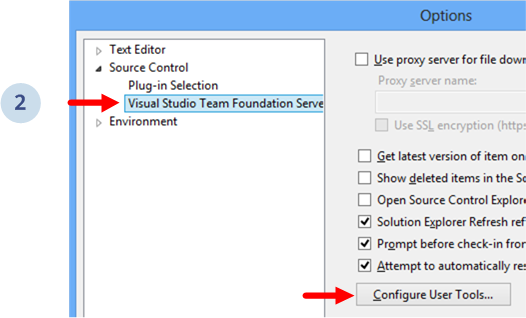
And select Visual Studio Team Foundation Server. Then, click the Configure User Tools... button as the figure below shows:
Then, a dialog like the one below will show up and you have to choose Add:

And you'll enter in the Configure Tool dialog which is rather simple as you can see below:
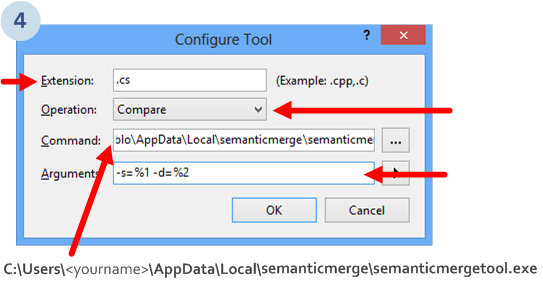
You've to set the following arguments:
.cs.C:\Users\<yourname>\AppData\Local\semanticmerge\semanticmergetool.exe
-s=%1 -d=%2To learn more about the argument magic please go here.
And now you're done!
Go to Tools > Options:

And select Visual Studio Team Foundation Server. Then, click the Configure User Tools... button as the figure below shows:

Then, a dialog like the one below will show up and you have to choose Add:

Then, you'll enter in the Configure Tool dialog:
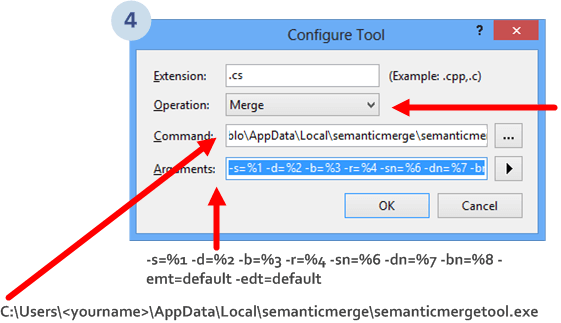
You've to set the following arguments:
.cs.C:\Users\<yourname>\AppData\Local\semanticmerge\semanticmergetool.exe
-s=%1 -d=%2 -b=%3 -r=%4 -sn=%6 -dn=%7 -bn=%8 -emt=default -edt=defaultTo learn more about the argument magic please go here.
This article will explain how to configure SemanticMerge as the diff and merge tools for Perforce.
.bat file is no longer needed.
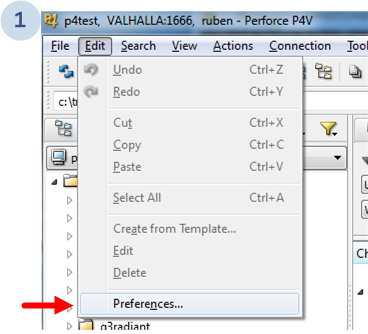
First go to Preferences:
And the following dialog will show up:
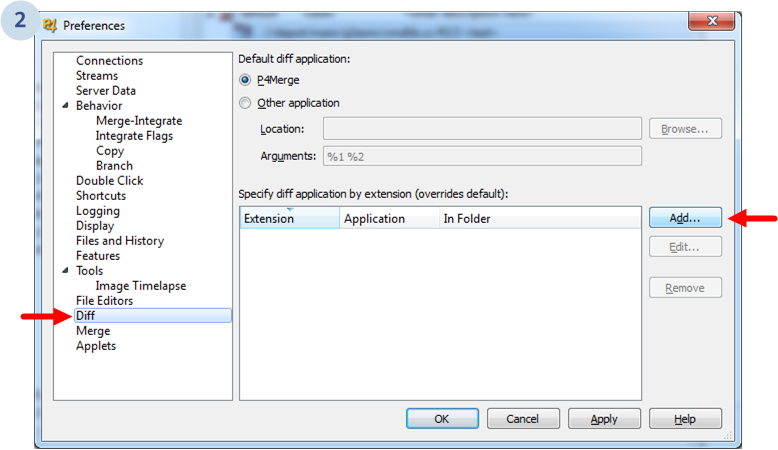
You've to click Diff on the left. Then, click Add to add a new external application by extension. (We're going to set it up for C# only. You can set it for VB.net files too repeating the process with .vb extension).
Once you click Add, the following dialog will appear:
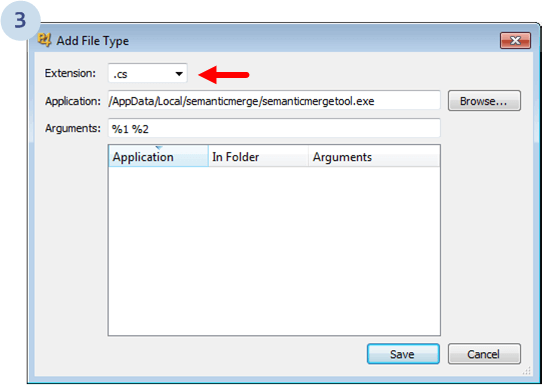
Make sure you enter the following values:
.cs.C:\Users\<yourname>\AppData\Local\semanticmerge\semanticmergetool.exe
%1 %2 (the positional arguments which are source (theirs) and destination (yours), and they are set up by Perforce).
In case you need to modify the order of the arguments, you can do that with the configuration file including the --fileparamorder flag.
Run the semanticmergetool --help command for further information.
First you've to click Preferences:

Then the dialog will show up and you'll see something like this:
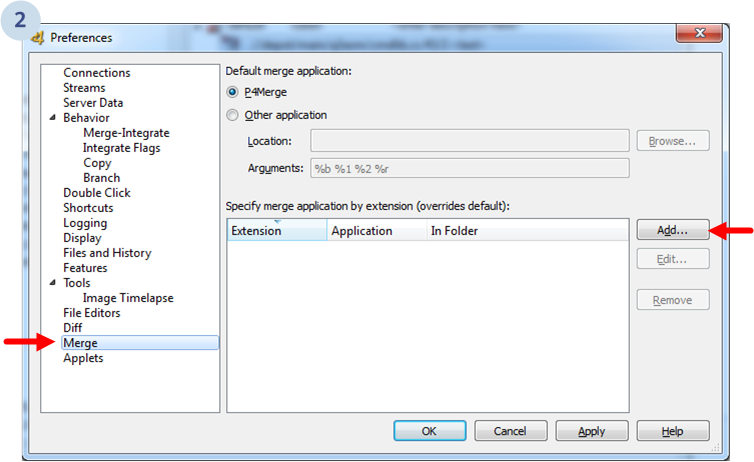
Select Merge. Then, click Add to add a new external application by extension. (We're going to set it up for C# only. You can set it for VB.net files too repeating the process with .vb extension).
Once you do that, you'll see a dialog like the following:
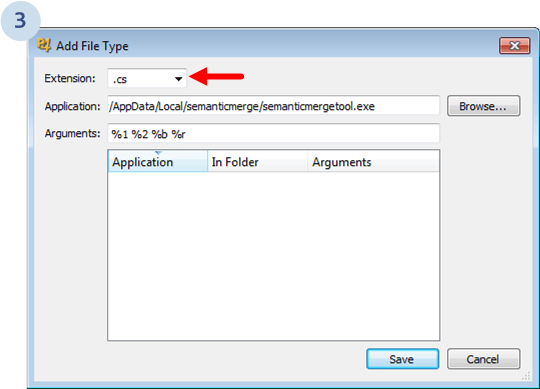
Make sure you enter the following values:
.cs.C:\Users\<yourname>\AppData\Local\semanticmerge\semanticmergetool.exe
%1 %2 %b %r (the positional arguments which are source (theirs), destination (yours), base and output (result)).
In case you need to modify the order of the arguments, you can do that with the configuration file including the --fileparamorder flag.
Run the semanticmergetool --help command for further information.
And you're ready to use SemanticMerge with Perforce!
This article will explain how to configure SemanticMerge as the diff and merge tools for Plastic SCM.
First go to Preferences:

The following dialog will display. Select Diff tools and click Add...:
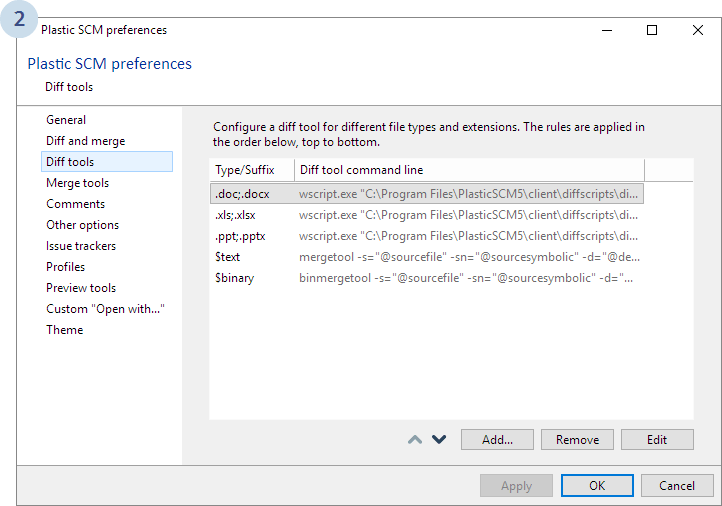
Now we need to configure SemanticMerge as the diff tool:
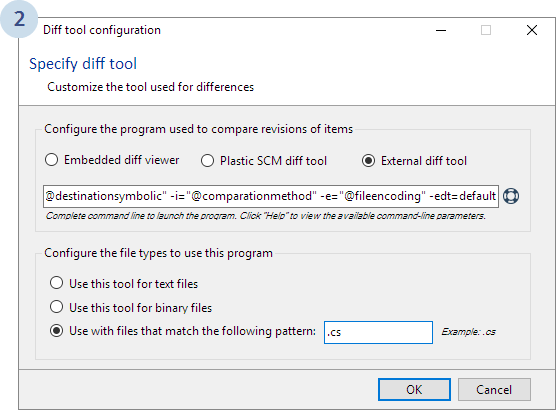
"C:\Users\<yourname>\AppData\Local\semanticmerge\semanticmergetool.exe" -s="@sourcefile" -sn="@sourcesymbolic" -d="@destinationfile" -dn="@destinationsymbolic" -i="@comparationmethod" -e="@fileencoding" -edt=default
<yourname> with your own username.
.cs extension. (We currently only support C# files today).
With this configuration, we will be running the Plastic SCM s Xdiff tool to execute text-based diffs (to compare methods and so on), which is done by adding the -edt=default parameter.
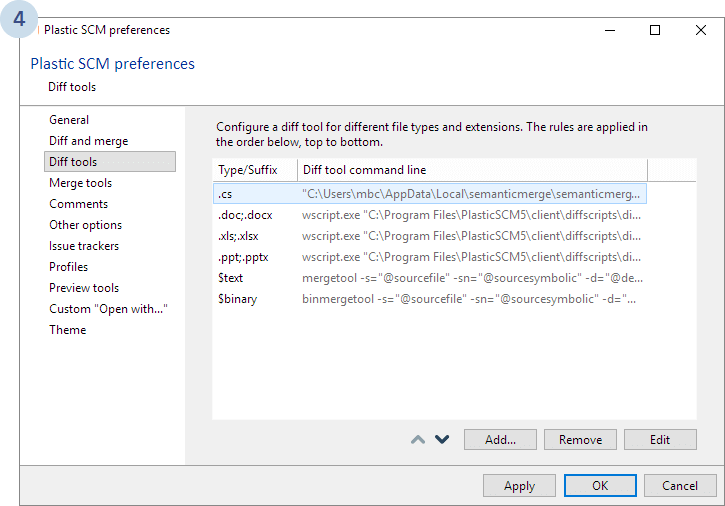
Once you've set up the newly configured tool, remember to change the priority to the top of the list, as the following image shows:
If you prefer to use another diff tool other than Xdiff (ex: kdiff3), you can configure the tool as follows:
"C:\Users\<yourname>\AppData\Local\semanticmerge\semanticmergetool.exe" -s="@sourcefile" -sn="@sourcesymbolic" -d="@destinationfile" -dn="@destinationsymbolic" -i="@comparationmethod" -e="@fileencoding" -edt=""C:\<Path to kdiff3 executable>\kdiff3.exe" ""#sourcefile"" ""#destinationfile"""
<yourname> and <Path to kdiff3 executable> accordingly.
Using this configuration, when you diff text, you'll see something like the following:
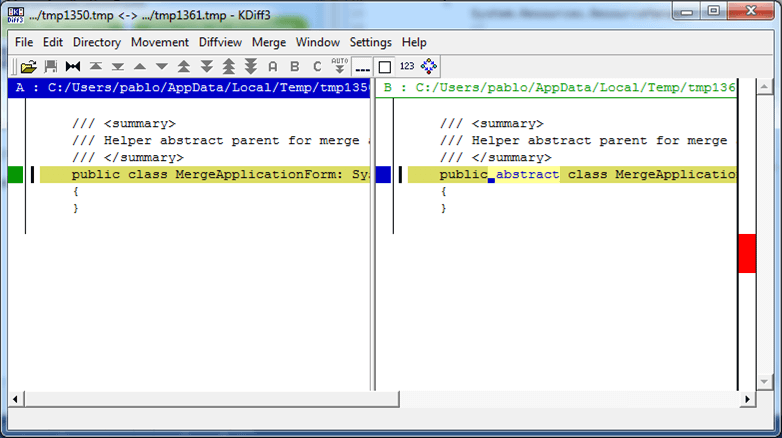
First go to Preferences:

The following dialog will display. Select Merge tools and click Add...:
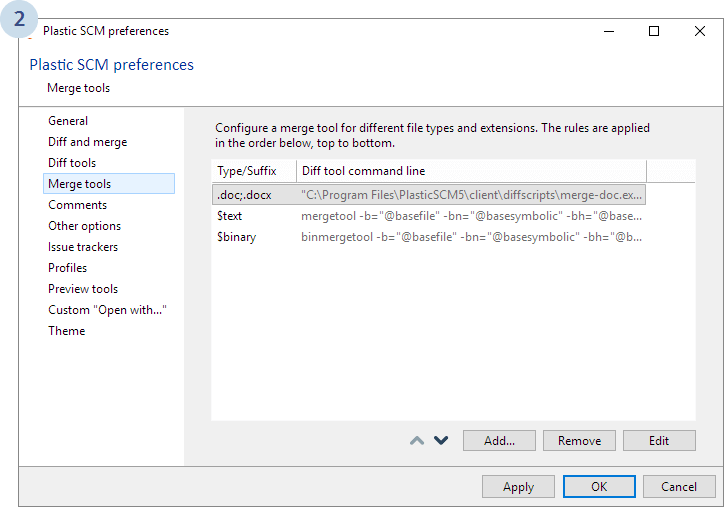
As with the diff tool, you need to select the appropriate options and enter the right command line to launch SemanticMerge:
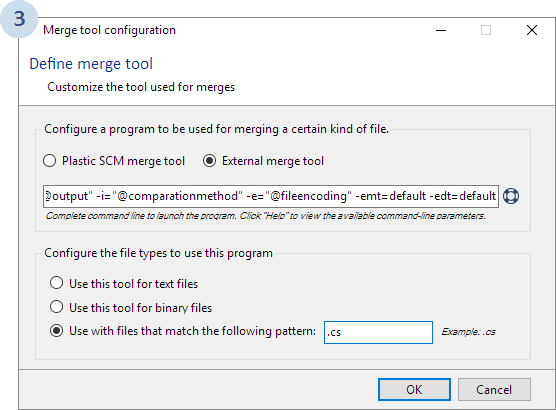
"C:\Users\<yourname>\AppData\Local\semanticmerge\semanticmergetool.exe" -b="@basefile" -bn="@basesymbolic" -s="@sourcefile" -sn="@sourcesymbolic" -d="@destinationfile" -dn="@destinationsymbolic" -r="@output" -i="@comparationmethod" -e="@fileencoding" -emt=default -edt=default
<yourname> accordingly, and don't forget the quotation marks.
.cs extension (We currently only support C# files today).Once you've set up the newly configured tool, remember to change the priority to the top of the list, as the following image shows:
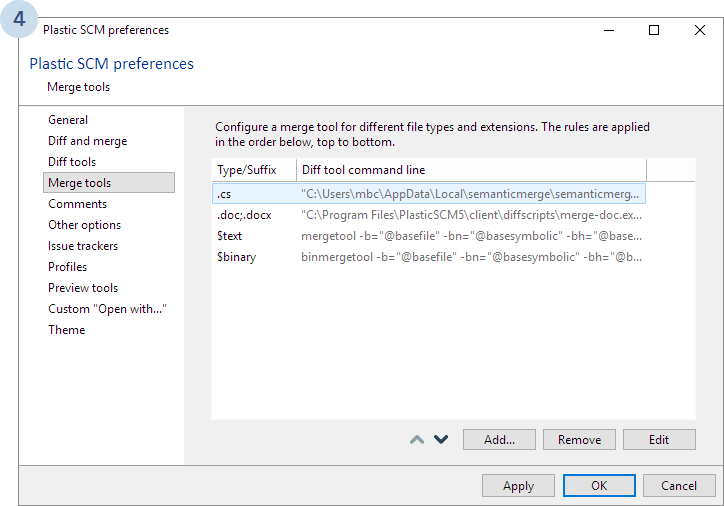
SemanticMerge handles the merges at the structure level. However, when two contributors have modified a method, it needs to run a 3-way text-based merge.
With this configuration, we will be running the Plastic SCM Xdiff tool to execute text-based diffs (to compare methods and so on), which is done by adding the -edt and -emt parameters:
"C:\Users\<yourname>\AppData\Local\semanticmerge\semanticmergetool.exe" -b="@basefile" -bn="@basesymbolic" -s="@sourcefile" -sn="@sourcesymbolic" -d="@destinationfile" -dn="@destinationsymbolic" -r="@output" -i="@comparationmethod" -e="@fileencoding" -edt=""C:\<Path to kdiff3 executable>\kdiff3.exe" ""#sourcefile"" ""#destinationfile""" -emt="" C:\<Path to kdiff3 executable>\kdiff3.exe " -b=""#basefile"" ""#sourcefile"" ""#destinationfile"" --L1 ""#basesymbolic"" --L2 ""#sourcesymbolic"" --L3 ""#destinationsymbolic"" -o ""#output"""
<yourname> and <Path to kdiff3 executable> accordingly.
This configuration will use Kdiff3 for both diff and merge.
This chapter will explain how to configure SemanticMerge as the diff and merge tools for Mercurial.
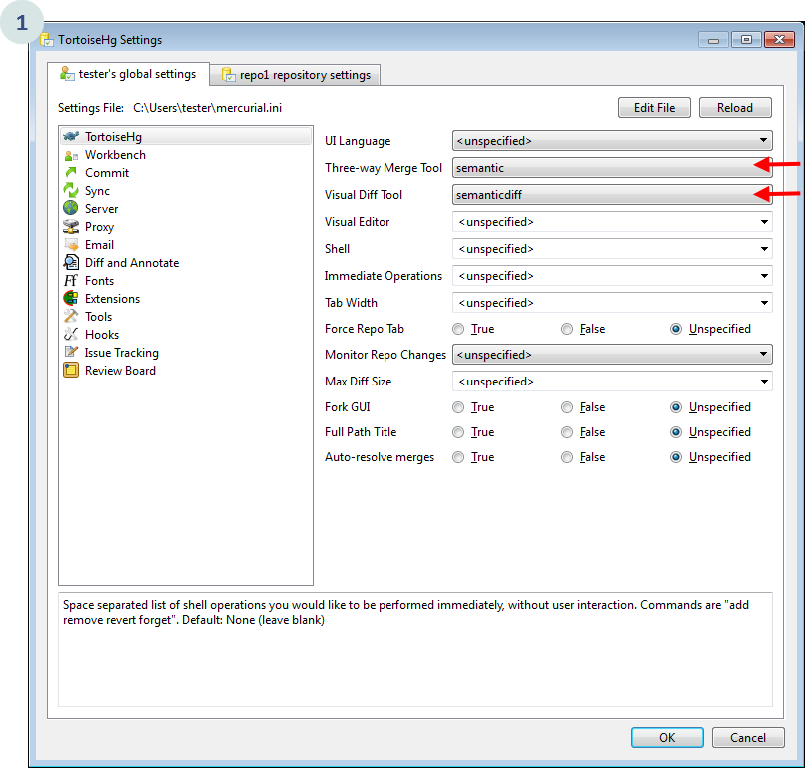
mercurial.ini file and the TortoiseHg Settings picture.
First, you've to find the mercurial.ini file, which is normally at %HOMEPATH%\mercurial.ini.
Once you have it, open it up and make sure you add the following content. Remember to replace the <yourname> entries with the right paths. Check that the paths are correct in your case and so on:
[extensions]
  extdiff =

[extdiff]
  cmd.semanticdiff = C:\Users\<yourname>\AppData\Local\semanticmerge\semanticmergetool.exe
  opts.semanticdiff = $parent $child
  cmd.kdiff3 = kdiff3.exe
  opts.kdiff3 = $parent $child

[merge-tools]
  semantic.executable = C:\Users\<yourname>\AppData\Local\semanticmerge\semanticmergetool.exe
  semantic.premerge=False
  semantic.binary=False
  semantic.args=-b=$base -s=$local -d=$other -r=$output -l=csharp -edt="kdiff3.exe ""#sourcefile"" ""#destinationfile""" -emt="kdiff3.exe ""#basefile"" ""#sourcefile"" ""#destinationfile"" --L1 ""#basesymbolic"" --L2 ""#sourcesymbolic"" --L3 ""#destinationsymbolic"" -o ""#output"""
  semantic.gui=True
  semantic.checkconflicts=True
  kdiff3.executable = kdiff3.exe
  kdiff3.args = $base $local $other -o $output
  kdiff3.gui=True

[merge-patterns]
  **.cs = semantic
  **.** = kdiff3

[diff-patterns]
  **.cs = semanticdiff
  **.** = kdiff3

[tortoisehg]
  vdiff = semanticdiff

[ui]
  username = <yourname>
  merge = semantic
Basically, you've to enable the diff extension ([extensions]). Then, setup the difftool. The key is adding the opts.semanticdiff entry setting up the right params to invoke semantic as difftool.
Then, you define a new merge tool, in the [merge-tools] section. Also specify that you just need the tool to work with .cs files and you're done.
Once the mercurial.ini is set up, you'll see a few changes inside Tortoise Hg.
Go to Preferences and you'll see the semantic set as diff and merge tool.
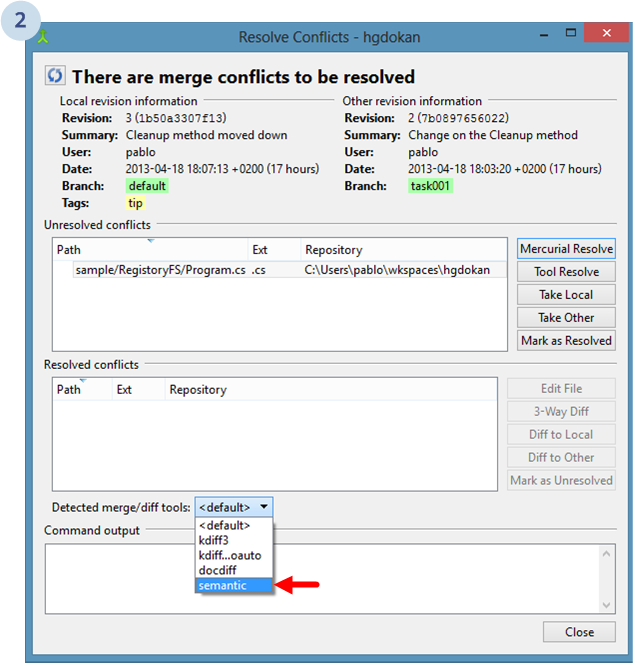
And then, when you merge, you'll be able to select semantic as your merge tool as you can see below:
SemanticMerge uses text-based diff and merge tools to compare or merge the method bodies, properties and so on.
By default, it will use the included mergetool.exe which is the Xdiff/Xmerge tool included in Plastic SCM.
But you can use your favorite one. Just modify the -edt and -emt params as you can see below:
semantic.args=-b=$base -s=$local -d=$other -r=$output -l=csharp -edt="kdiff3.exe ""#sourcefile"" ""#destinationfile""" -emt="kdiff3.exe ""#basefile"" ""#sourcefile"" ""#destinationfile"" --L1 ""#basesymbolic"" --L2 ""#sourcesymbolic"" --L3 ""#destinationsymbolic"" -o ""#output"""
It is possible to use SemanticMerge as diff and merge tool for Mercurial using Atlassian SourceTree.
As of SouceTree 1.3.1.0, there are some issues in the external diff tool configuration that you must take into account in order to be able to use SemanticMerge.
Check the following image:
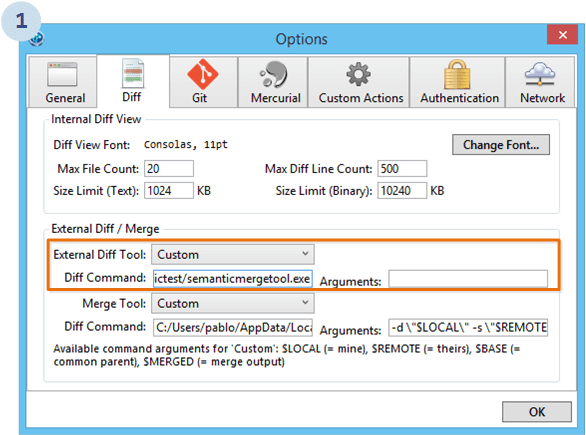
As you can see, to make SemanticMerge work as an external diff tool for SourceTree with Mercurial, just keep the arguments empty and it will work.
Make sure you enter the following values:
C:\Users\<yourname>\AppData\Local\semanticmerge\semanticmergetool.exe
$LOCAL or $REMOTE here. It simply does not work. Just leave it empty. Then, SourceTree will invoke SemanticMerge as follows: semanticmergetool.exe source destination, where source -> remote changes, and destination -> your changes.The merge tool configuration for SourceTree and Mercurial is rather simple.

Just enter the following values:
C:\Users\<yourname>\AppData\Local\semanticmerge\semanticmergetool.exe
-d \"$LOCAL\" -s \"$REMOTE\" -b \"$BASE\" -r \"$MERGED\"As you can see, while the diff tool configuration has to deal with a strange bug, the external merge tool seems to be working fine.
-d main.cs.orig-s main.cs~other.gwgxtv-b main.cs~base.zlpllj-r main.csAs you can see, it does not respect the file extension except on the destination file (normally, version controls respect the "destination" or "yours" because this is the file in the working copy).
SemanticMerge will try to figure out the correct extension from the -d argument and if it can't find the extension, it will try with the -r argument.
In case none of the files sent as arguments to SemanticMerge has a known file extension, Semantic will fail.
You can always force the -l=csharp or -l=java to "force the language" (or any other supported language).
Configuring IntelliJ (also valid for Android Studio) to use SemanticMerge is quite simple. Let's see how to do it.
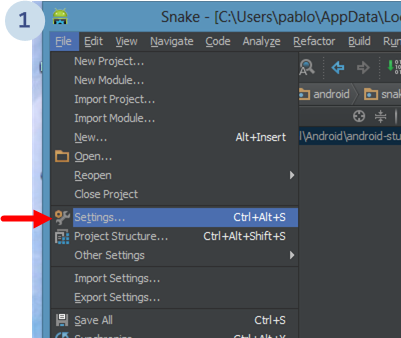
Go to File > Settings:
In the new dialog, select the External Diff Tools menu. Then, check the Use external merge tool option as the following picture shows:
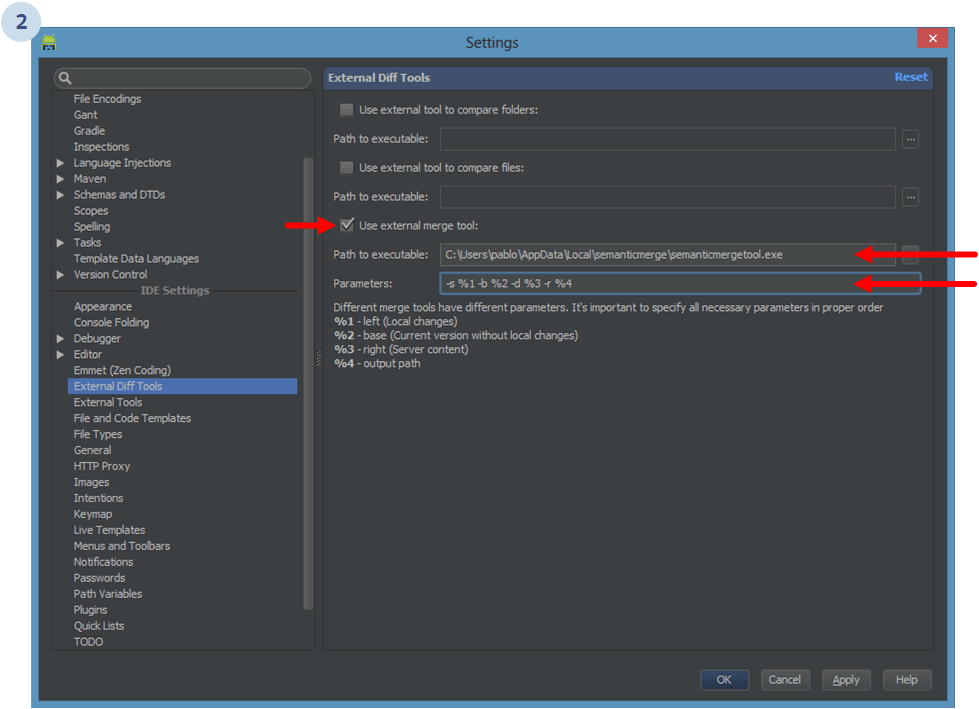
And enter these values:
C:\Users\<yourname>\AppData\Local\semanticmerge\semanticmergetool.exe
-s %1 -b %2 -d %3 -r %4.
-s=PARAM-s PARAM (blank instead of "=")%1, %2 and so on).
Later, when you run a merge using the Git plugin (for instance), you'll be prompted with the following dialog:

You will have to click Merge to launch SemanticMerge.
Visual Studio Code can't be configured to directly use an external mergetool to solve the merges it detects. However, with third-party extensions, it can be configured to use the git mergetool command in such situations, so if you have SemanticMerge configured as a Git diff or mergetool, you can easily launch it within Visual Studio Code. Let's see how can do it.
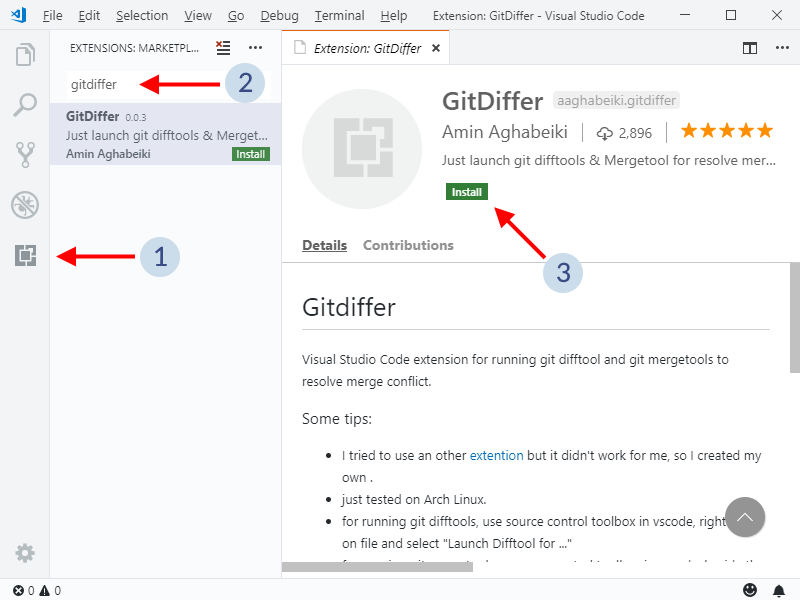
There are two extensions listed here: GitDiffer and vscode-ext-git-mergetool. The first one does the job behind the hood, while the second one opens VS Code terminal to execute Git commands. With the second one it is easier to see what's happening, but, having the terminal window open over and over can be annoying. So, both extensions are listed here so you can choose which one better suits your needs.
As shown in the figure below:
Once installed, click on Reload to activate.
Then, once in a file with merge conflicts:
Launch Mergetool command.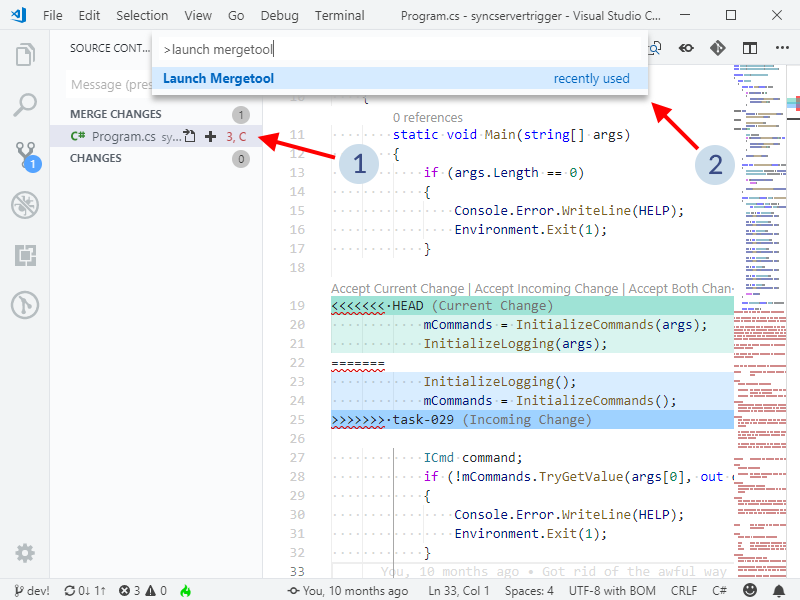
You will see the necessary files for the merge appear in your Visual Studio Code file explorer: the base, the source and the destination. Once you complete the merge using SemanticMerge, those files will clean up automatically.
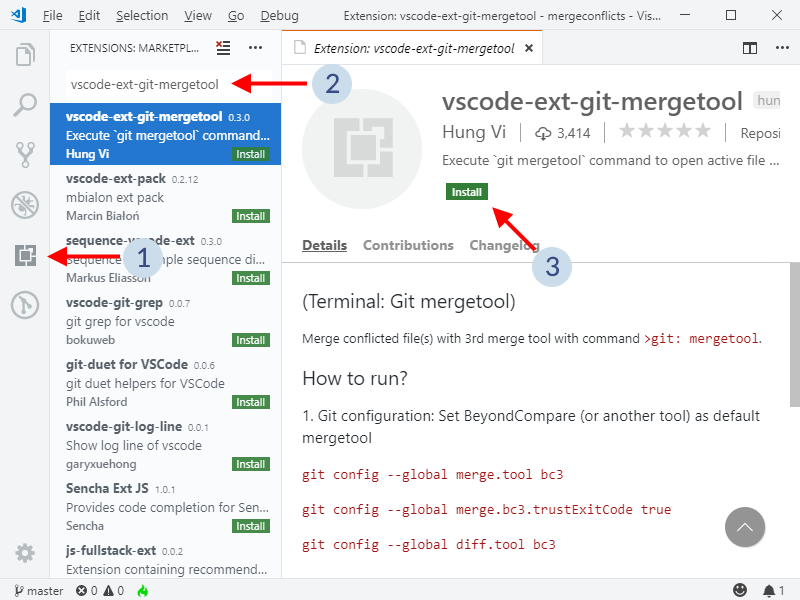
Alternatively, you can install vscode-ext-git-mergetool for the same purpose.
As shown in the figure below:
Once installed, click on Reload to activate.
Then, once in a file with merge conflicts:
Terminal: Git mergetool command.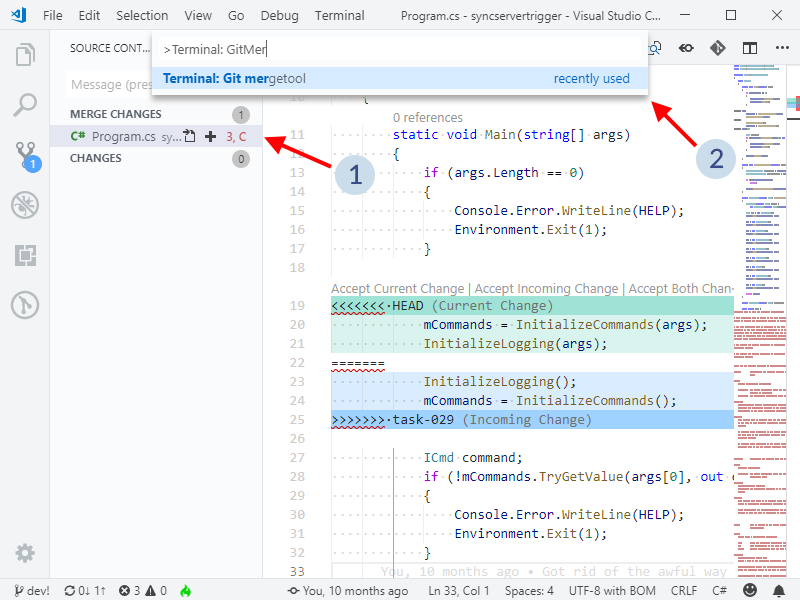
All the common configuration arguments that can be passed to SemanticMerge to define the external text diff or merge took, 2-way merge tool and so on, can be easily configured in a configuration file.
This way, you don't need to setup a long configuration line (potentially having trouble with scape characters) in your version control diff and merge tool configuration because every argument will be defined there.
The file to configure the arguments is semanticmergetool.conf and can be placed under the SemanticMerge user directory (C:\Users\pablo\AppData\Local\semanticmerge in my case) or the location where the binaries are.
A typical semanticmergetool.conf file to use external Kdiff3 as a text merge tool will be as follows:
# external diff tool -> kdiff3
-edt="c:/program files/kdiff3/kdiff3.exe" "#sourcefile" "#destinationfile"
# external mergetool -> kdiff3 with symbolic info
-emt="C:/Program Files/KDiff3/kdiff3.exe" -b "#basefile" "#sourcefile" "#destinationfile" --L1 "#basesymbolic" --L2 "#sourcesymbolic" --L3 "#destinationsymbolic" -o "#output"
# external 2-way merge -> also Kdiff3
-e2mt="C:/Program Files/KDiff3/kdiff3.exe" "#sourcefile" "#destinationfile" --L1 "#sourcesymbolic" --L2 "#destinationsymbolic" -o "#output"
# try to automate the conflicts as much as possible
-a
# do not check updates
--nocheckupdates
And this way the configuration to run SemanticMerge inside Git, or Mercurial, Perforce and so on, will not need to specify all these params.
The priority of the arguments is as follows:
semanticmergetool.conf.